Page 3 - Physical Look - Inside
Some of you may notice Cooler Master's patented technologies and wonder, "What exactly does this mean?" Let me introduce them to you before we move on to the rest of the power supply. Firstly, we have what we call the "Hybrid Transformer" -- meaning the heatsink is embedded onto the transformer, reducing its size by a claimed 25%. The "Hyper Path" simply means that Cooler Master have placed transistors, which act as rectifiers, as close as possible to the transformer terminal to ensure the electrons travel in the shortest path possible. These transistors are soldered onto the PCB with the transformer, as if they are one single piece. Lastly, Cooler Master has created the "Heat Transfer Technology", which is a unique L-shaped heatsink designed to improve airflow inside the power supply, thus lowering operating temperatures.
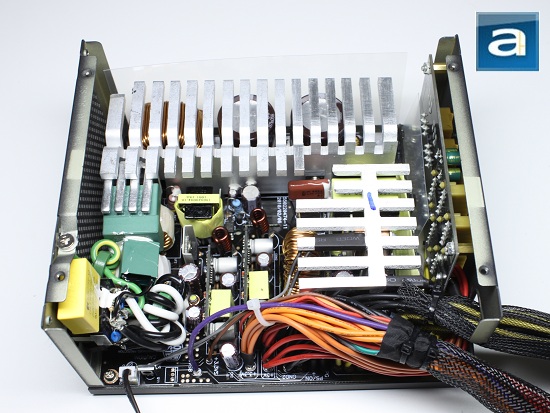
To reveal the inside, we will be removing the four Philips head screws, despite breaking the warranty agreement. There are no user serviceable parts inside the power supply for the average user anyway, but we will be breaking the seal for a closer look at the power supply just for you. The power cables are soldered cleanly onto the main circuit board, showing that Cooler Master has put effort and time into ensuring their product's quality is top notch.
At first look, the Cooler Master Silent Pro Gold 1000W seems like it is packing quite a punch in terms of components, and taking a closer look helps us identify different parts of this power supply in more specific detail. The first (And most obvious) component noticed is the 135mm fan. It is interesting to note that the fan can be easily detached and unscrewed if you decide to switch to a different fan down the road. There are also two heatsinks over the Silent Pro Gold's internal components -- one of which is approximately half the size of the other -- with both constructed out of aluminum and presented in its natural color for heat dissipation purposes. These can be easily identified in our photo above, as well as excellent Japanese brand capacitors, ferrite coils, and such. As aforementioned, Cooler Master has done a great job on the soldering of the wires onto the main PCB, even though the average user may not open up a power supply to take a look at such things.

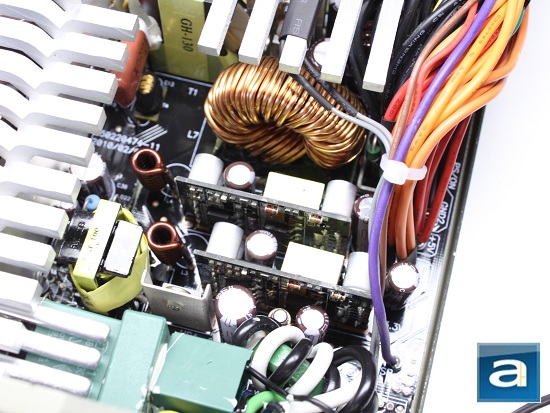
The primary side houses a ferrite coil next to two high quality Japanese brand capacitors connected in parallel, with a piece of plastic on the side for additional protection. Capacitors used inside the Cooler Master Silent Pro Gold 1000W are electrolyte based units. They are situated right, under the larger of the two heatsinks. A second coil is placed under the smaller of the two heatsinks; while the third and fourth one is barely hidden out of view next to the honeycomb mesh. As you can see, almost nothing restricts airflow out of the honeycomb mesh, besides impedance cause by the larger heatsink for obvious reasons. A closer examination of the capacitors reveals that it is a Nippon Chemi-Con KMR96P088 unit rated for 2000 hours at 105c. These are 540µF x 420V capacitors, combined capacitance is 1080µF. This happens to be the same one found in the Cooler Master Silent Pro M 1000W. In the Silent Pro Gold 800W version, it also has two similar capacitors, but are rated at 270µF x 420V @ 85c, which totals to only 540µF.
Like many other power supplies with similar qualities, the transient filter phase starts at the AC input near the honey comb mesh. A small box is located next to the power switch, and holds the Y capacitors for its part in AC to DC electrical conversion. There are also other X and Y capacitors in the transient filter phase for a total of two Y capacitors and three X capacitors in conjunction with two ferrite coils and one Metal Oxide Varistor.

The power switch, power adapter, and the automatic fully range (100V-240V) AC line voltage selector are located on this side near the honeycomb mesh, along with two Y capacitors. All these are soldered quite neatly, and out of plain sight. Other components on the board include copper ferrite coils, X and Y capacitors, and the such -- as previously discussed. Capacitors in this power supply have yellow plastic around them. The heatsinks are bent over some of these components in a rib-like design to cover more space so that it maximizes heat dissipation.
The Cooler Master Silent Pro Gold 1000W also features two daughterboards for its modular connectors. There are a few filtering capacitors found on these boards. The smaller capacitors are Suncon branded; while the larger ones are Teapo branded. All of these capacitor brands are Japanese brand, except for Teapo, which is a considerably popular Taiwan based manufacturer. Overall, we can see that Cooler Master has chosen components that gives the power supply a long life expectancy with sustained performance.
The main PCB is marked EPS0600/RS-A00. The same PCB is used in the Silent Pro Gold 800W, 1000W, and 1200W. This simply means that Cooler Master uses the same circuit board design for the entire Silent Pro Gold product line. A little digging indicates that the original manufacturer, or OEM, of the Cooler Master Silent Pro Gold 1000W is Enhance Electronics. Enhance is a major power supply OEM for many different brands, and it is safe to say that Cooler Master's design specification in conjunction with this manufacturer would end up with a quality product, as what we have here.
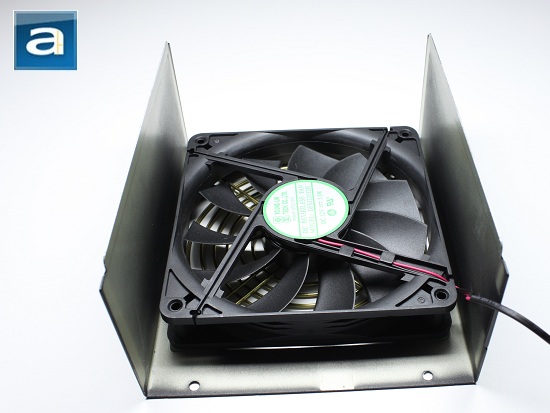
The Cooler Master Silent Pro Gold 1000W uses a Young Lin Tech Co. DFS132512H DC 135mm Brushless Fan, rated 0.25A @ 12V. The maximum rotational speed is 1700RPM @ 36.28dBA with airflow rated at 91.16CFM, which is the highest rated fan in the Gold series. The Cooler Master Silent Pro Gold 1000W happens to use the same fan as SilverStone Strider Plus ST75F-P 750W power supply we have taken a look at a few months back. This seems to be quite a quiet fan for the amount of airflow it is capable of. In my opinion, it would be nice to have noise dampeners to further enhance the noise reduction, however.
Page Index
1. Introduction, Packaging, Specifications
2. Physical Look - Outside
3. Physical Look - Inside
4. Minor Tests and Conclusion