Page 3 - A Closer Look, Board Layout, Test System
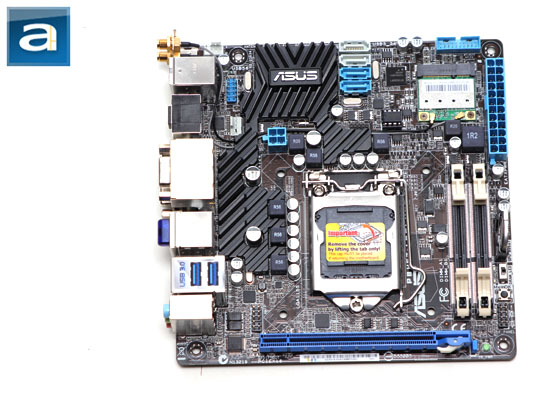
In classic ASUS style is the P8H67-I Deluxe built on a beautiful black colored printed circuit board. Consisting primarily of blue and black components, the end result is excellent as always. I have always been a big fan of the way ASUS motherboards look (Especially in my windowed case, although such mini-ITX cases are not very common), and this one is certainly no exception. While aesthetics is not really an issue when it comes to internal components of a computer compared to the way the board is built and how well it performs, surprisingly it can be a deciding factor for some users. Of course, the comments on the look are just a personal opinion. As it has gained immense popularity for the last couple years, the ASUS P8H67-I Deluxe, like many performance motherboards in the industry, features 100% solid state capacitors for maximum durability and energy efficiency.
As you can see in the photo of the P8H67-I Deluxe above, it is quite a tightly packed motherboard component-wise. A low profile passive heatsink provides cooling to its onboard devices such as the H67 chipset; which is located near the upper left corner, under the part where the ASUS logo is. This heatsink extends to other areas of the motherboard as well, but a quick glance at the block diagram indicates there is nothing else significant underneath other than being close to the CPU voltage regulator circuit.
The ATX 4-pin power connector can be found between the CPU socket and H67 chipset. I found this placement slightly strange, since it is normally placed closed to the edge of the motherboard. Additionally, adjacent to it is a choke on the right, and a heatsink on the left -- so it will inevitably get a bit tight here. Located within close range is a 4-pin CPU fan and USB 2.0 header in its northwest direction. Again, I found it kind of strange how the CPU fan header is further away than the 4-pin ATX power connector to the LGA 1155 socket. The last 4-pin fan header is located at the top left corner of the ASUS P8H67-I Deluxe.
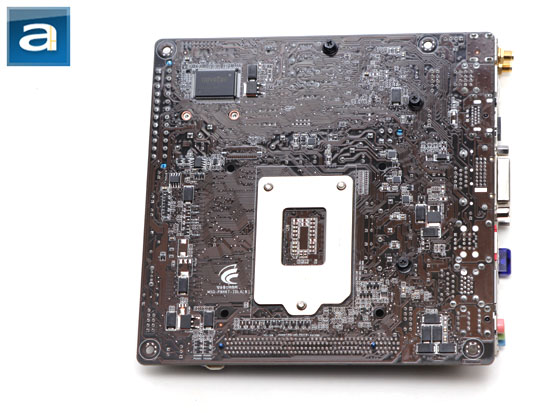
A shot of the back of the motherboard. A very clean design; for those who are going to install aftermarket heatsinks with proprietary backplates, rest be assured there is absolutely nothing to worry about. What you will find is the standard Intel backplate, but all heatsinks designed for LGA1155 should be designed to work with the backplate in its place. Unlike some higher end enthusiast motherboards out there, ASUS does not advertise having two ounces of copper on the inner layers of the P8H67-I Deluxe. The reason why I point this out is because this is normally used to improve its cooling efficiency by spreading the heat out more evenly, as well as delivering more power more efficiently to its components by lowering the PCB impedance. In my opinion, it is not a huge deal for motherboards in this niche, but just keep it in mind. Regarding the use of capacitors, the use of surface mounts is evident for some components, but traditional implementations are equally as evident. For example, the PCI Express x16 socket pins still use traditional mounts -- since SMT is not capable of withstanding higher mechanical stress required for this purpose.
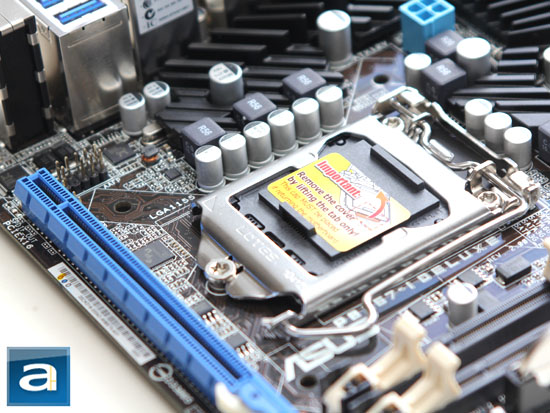
Within close proximity of the LGA1155 processor socket is the usual array of items -- components relating to the CPU voltage regulator circuit, as well as sections of the low profile heatsink as aforementioned. The ASUS P8H67-I Deluxe is not an overclocking motherboard, so the company does not advertise anything specific regarding its power design. Unfortunately, I don't have any literature on how the chokes are hooked up electrically, but by inspection my best guess is that it is a 3+2 phase power design. The R20 labeled choke next to the 4-pin ATX connector is most likely used to remove spikes from the power supply to form ASUS' Anti-Surge Protection. The Energy Processing Unit (EPU) can be found between the CPU socket and the PCI Express 2.0 x16 slot.
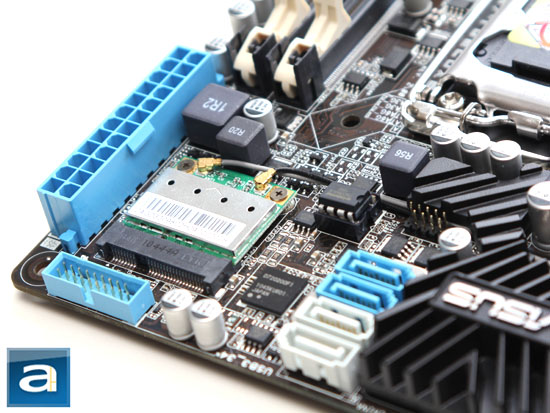
Most of the interesting stuff is located at top right corner of the ASUS P8H67-I Deluxe. A 24-pin ATX power connector is placed on the edge where it should be. Meanwhile, an internal USB 3.0 header can be found just around the corner. Between the two is a mini-PCIe slot featuring a pre-installed, half length, dual antenna Atheros b/g/n WiFi card. Also visible in our photo above is the NEC USB 3.0 controller, and what appears to be a socketed BIOS chip.
Four color coded Serial ATA connectors are present on this mini-ITX motherboard. The first two ports in grey are SATA 6Gb/s ports native to the H67 chipset. The blue ports are SATA 3Gb/s ports; also native to the H67 chipset. In combination, you will get RAID 0, 1, 5 and 10 support. ASUS' P8H67-I Deluxe motherboard does not feature any legacy PATA or floppy connectors, which is not something we would expect anyway.
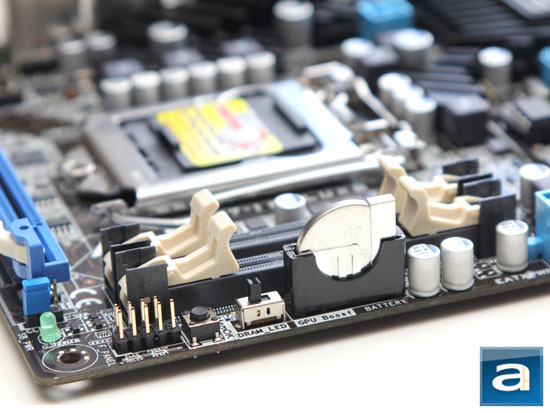
The RAM slots are placed pretty close to the CPU socket, but this should not pose too much of a concern, since the ASUS P8H67-I Deluxe is a mITX board with no overclocking capabilities -- it is not likely the end user will install big fat heatsinks over the processor anyway. This motherboard also has two 204-pin DDR3 SODIMM slots to conserve space, but this means you will need to shell out some extra cash for laptop RAM. Like its regular desktop counterparts, the RAM is to be installed in a perpendicular manner, rather than in a parallel manner like you would in a laptop. Adjacent to it is a 3V CR2032 CMOS battery oriented vertically, followed by a GPU Boost switch, MemOK! button, and front panel I/O headers.
The GPU Boost switch overclocks the integrated GPU in Sandy Bridge processors. Meanwhile, the MemOK! button allows the user to auto start the system in working with the memory in the pre-post state by first attempting relaxing the timings, followed by adjusting frequency, and finally increasing the voltage to allow the system to POST. This is very beneficial, since there may be boot issues with higher voltage memory kits or otherwise problematic memory -- and users won't be stuck looking for standard voltage memory in order to modify settings in their BIOS just to start their system. Overclockers may also find this feature beneficial by using MemOK! to reset their memory settings only, rather than resorting to clearing the CMOS.
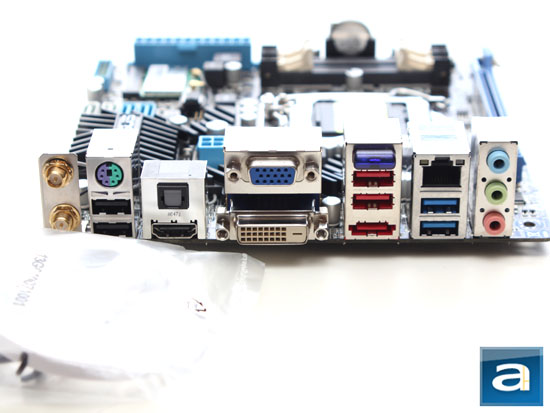
ASUS offers a reasonable amount of available external connectors at the back panel; pretty much everything you need are available -- unless you're after Firewire. From the left, and ordering from the top in case of present adjacent connectors, we have two WLAN antenna ports, one PS/2 port for both your keyboard and mouse, two USB 2.0 connectors, optical audio output, HDMI port, VGA port, DVI-D port, Bluetooth module, two USB 2.0 ports, one eSATA port, one Realtek RTL8111E powered Gigabit LAN jack, two NEC powered USB 3.0 connectors, and three standard Realtek ALC892 powered 3.5mm analog audio jacks, An EMI shielded I/O backplate, which ASUS calls the "Q-Shield", accompanies the motherboard.
If you have been paying attention, the ALC892 codec is a slight upgrade from the ALC889 used in other ASUS motherboards. Since this is a consumer focused board, a better integrated sound solution makes a lot of sense. The company uses terms like "Absolute Pitch 192kHz/24-bit True BD Lossless Sound", "BD Audio Layer Content Protection", and "DTS Surround Sensation UltraPC" to promote this audio codec on other motherboards such as the P8P67 PRO, but no specific highlights were used on the P8H67-I Deluxe's product page. Fundamentally, all this means is it has enhanced digital decoding and encoding capabilities; as far as actual performance is concerned, we will cover that in our RMAA tests later on in this review.
The Bluetooth module enables ASUS' BT GO! on the ASUS P8H67-I Deluxe. In addition to being a standard adapter for all your Bluetooth devices, it also provides seven services of which ASUS calls Folder Sync, BT Transfer, BT Turbo Remote, BT-to-Net, Music Player, Shot and Send, and Personal Manager. You can also use your smartphone as a remote for your PC to do stuff like play or pause your music.
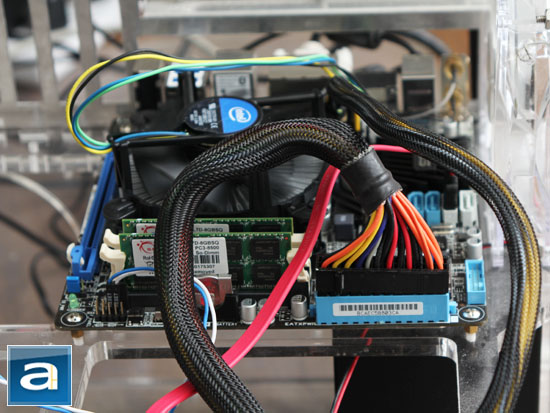
Our test configuration as follows. Unfortunately, I don't have any DDR3-1333 SODIMM memory sitting around, so I resorted to the DDR3-1066 I've reviewed back in 2009. It is important to note we are not directly comparing the two motherboards, but rather use it as a baseline reference to see if the P8H67-I Deluxe is performing within expectations.
Compared Hardware:
- ASUS P8H67-I Deluxe, G.SKILL F3-8500CL7D-8GBSQ 2x4GB (Stock frequency @ stock latencies), Integrated Intel HD 2000
- ASUS P8P67 PRO, G.SKILL Ripjaws F3-12800CL7D-8GBRH 2x4GB @ DDR3-1333 7-8-7-24 (Reduced frequency @ stock latencies), Gigabyte Radeon HD 6850 1GB
Common Specifications:
CPU: Intel Core i3-2120 @ 3.33 GHz (Stock speed)
Chassis: Danger Den Torture Rack
Storage G.SKILL Phoenix EVO 115GB; Seagate Barracuda 7200.10 320GB
Power: Seasonic S12D 850W
Operating System: Microsoft Windows 7 Professional x64 SP1
Page Index
1. Introduction, Features, and Specifications
2. Bundle, Chipset, BIOS
3. A Closer Look, Board Layout, Test System
4. Benchmark: AIDA64 CPU
5. Benchmark: AIDA64 FPU
6. Benchmark: AIDA64 Memory
7. Benchmark: PCMark Vantage
8. Benchmark: 3DMark Vantage
9. Benchmark: PassMark PerformanceTest 7.0
10. Benchmark: SuperPI 1M, Cinebench R11.5
11. Onboard Sound (RMAA 6.2.3) Analyzation
12. Conclusion