Page 4 - Installation and Conclusion

Installation was a relatively smooth process, with only a few hiccups in between. I will outline the hiccups as I go through this section. Naturally, I started with the power supply, at it is a good place to begin. As you can see in the above picture, my PSU is a bit larger than what the BitFenix Merc Alpha is designed to handle. Not only does it cover a part of the bottom vent for the optional 120mm fan, it also makes the power supply brace provided absolutely useless. They just don't have the holes for me to attach the brace. I am also not convinced that the brace is even required in the first place, but if you have a small enough PSU, you might as well take advantage of what is given to you. I do like the nice large opening for me to route my power cables to the back side of the chassis. This opening is not only located in the perfect location, but it is also sufficiently large to accommodate a wide variety of power cables.
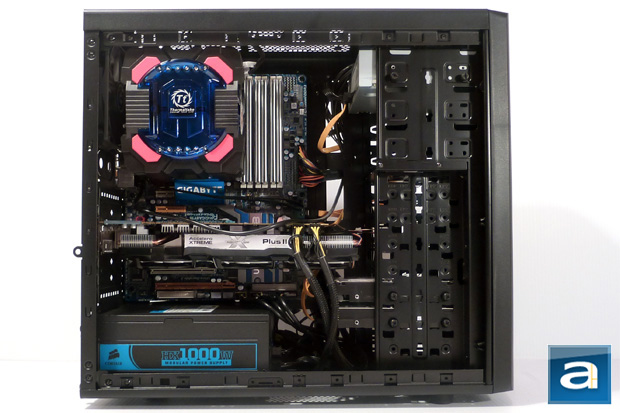
Moving on, it is time to put in the motherboard itself. I'm sure the picture above does a good job of showing you how little room you will have if you own a large aftermarket CPU cooler like the Thermaltake Frio OCK. The BitFenix Merc Alpha isn't what I would call an overclocker's best friend, so really, I shouldn't be expecting such luxuries from a value chassis. I also initially installed my two hard drives near the top of the 3.5" rack. This was instantly switched to the lower racks once I found my graphics card's cooler (The Arctic Cooling Accelero XTREME Plus II I reviewed last week) is way too fat for its own good.
It wasn't actually that compact for such a small ATX chassis. Many areas where I wanted space, plenty was provided; however, the top left corner where the CPU power connects is a different story, I couldn't even fit my fingers between the back fan and my CPU cooler. I ended up connecting the power cable before securing the motherboard. I was a bit skeptical of the motherboard mounting design, as you are only provided eight screws to secure the board, and the middle is simply a metal rod that comes through the hole. Personally, when I saw my graphics card and CPU cooler nearby, I got a bit worried about the force being put on my motherboard. However, this concern appeared to not be a huge deal, and BitFenix proved to me that a screw in the middle isn't required.
As mentioned earlier, I had to move the hard drives to a lower position to accommodate my massive VGA cooler. As for the cabling of the hard drives, I was able to easily redirect them around the back side without getting in the way. The next task was installing the optical disk drive. As also mentioned earlier, the front panels can be removed by clips, so that you can easily slide in your 5.25" drives. The clips were fine, but the way the bay covers were secured made it a bit of a challenge. Once in place, it was four thumbscrews and time to wire it up. I was also able to direct the wires to the back side of the chassis, and reduce any unnecessary cables from the front.
Finally, it was big fat VGA time. I had to remove three screws to get to the PCI slot covers from the back side. This was coupled with the additional challenge of prying and snapping off the covers, as only the top and bottom one were able to come off easily. Now, the interesting catch is the PCI slot clamp means you don't actually screw in any of your cards, except for where the three holes are located. This wasn't the most comforting thought, as my Radeon HD 6950 has a reasonable amount of weight to it. It was an interesting way to secure the PCI slots. However, when you have a bunch of PCI slots being used, and nothing to really hold them in place while you bolt down the clamp, it makes the task significantly more difficult than needed. While this certainly wasn't the best installation process in history, I have had worse. Overall, it does a fairly reasonable job, and not too much to complain about. I admit my hardware is a little bit on the more extreme side for a $40 budget case, but the good news is that this chassis does work with larger than average hardware components.

Ignoring my non-professional cabling job on the back side, I just wanted to point out how much room is available for the backplate of the CPU cooler. It has plenty of space, and the CPU opening extends out more to the front than most cases. You can also see the large number of openings for routing cables through the back side. This gives you lots of flexibility, and an easy to work with area for cables. With everything installed, let's take a look at the final product.

Ladies and gentlemen, start your engines. I'm sure you can see the optical disk drive is slightly recessed, because of the curvature of the front. I'm not really a fan of the curves, as I do like a flat front (Only for computers). The LEDs at the top are not overly bright, so you won't have to worry about them distracting you when turned on.
So, how loud is the BitFenix Merc Alpha with only a single fan? Well, the rest of my components were louder, so I dropped the fan speed of all my other parts to their lowest setting. This allowed me to isolate the sound of the lonely case fan. On the APH Sound Scale of Awesomeness, with a range of 0.0 to 10.0, where 0.0 is silent and 10.0 is a rocket launching into orbit, the stock fan came in at a 2.0 in my personal opinion. Obviously, a single fan isn't expected to make a ton of noise, but it does make a slight audible difference. The amount of cooling provided by this single fan is subjective, and was not taken into consideration.
-----------------------------------------
I'm just going to come out and just say it. The BitFenix Merc Alpha has impressed me, but not because it is the most amazing product ever. Instead, it is because the Merc Alpha provided significantly more features and a higher build quality than expected for its price range. Retailing for $39 at press time, I would recommend this to anyone who is strapped for cash and simply needs a chassis to put their computer parts into. Probably buying another fan would also be a reasonable idea, as this would make a respectable difference in cooling performance. The lack of front USB 3.0 ports is a bit of a kick in the pants. If you happen to have support for them with your motherboard, you will miss out for now, but the large number of USB 2.0 ports on the front makes up for it. The lack of thumbscrews for the rear side panel, as well as the screws for the PCI slot brace are not what I would call an ideal design choice, but it works. I would have preferred my Merc Alpha to having all four feet properly attached, but I will give BitFenix the benefit of the doubt that this is just a rare defect. Aesthetically, I can't say I'm drawn on the looks, but if you really just need something cheap to put your parts in, looks are probably not the highest priority on your list. Designed for your average computer on a tight budget, the BitFenix Merc Alpha does what many other cases try to do with a higher price tag. Overall, if you are tight on cash, then this is the way to go.

BitFenix provided this product to APH Networks for the purpose of evaluation.

APH equal.balance Award | APH Review Focus Summary:
8/10 means Definitely a very good product with drawbacks that aren't likely going to matter to the end user.
7/10 means Great product with many advantages and certain insignificant drawbacks; but should be considered before purchasing.
-- Final APH Numeric Rating is 7.3/10
Please note that the APH Numeric Rating system is based off our proprietary guidelines in the Review Focus, and should not be compared to other sites.
Searching for the best chassis you can get at the lowest possible price? Look no further than the BitFenix Merc Alpha.
Do you have any comments or questions about the BitFenix Merc Alpha? Drop by our Forums. Registration is free, and it only takes a minute!
Page Index
1. Introduction, Packaging, Specifications
2. Physical Look - Outside
3. Physical Look - Inside
4. Installation and Conclusion