Page 2 - Physical Look - Outside
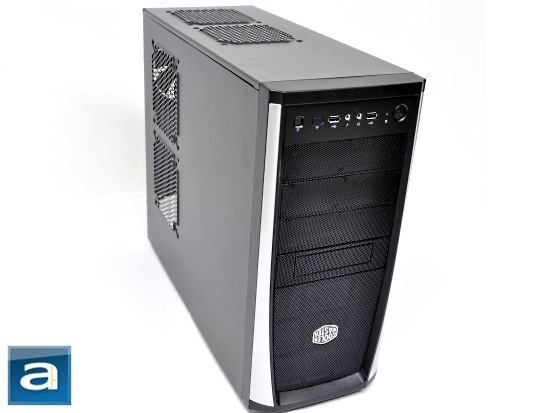
As far as the physical look is concerned, Cooler Master has done a relatively bang-up job on the Elite 371 for a budget case. For some reason, I got an 'Australian' unit signified by the upside-down logo, but I am sure retail units would not have this problem -- Cooler Master assures us this is an isolated incident. It is definitely not overdone like many chassis I have seen, and yet still maintains a distinct look from your average run-of-the-mill chassis. Since aesthetics are a very opinionated topic, I will leave you to decide whether or not it deserves your approval. The body of the Elite 371 consists mainly of steel sheet metal that is pieced together relatively well. The front bezel, however, is made mainly of acrylonitrile butadiene styrene (ABS) plastic that is known for its lightweight and relatively durable properties. Also seen on the bezel would be a steel mesh material for the front bay covers. I will go into more detail later.
On the left side of the Cooler Master Elite 371 is a panel that allows one to mount an additional two 120mm fans or two 140mm fans. This will allow the user to add extra cooling options to the side of the case that will assist in cooling internal components around this area. This is something quite cool to see for a budget case as it will allow one to have a little more freedom when building their rig. One thing to note is that the mesh is not lined with dust filters, which is a little bit of a letdown. If you are not using the side fan cooling option, then one could just place something on top of the mesh to prevent dust circulation. However, if you do intend to use the cooling option, you may need to be prepared to deal with some dust invasion.
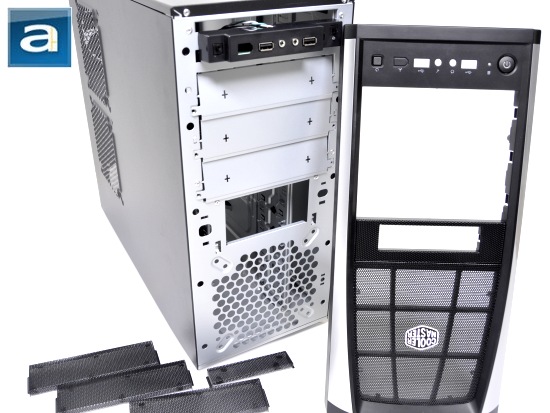
Once the front panel is removed, we can see the external drive bay options on the Elite 371. There are a total of three 5.25" bays that can be used, which is more than enough for most users. Below the 5.25" drive bays is a single external 3.5" bay. This can be used for those who still utilize floppy bays or other external 3.5" components. To utilize an external 5.25" bay, however, one will need to manually clip off the small piece of sheet metal, which is not replaceable. At the bottom of the front is another cooling option that can be used. According to my measurements, as well as the information provided in the specifications, the front can utilize one 120mm or one 140mm fan; not included. This can provide cooling for the internal hard drives.
Let's briefly go over the drive bay openings on the front panel. First, what I find surprising was that removing and installing the bay covers was a tool-free operation. There is one condition though, in that the front bezel must first be removed, since the bay covers must be removed via clips from the backside of the bezel. As stated previously, the covers are made of a steel mesh wiring material. This is not the type of metal wiring seen on the In Win Dragon Rider chassis I reviewed a few weeks back that is known to be brittle. But rather, the steel mesh material on the covers is quite durable and sturdy. As well, each cover is lined with a cloth fiber filter that can be removed without much effort to clean. Unfortunately, the filter feels quite cheap, and hence, it can shed and rip over time. One solution that many uses nowadays are cans of compressed gas to remove dust rather than removing the filter and leaving it under the tap.
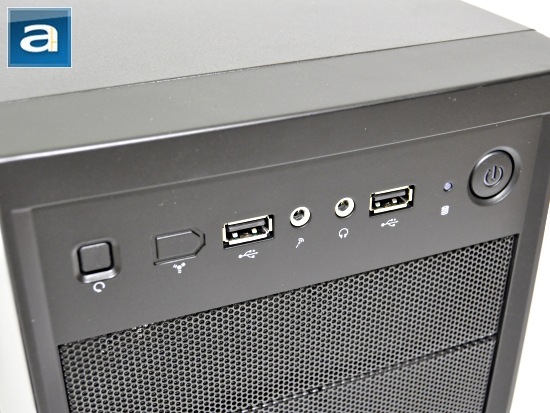
The Cooler Master Elite 371's front panel connection options are quite simple and relatively standard. Since the case is relatively small in terms of dimensions, the front panel connectors are located on top of the 5.25" drive bays. This is nice and easy to access for those who have their case on top of their desk, as well as for those who keep it on the floor. From the right is the power button with the power LED integrated, HDD activity LED, one USB 2.0 port, 3.5mm microphone and headphone jacks, another USB 2.0 port, a blank IEEE 1394a FireWire port, and a reset button. Since the Cooler Master Elite 371 is a budget case, we really cannot expect much beyond the standard array of connections, so there is not much to comment on here.

Like most cases, the Elite 371 utilizes a bottom mounted power supply bay. Above the PSU bay is a total of seven PCI slots, which is the standard number for mid-towers nowadays. Above that are the I/O shield cutout and a honeycomb mesh panel for the exhaust fan. From the above picture, you may be able to make out that the exhaust mesh has two mounting points for those who want to install a 140mm exhaust fan to replace the provided 120mm exhaust fan. Lastly, above the exhaust grill are two indents in the metal that can be drilled out for water cooling holes. In this case, I agree with Cooler Master on this decision to not provide two pre-drilled and pre-fitted water cooling holes, since I would doubt that one would use water cooling for their system using a budget case such as the Cooler Master Elite 371 itself. In other words, no one in the right mind would fit a Ferrari with a Hyundai engine (No offence) and vice versa. Besides this, there really is not much to comment on. Cooler Master has done quite a nice job providing us with the necessities of what is needed in a case -- nothing less, nothing more.
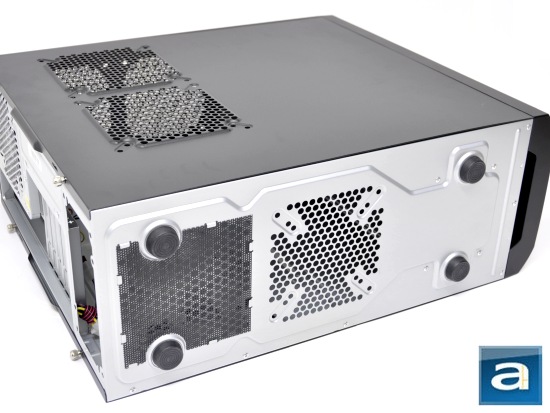
The bottom of the Elite 371 is quite interesting. First are the two grilles at the bottom. The first grille with the fiber-based filter is used for power supply air intake. But what is interesting is how Cooler Master decided to add a second opening for those who want additional cooling. To be honest, this is quite rare to see on a budget case, and I am quite impressed. It seems Cooler Master has decided to allow this case to have great cooling potential to accommodate all our needs down the road. Of course, the missing ingredient would be the dust filter. Bottom mounted fans on a case is a tricky topic to discuss and analyze. I have previously seen many cases that utilize the option, which is great, but forget to note that power supply unit cables tend to make the fan either useless or impossible to install. Cooler Master, however, did not forget this issue, as the floor fan opening includes mounting holes for the option of installing either a single 120mm fan, a single 90mm fan, or a single 80mm fan. In one word, I would have to say "brilliant". Now, anyone can utilize the bottom floor cooling option without much worry, since a small fan would easily be able to dodge the wires of most, if not, all power supplies. On the other hand, an internal removable fan grille would be a viable solution as well. Also seen at the bottom are four soft-plastic grommets. Unfortunately, the grommets are not the usual rubberized feet that are known to reduce vibration and increase grip.
Overall, the exterior of the Cooler Master Elite 371 is very well designed. The chassis exhibits a very durable feel, and has some cool features here and there that set it apart from other cases in its class. Of course, there can be some refinement here and there, but it is something definitely not expected and not required at the given price range.
Page Index
1. Introduction, Packaging, Specifications
2. Physical Look - Outside
3. Physical Look - Inside
4. Installation and Conclusion


