Page 4 - Installation and Conclusion
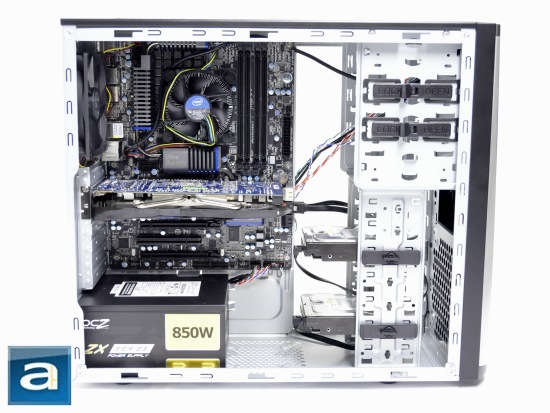
The installation process for the Cooler Master Elite 371 is relatively straightforward and easy. This time, I started by installing my Gigabyte GA-P67A-UD5-B3 motherboard first before moving on to the OCZ ZX Series 850W power supply unit. One quick thing to note here is that you will not be able to install a bottom fan into this case with relatively long power supplies like the one that I have installed.
Instead of installing CPU aftermarket cooling for this setup, I decided to leave my stock cooling on my motherboard. According to my measurements, the Thermaltake Jing that I reviewed just last week will just be able to fit into the case. I would not advise buying a taller CPU cooler than that. Just for your reference, the Thermaltake Jing is 162mm in height.
The number of front panel connection wires was quite small in quantity, so routing the wires to the motherboard did not take much effort. However, the power wires, HDD LED wires, and the such are very short -- this forced me to route them through the back of my motherboard in order for me to keep the wiring looking neat and tidy. The rest of the cables will have to come through the large opening at the right side of the motherboard tray. This is pretty much standard design.
One thing I need to mention would be to first remove the number of expansion slot covers that you intend to use first before installing the motherboard. This is because to snap the metal braces off of the expansion slots, one needs to bend the cover towards the inside, in which the motherboard will be in the way. After I removed the expansion slot covers, I installed my Gigabyte Radeon HD 6850 1GB OC next. It is no doubt that the Elite 371 has a lot of room for video cards.
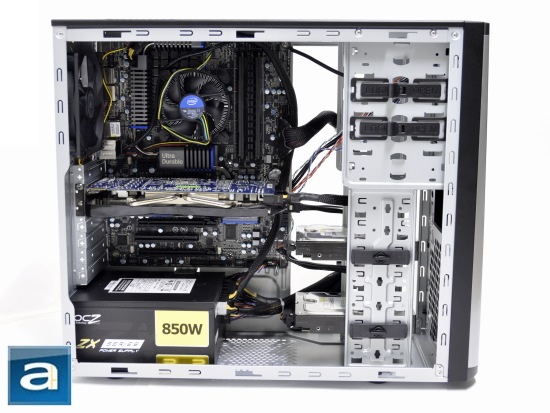
Once I started wiring the system together, I really found the Cooler Master Elite 371 to be a very well-built budget case. Behind the internal hard drive rack is enough room to place a huge amount of messy wires that can be zip-tied using the holes provided on the rack. Of course, because the spacing behind the motherboard tray to the side panel is only 5mm, one would be forced to route all the wires behind the 3.5" drive bays anyway. There really is not much of a difference between the two images above. However, one picture is without a single power cable plugged in from the power supply, and the other is a snapshot of the case after everything is plugged in.
On the previous page, I stated that the Cooler Master Elite 371 does not support 2.5" drives. This is not entirely true. SSDs usually come with a 3.5" mounting bracket that can be used to install in a 3.5" drive bay. In my case, I still mounted my SSD 3.5" plate onto the rail without any mounting brackets, because it was a tight fit. I do not recommend you to do this, but if you know that you won't be moving components around very much, then it should not be such a problem after all.
Once it was all setup and plugged in, I pushed the power button, and everything came to life. Of course, the only LEDs I was greeted with would be the power and HDD indicator.
I then tested the overall sound produced from the case. On a scale from 0.0 to 10.0 where 0.0 is silent and 10.0 is the loudest, the Cooler Master Elite 371 would come in at 2.0/10. This is mainly because it comes with only one pre-installed exhaust fan at the back. However, with only one fan installed, the system is so quiet, the loudest component in my case would have to be my hard drives. In this area, I am quite impressed.
-----------------------------------------
I firmly believe the Australian Special Edition Cooler Master Elite 371 is one of the best chassis out there for its price range. Retailing as low as $49.99 at press time, this case has every necessity one would need. First off, one of the largest reasons as to why this chassis is up and above all the others would be the air filters. The missing air filters at the bottom and sides of the case may very well be analyzed as a con. However, I am one to be impressed by the effort. Also, the Elite 371 is a surprisingly cable tidy case, even though you can't route anything behind the motherboard tray. The seemingly limitless cooling options on this case allows the Elite 371 to be a large potential air-cooling player on the market. Lastly, the solid overall build, the fairly quiet rig, and the tool-free hard drive and 5.25" bay mounting system make this chassis an excellent buy. The Elite 371, however, is not without its flaws. First off, the lack of extra hard drive mounting rail clips can limit the case. The slightly sharp edges of sheet metal are seen around the case, which can wear down the cables, and cut the unsuspecting user. The relatively short front panel cables may at times force one to have a little less tidy build. Lastly, the lack of fans provided is also a small let down, as one would have to spend a little more pocket change to fully utilize the cooling options. All in all, the Elite 371 is one to be feared. Or in Australia, one would say the Elite 371 is one to be deraef.
Cooler Master provided this product to APH Networks for the purposes of evaluation.
APH Review Focus Summary:
8/10 means Definitely a very good product with drawbacks that aren't likely going to matter to the end user.
7/10 means Great product with many advantages and certain insignificant drawbacks; but should be considered before purchasing.
-- Final APH Numeric Rating is 7.4/10
Please note that the APH Numeric Rating system is based off our proprietary guidelines in the Review Focus, and should not be compared to other sites.
For as low as $49.99 at press time, the Cooler Master Elite 371 is a decently built budget case to meets or exceeds your basic case necessities.
Do you have any comments or questions about the Cooler Master Elite 371? Drop by our Forums. Registration is free, and it only takes a minute!
Page Index
1. Introduction, Packaging, Specifications
2. Physical Look - Outside
3. Physical Look - Inside
4. Installation and Conclusion


