Page 3 – Physical Look – Inside

Removing four thumb screws -- two for each panel -- allows us to take off both side panels to enter into the Cooler Master N400's innards. The first thing I noticed was the interior is also black. This makes sense, especially since other models of the N400 have windows, and it would be quite ugly to see the regular unpainted interior as found on most pre-built desktop computer systems. In terms of real estate, it is a bit tighter than I would like. Of course, this being a mid-tower case, there are restrictions to sizing. and this is understandable. However, in terms of cable management, it is not ideal, and I will expand more on this later.
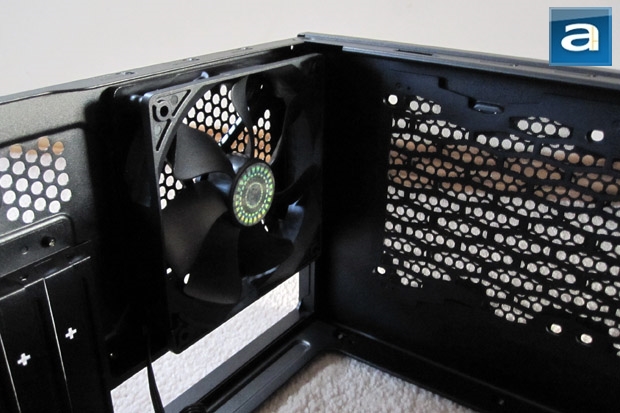
Displayed above is the top left corner where the 120mm exhaust fan is located. There is a small extra that is on the fan connector, which is an included 3-pin to Molex adapter to allow for more flexibility while wiring around. On the other hand, the wire is pretty short, and users may use the Molex adapter as an extension cable. Right beside the fan on the top of the case is another ventilation area with a mesh filter covering the area. Underneath the fan and the top ventilation area is the large opening on the motherboard tray to allow for an aftermarket heatsink with a backplate. As this is a mid-tower chassis, it is capable of handling ATX and mATX motherboards. The tray inside the N400 is clearly marked by letters corresponding to where the motherboard should be placed and mounted.

On the bottom, the Cooler Master N400 utilizes the modern method for mounting a power supply. There are four rubber feet that grip the power supply in place, while also reducing vibration from the power supply. The feet are quite a feat, as many standard budget cases do not have any rubber mounts, and let the power supply sit directly on the base of the case. As well, located underneath the power supply is an intake area with a dust filter to block off dust from entering the case interior or the power supply.
Directly in the middle of the back panel are expansion card slots. As prior mentioned, there are a standard seven in total. It should be noted that the slots are also not tool-free, as the braces must be snapped off to create an opening. Screws are provided to mount and fasten the components in place. The nice thing is these openings are not permanent, as the metal braces can be put back in place with the provided screws.
Located at the front interior of the case are the internal 3.5” and external 5.25” bay rails. Both of the 5.25” bays can be mounted in a tool-free manner, as two mounting brackets are provided. As well, two additional mounting brackets are provided for the internal 3.5” bays, but as per the specifications, as many as eight hard drives can be mounted. This raises the question, “Why did Cooler Master not provide more tool-free brackets?” These brackets could have easily been placed without thought, and we would be satisfied. On the other hand, considering the audience and target market, most people would not be putting more than two hard drives in their system anyways, so having more might instead be unnecessary. Once again, manufacturing cost.
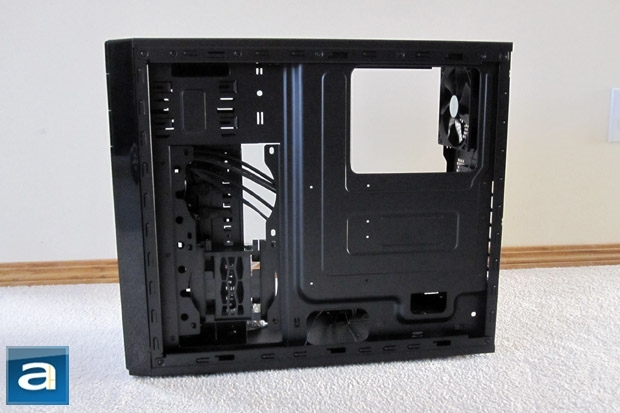
Finally, on the flip side of the motherboard tray is the back side. In a lot of other computer chassis, the back is utilized for hiding cables and other wires to clear up the front area. However, with a lower-priced case like the N400, there is very little space to hide wires. I think there should be a bit more room in the case to allow for these extra wires to move around, even if only a bit more room. The only other place that I would have thought to put the hanging wires is near the opening near the front by the drive bays (On the left side in the image). However, this is also where two extra 120mm fans can be put, so if cooling is an issue for a user, he would not be able to cool while keeping the wires neat. It is not all bad news here, as located in front of the fan area are two tool-less 2.5” hard drive slot. While traditional hard drives have been used for the past few centuries, the solid state drive is on the up and coming, and with prices on them dropping faster and faster, more people can now get their hands on them. It is an appreciated feature as it allows for easy mounting of a solid state drive. There is also a third mount for a SSD/laptop sized drive, but this requires the drive to be mounted to the bottom of the case with screws.
Page Index
1. Introduction, Packaging, Specifications
2.Physical Look - Outside
3. Physical Look - Inside
4. Installation and Conclusion


