Page 3 - Physical Look - Inside
In their interior design of the XL Tank, Cubitek has implemented a number of useful solutions, making component assembly considerably more convenient for the end user. As seen in the photo above, the I/O connector cables are anchored at the same spot, which makes for easier and more aesthetically pleasing cabling. You can also see that the expansion cutouts are all secured by thumbscrews for easy expansion card installation. This is a great boon for users who, either out of necessity or simply because they can, have a habit of regularly swapping video cards and other miscellaneous cards. Also clearly visible is the VGA card retention beam. If you have ever used a heavy, full-sized, multiple-slot video card, you will most likely be aware of the adverse flexing effects the weight of the card has on its own PCB, an increasing occurrence in this age of high-performance video cards. The bracket tilts out from its base once the two thumbscrews that hold it in place are removed. Once the motherboard is installed, it is simply a matter of unscrewing one of those convenient expansion cutouts, placing the video card into its respective PCIe x16 slot, and lowering the bracket into place. That's it. Say goodbye to PCB flex!
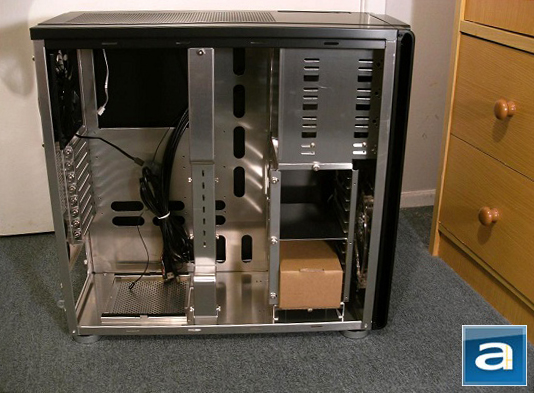
Included in the displayed compact brown corrugated box are all the necessary fasteners you will need to secure the hardware in the case, such as your motherboard and hard drives, as well as extra thumbscrews and extension cables for the case fans and USB headers. All of the fasteners listed on the user manual were present in their individual plastic zip-lock bags. However, as we will see on the next page, not all went according to plan in this respect.
Motherboards that measure all the way from micro-ATX all the way up to XL-ATX, and every size in between, are capable of fitting in the roomy interior of the XL Tank, which lives up to its XL moniker. If you don't know what XL-ATX is, don't worry about it -- all you need to know is the Cubitek XL Tank is slightly bigger than a regular ATX mid-tower, but it is still basically a mid-tower. With a maximum PCI card length of 310mm and CPU cooler height of 190mm, there is ample room for installing your components without feeling cramped while doing the installation.
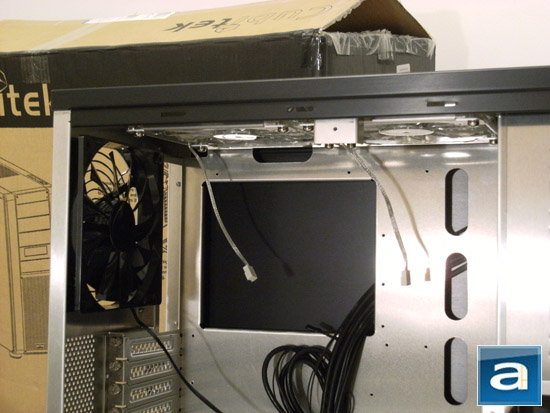
There are two 140mm chassis exhaust fans located on the top panel, both of which have built-in LEDs to make the case more aesthetically pleasing. They serve to provide extra cooling to your computer's internal components, as it capitalizes on the fact that heat rises naturally. A large exhaust fan also sits attached to the rear panel, the purpose of which is to draw out any remaining hot air from above the motherboard. All three fans have 3-pin motherboard headers, and extension cables are included in the case accessories, making installation a piece of cake. As mentioned on the previous page, these top mounted fans do not have dust filters of any sort, making them very prone to accumulating dust -- especially when your computer is turned off.
A large square opening is visible on the motherboard tray for easy aftermarket CPU heatsink backplate installation. The opening is also more than large enough for modern shifted CPU sockets on LGA 1155 and 1156 boards; this is evidence of a well-thought out case interior, as it caters for the whole spectrum of users.
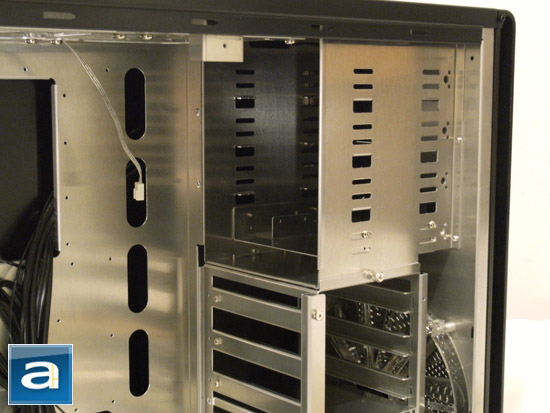
Moving towards the right side of the interior, we see the six 3.5" and four 5.25" drive bays. In keeping with the trend of tool-less installation in this case, it is no surprise to see that all drives are fixed into their respective bays using thumbscrews. Included in the cardboard box as seen in the first photo above is a small bag containing twenty rubber washers, designed to prevent vibrations during hard drive operation. You will still be able to use the supplied screws to affix the washers to the hard drive, but once that step is completed, it is simply a matter of slapping the hard drive into an empty 3.5" slot and sliding the side bracket across to lock the drive in place. I was concerned that these measures taken by Cubitek would not be enough to secure the hard drive; sure enough, there is still some minor give when installation is completed, but nothing that should worry you. Heck, if you were rattling the case around enough to worry about the hard drive being dislodged, all I can say is that the hard drive falling out would be the least of your worries.
The alignment of the drive cage facilitates tidy cabling, with the option of installing the hard drive in such a way that the connectors face the back panel, which seems to be what Cubitek is encouraging users to do. This makes it a lot easier for the user to route SATA power and data cables behind the motherboard tray, thus, improves look and aiding airflow by eliminating extraneous cables within the case.
You will be able to see that the bottom 5.25" drive bay contains a removable bracket for easy mounting of an SSD (Or any 2.5" hard drive, although it is beyond me as to why you would want to do that in a desktop build, haha). Doing so is extremely intuitive and straightforward, but instructions for that process are still included on the user manual.
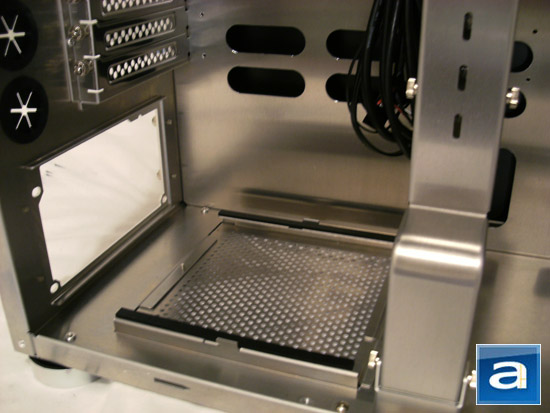
The Cubitek XL Tank has ample room for a power supply, and being mounted on the floor of the case as is the trend with most cases nowadays. A power supply bracket is attached with thumbscrews to the outside of the power supply opening at the rear of the case; it can be inverted 180 degrees to accommodate various power supply designs, depending on the alignment of the fan and screw holes on each model. Furthermore, four small screws supplied in the bag of accessories are used to affix the power supply itself to the aluminum bracket.
Clearly visible in the photo above are the two rubber-covered rails on which the power supply sits after installation. This dampens any possible vibrations produced when the power supply is in operation, hence minimizing noise output. We can also see the large removable aluminum mesh panel in the space between the rails, which is placed in that location to enhance airflow for power supplies with bottom mounted fans. A square piece of thin foam, roughly the same dimensions as the mesh panel, can be screwed in place above the panel to act as a dust filter.
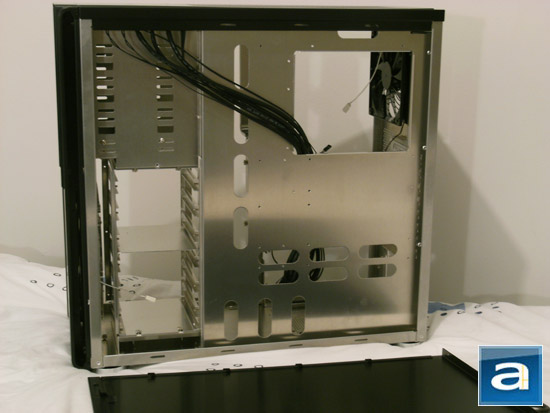
Removing the back panel reveals the rear side of the sturdy motherboard tray, which is pretty much what can make or break a good cabling job. The abundance of openings -- fourteen to be precise -- in the tray is very obvious from this angle, and it is clear that Cubitek has made an effort to make cabling as easy as possible for the user. A nice touch that has been included is the opening situated at the top right of the motherboard tray above the backplate panel is a dedicated opening for the purpose of accommodating the ATX 4-pin/EPS 8-pin connector from the power supply. The six horizontal openings ensure that regardless of the size of your motherboard, the case I/O cables can be easily positioned. Even I, doing my first cabling job, found it very straightforward to arrange the cables to my liking. Speaking of installation and cabling, let's move on to the final page to see how my attempt turned out with this case!
Page Index
1. Introduction, Packaging, Specifications
2. Physical Look - Outside
3. Physical Look - Inside
4. Installation and Conclusion