Page 3 - A Closer Look, Board Layout, Test System
Some may call the Gigabyte GA-Z170X-UD5 subtle looking, but I found its understated appearance to be quite attractive in my windowed chassis. Gigabyte has been using flat black soldermask on their lineup for quite a number of years now, but the secondary colors always varied between generations, and even models within the same generation. For the Gigabyte GA-Z170X-UD5, it has taken a page out of the Black Edition series we have first seen in GA-Z97X-UD3H-BK. All of the components are in various shades of monochrome; the only exception is the flat gold stripes and "Ultra Durable" text on the trio of heatsinks. Even the capacitors are custom made to be black in color, which makes it very sleek in my opinion. The GA-Z170X-UD5 is a mainstream performance board, but it certainly carries the classy vibe of a high performance model. While aesthetics are not really an issue when it comes to internal components of a computer compared to the way the board is built and how well it performs, surprisingly it can be a deciding factor for some users. Of course, the comments on the look are just a personal opinion. As it has gained immense popularity for the last couple years, the GA-Z170X-UD5, like all Gigabyte midrange motherboards, features Japanese ultra-low ESR solid state capacitors guaranteed for maximum performance for 10,000 hours. We also have ferrite core chokes and lower RDS(on) MOSFETS for maximum durability and energy efficiency.
As you can see in the photo of the Gigabyte GA-Z170X-UD5 above, the heatsink configuration is very simple. Because the Z170 PCH is a simple chipset with a 6W TDP rating, a simple passive cooler over the chip makes a whole lot of sense. The second heatsink extends over the MOSFETs placed around the processor socket, in which we will cover in just a short moment. Either way, the Gigabyte GA-Z170X-UD5 will work just fine even in cases with not a whole lot of airflow. This is a standard ATX board at 30.5cm by 24.4cm.
As with most motherboards, the ATX 4-pin/EPS 8-pin power connector is located horizontally at the top left corner, between the PS/2 rear external block top heatsink segment. It is fairly cramped in this area, but it is one of the better ones I have seen, since it is located right on the edge of the board with nothing in between. This leaves sufficient room for people with average sized fingers to unlatch their cables. A 4-pin fan header is on the left of the power connector. Unless you have a Noctua NH-D15 sitting over your processor or a large water cooling radiator at the top of your case, you should not have a whole lot of issues getting in and out of this area.
Above is a shot of the motherboard at the back. The design is relatively simple and clean; great for those thinking of adding aftermarket CPU cooling solutions. A standard Intel backplate is found here, but all LGA 1151 aftermarket coolers should be designed to work with this backplate in place. Along with the Ultra Durable scheme Gigabyte's performance motherboards are known to have, they also market the board to have two times the amount of copper used on the power and ground layers of the PCB in order to improve both its cooling and power delivery efficiency to its components. With more copper on these layers, current will flow with reduced impedance, and in turn, less power will wasted into heat. The GA-Z170X-UD5 also has a glass fabric PCB, which is weaved in a much tighter fashion than traditional builds. Gigabyte claims this will provide better humidity protection, but I do not think I ever had this problem in the past, haha. The company also markets dedicated anti-ESD protection for Ethernet and USB ports for better reliability. Anti-surge ICs are also placed to protect the motherboard. As always, the RAM socket and expansion card slots uses through hole connectors, as shown in our photo above; SMT (Surface-mount technology) is not capable of withstanding higher mechanical stress required for this purpose.
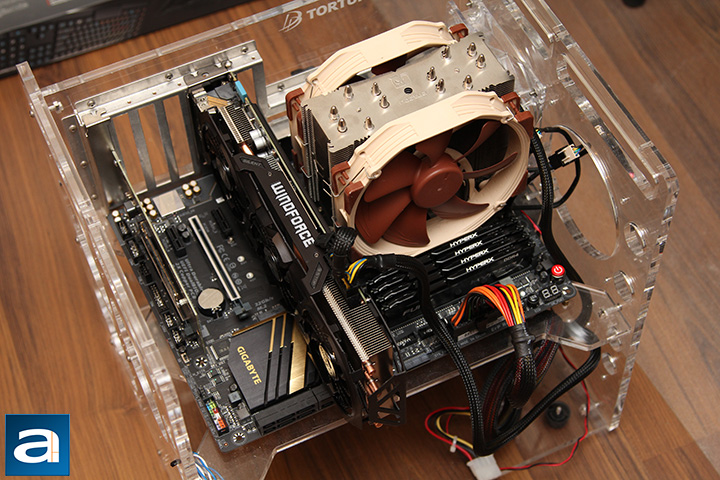
Within close proximity of the LGA1151 processor socket is the usual array of items -- components relating to the CPU voltage regulator circuit, as well as the two corresponding heatsinks. The heatsinks as well as the exposed components in general are low profile, so I have experienced no problems in installing large heatsinks such as the Noctua NH-D15. The CPU socket pins are fifteen micron thick gold plated for best reliability. With Skylake desktop processors, voltage regulation is now back onto the motherboard due to heat generation at high frequencies; an undesirable side effect for enthusiasts looking to overclock their CPUs. As such, the GA-Z170X-UD5 features a twelve phase digital PWM power design. Since steady and precise level of voltage control is required for performance tuning, we will explore the board's overclocking potential later on in this review.
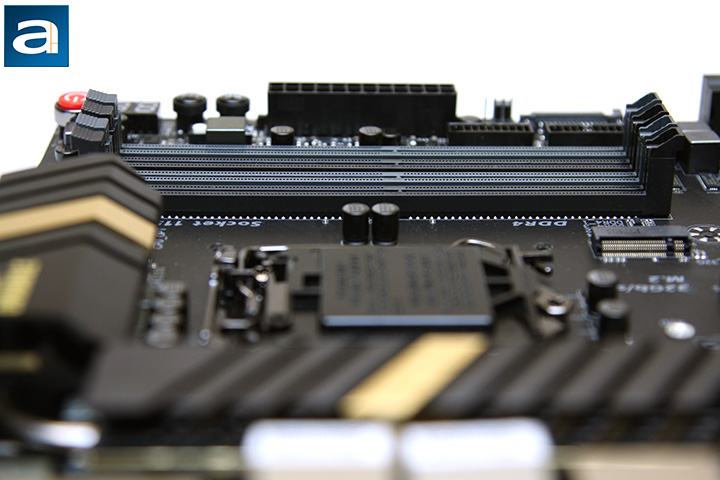
The RAM slots are placed a fair distance from the CPU socket, and it is about as far as you can physically put it. You will very likely experience clearance issues with the inside slots if you have memory with tall heatspreaders in conjunction with a large CPU heatsink/fan. That said, many RAM manufacturers are aware of this issue, so low memory kits with low profile heatspreaders are quite common today than it was a couple of years ago. Such example would be the Kingston HyperX Fury HX426C15FBK4/32 4x8GB I will be using to test with this motherboard. The outermost slot is DIMM 1, while the one closest to the processor socket is DIMM 4. The ATX 24-pin power connector is placed along the side of the motherboard as far as standard design is concerned.
A good number of user accessible functions can also be found in this area as well. This includes an array of voltage test points is on top of the memory sockets. Along the edge, there is a large red power button, debug LED display, reset button, clear CMOS, ECO button, and OC button. The debug LED displays a code corresponding to the boot sequence, so if there are any issues preventing your system from starting, you will not have to debug a series of beeps just to get things going. Meanwhile, the ECO button optimizes BIOS settings for power savings, and the OC button loads optimized overclocking settings for your system. Below the ATX 24-pin power connector, there is a 4-pin fan header, two USB 3.0 headers, and SATA power connector for supplying auxiliary power to the PCI Express slots.
There are two 4-pin fan headers intended for use with the CPU fan on the GA-Z170X-UD5. The white one is labeled CPU_FAN, while the black one is labeled CPU_OPT. CPU_OPT is designed for water cooling pumps. What it does is it can operate at full speed in order to accommodate water pumps, which is very convenient for those with closed loop systems.
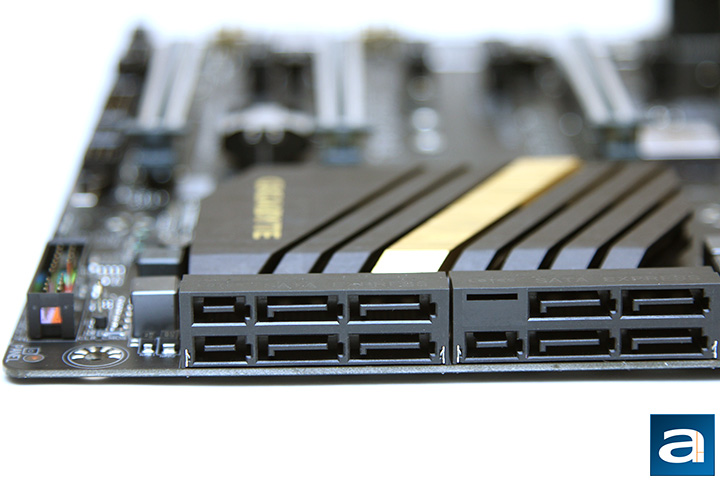
Eight standard SATA 6Gb/s and three SATA Express connector are angled perpendicular to the motherboard for optimal cabling convenience. Although they are placed in two separate blocks, all of them except for Port 6 and Port 7 are native to the Z170 chipset; and supports RAID 0, 1, 5 and 10. Port 6 and Port 7 are powered by an external ASMedia ASM1061 chip. This is a pretty good layout in my opinion, and it is quite optimal as far as cabling is concerned.
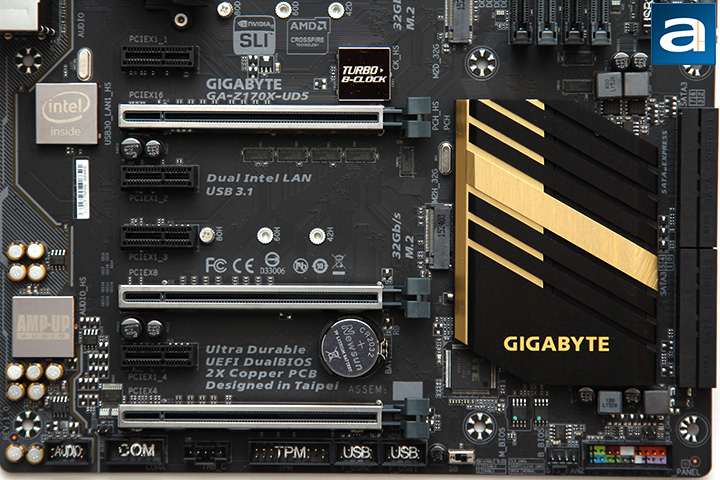
The PCI Express 3.0 expansion slots follow the M.2 port at the top as aforementioned, and are ordered as follows: PCIe x1, PCIe x16, PCIe x1, PCIe x1, PCIe x16, PCIe x1, and another PCIe x16. On top of the first PCI Express x16 slot is a Turbo B-Clock IC, which is allows high precision base clock adjustment. Moving to the physical side, one of the highlights of the Gigabyte GA-Z170X-UD5 motherboard is its metal shielded PCI Express graphics slots. Traditionally, all slots are made out of plastic, but Gigabyte decided to use a one piece stainless steel piece to provide up to 1.7 times higher resistance to shearing forces and 3.2 times better retention force to support heavy graphics cards. However, do keep in mind that only the first PCIe x16 slot is a "true" PCIe x16 slot; the second one will have a nice sharing-is-caring session with the first slot if a graphics card is installed to become two x8 slots. This is due to limited availability of PCIe lanes provided by Skylake processors. The third slot is not even a true x16 slot by any means; it only gets four lanes allocated to it from the chipset -- and becomes unavailable when the second M.2 port located between the two PCI Express graphics slot is populated. So while you can technically install a video card there, you will not get full bandwidth. The top PCIe x1 slot will only support relatively small cards, as space is tight. There are no PCI slots on the Gigabyte GA-Z170X-UD5, and I am happy the legacy interface is finally gone.
An array of internal headers can be found at the bottom of the Gigabyte GA-Z170X-UD5. From the left, we have front panel audio, S/PDIF, serial, Thunderbolt, TPM, two USB 2.0, dual BIOS switch, 4-pin PWM, and front panel I/O. Next to the case I/O block are two pins used to clear CMOS when shorted, so you do not need to remove the CR2032 battery located between the two lower PCI Express graphics slots. This may be redundant, because this motherboard already features a dedicated clear CMOS button. As always, there are two BIOS chips soldered directly onto the Gigabyte GA-Z170X-UD5; one main, and one for back up. Generally speaking, good placement of connectors in this segment of the motherboard is usually very challenging, and Gigabyte has done an excellent job of organizing it in an efficient and user friendly manner in my opinion.
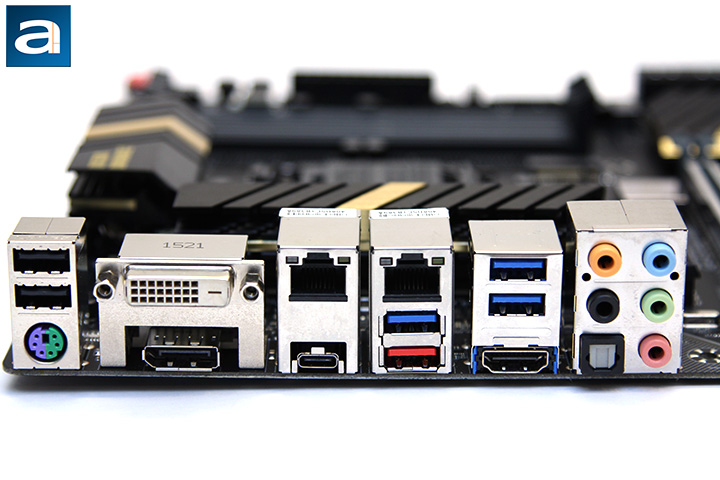
The back panel offers a generous array of available external connectors. It features one PS/2 connectors provided by its ITE IT8628E chip. Why anyone would need any PS/2 ports in 2015 is beyond me, but hey -- at least they are there. There is a total of three USB 3.0 ports; two adjacent to the Gigabit Ethernet jack on the first block, and two adjacent to the HDMI connector on the second block. They are all native to the Intel Z170 chipset, and so are the two USB 2.0 ports located at the top. New to the Gigabyte GA-Z170X-UD5 is a USB Type-C with USB 3.1 support, as well as a standard USB 3.1 port in red. Both of them are powered by an Intel USB 3.1 controller via two PCI Express 3.0 lanes. On the topic of USB ports there are no on/off charge functions we have seen on previous Gigabyte mainstream performance products. Also, more USB ports will be nice, but this is not bad at all.
Moving on, we have three video connectors. This includes a DVI-D, DisplayPort, and HDMI output. I am happy to finally see DisplayPort in place of VGA. DisplayPort is vastly superior in every practical way compared to legacy ports like DVI and VGA, especially since you can daisy chain multiple monitors together. An Intel Gigabit Ethernet with cFosSpeed controller makes for two LAN jacks with teaming support. An Intel based network solution is always desirable due to performance reasons. The rest are audio connectors based off the Realtek ALC1150 codec rated at 115dB SNR; an optical output can be seen in addition to the five standard 3.5mm analog jacks. High quality audio grade capacitors are used, and the motherboard comes with a dedicated rear audio amplifier. There is no coaxial output. The dedicated audio zone is electrically separated from the rest of the components to reduce noise. To give the user a visual cue of this design, an ambient LED strip lights up the audio guard path for some cool eye candy.
As most motherboard models perform almost identically, we chose to play around with the Intel Core i5-6600K CPU to test the Gigabyte GA-Z170X-UD5's potential performance in overclocking. The CPU used is a sealed retail processor purchased anonymously at a local retail store.
Our test configuration as follows:
Compared Hardware:
- Gigabyte GA-Z170X-UD5 (Intel Z170, $190 at press time; Turbo Boost enabled)
- Gigabyte GA-Z170X-UD5 (Intel Z170, $190 at press time; CPU overclocked to 4.7 GHz)
Common Specifications:
CPU: Intel Core i5-6600K
CPU Cooling: Noctua NH-U14S (Dual fan)
RAM: Kingston HyperX Fury HX426C15FBK4/32 4x8GB
Graphics: Gigabyte G1 Gaming GeForce GTX 960 4GB
Chassis: Danger Den Torture Rack
Storage: Kingston HyperX Predator PCIe 480GB
Power: FSP AURUM CM Gold 650W
Sound: Integrated
Optical Drive: None
Operating System: Microsoft Windows 10 x64
Page Index
1. Introduction, Packaging, Specifications
2. Bundle, Chipset, BIOS
3. A Closer Look, Board Layout, Test System
4. Benchmark: AIDA64 CPU
5. Benchmark: AIDA64 FPU
6. Benchmark: AIDA64 Memory
7. Benchmark: PCMark 8
8. Benchmark: 3DMark
9. Benchmark: PassMark PerformanceTest 8.0
10. Benchmark: SuperPI 1M, Cinebench R15
11. Onboard Sound Frequency Analysis
12. Overclocking and Conclusion