Page 2 - Bundle, Chipset, BIOS
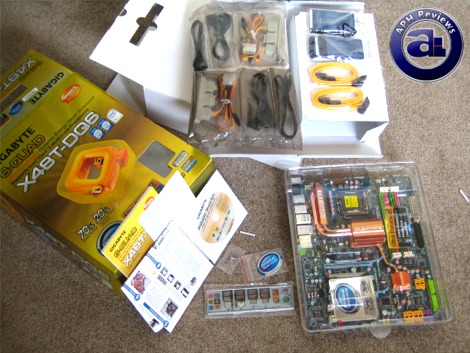
Everything is packed independently in the box -- in addition to the clear plastic motherboard tray with cover and separate accessories box, the cables and the such are packaged in sealed plastic bags in such form that has independent compartments each for optimal neatness and organization. Out of the box, you will receive the following:
- 1x Gigabyte X48T-DQ6 motherboard
- 1x PATA cable
- 1x FDD cable
- 2x SATA cables
- 2x Molex to SATA converter cable
- 2x eSATA cable
- 2x dual eSATA and single Molex PCI backplate
- 1x back I/O shield
- 2x screws
- 1x motherboard manual
- 1x CPU install guide
- 1x hardware installation poster
- 1x drivers/utilities DVD
- 1x case badge
- 1x Dynamic Energy Saver badge
Nothing excessive in this area, but there's certainly no lack of accessories. Personally, I find the dual eSATA/Molex backplate the most interesting -- now you can have some Molex power connectors at the back of your case. I don't see the use for it too often, but once in a while I do wish that I had one.
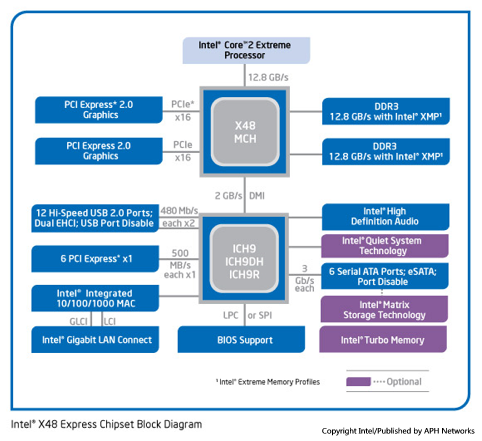
The chipset diagram of Intel's X48 chipset, as obtained from Intel's website. The Intel X48 chipset is essentially an optimized X38 chipset; complete with official 1600MHz FSB QDR (400MHz actual FSB) support. With offering native support for 1600/1333/1066/800MHz system bus measured at quad data rate, this X48 board will have absolutely no issues handling the latest quad core Yorkfield 45nm processors out of the box.
PCIe 2.0 is available on the Intel X48 as well, as with its initial introduction into the Intel chipset line through the X38. Another improvement over chipsets prior to the X38 is a total of 32 lanes offered by the X48 Northbridge (As identical to the X38 chipset), dual full PCIe x16 lanes for multi-GPU configuration is supported natively delivering up to 16GB/s theoretical bandwidth per port.
Intel's XMP support is available by default as a feature of X38/X48 chipsets -- basically the Intel version of NVIDIA EPP. Although it is less likely to pose any difference for enthusiasts defining manual settings regardless, it may come in handy or convenient for different types of users. I found this quite useful for booting RAM out of the box with XMP programmed memory, but other than than I ended up in the BIOS defining the settings manually anyway.
The Gigabyte X48T-DQ6 continues to use Intel's excellent ICH9R Southbridge, as it's typically paired with the X48 Northbridge like P35 and X38 based boards. This enables native support for up to 12 USB ports. 6 SATA and eSATA are also available out of the box. As usual, disk configuration can be made in RAID 0,1,5,10, or JBOD on ICH9R with Gigabyte's X48T-DQ6. Similar to the ICH8 series chipsets, PATA support is dropped and is left to third party controllers to enable this feature -- the Gigabyte X48T-DQ6 has both PATA and floppy support out of the box through third party controllers.
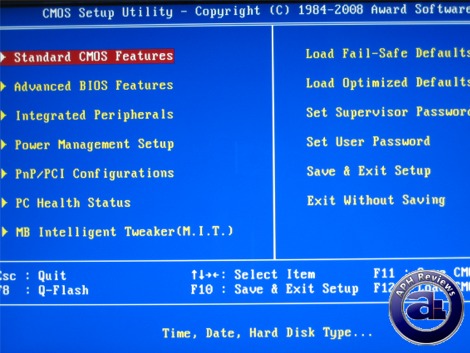
The Gigabyte X48T-DQ6, like other Gigabyte boards, uses an Award BIOS -- interestingly, I haven't used it since I've had my Pentium III based computer. It's not that I am not familiar with it, hard to use, or even anything to that extent -- it's just that I've grown a little to used to the tabbed design with clean lists with American Megatrends BIOSes typically used by Asus motherboards. Regardless, Award BIOS is quite simple in terms of pages, so newer users probably won't need to go through 5 tabs and 10 pages before finding the option they want.
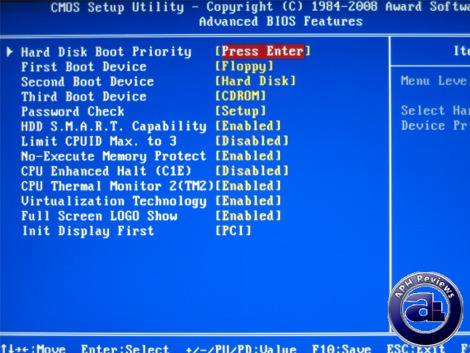
The Advanced BIOS features page. Boot devices, boot order, boot screen options, and basic CPU features options can be set here.
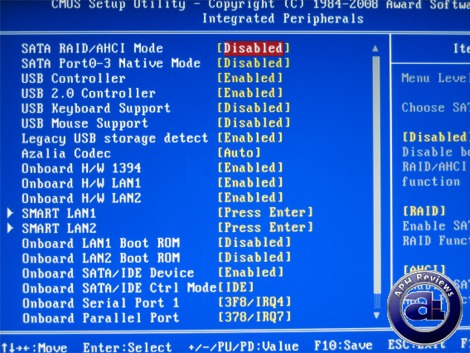
The Integrated Peripherals section, as its name suggests, allows you to configure (Enable/disable, as well as any other available options) of any onboard devices such as sound and LAN. Make sure you enable USB keyboard and mouse support here; I find it a bit awkward how they are not enabled by default -- causing our USB keyboard to not work half the time unless within Windows. Personally I find this option sort of useless and should be enabled by default; most people use USB keyboards anyway -- and newer users may not be aware of this setting. Thanks to a Gigabyte EX38-DQ6 board user for the tip!
All options are available on one page and a little more for scrolling.
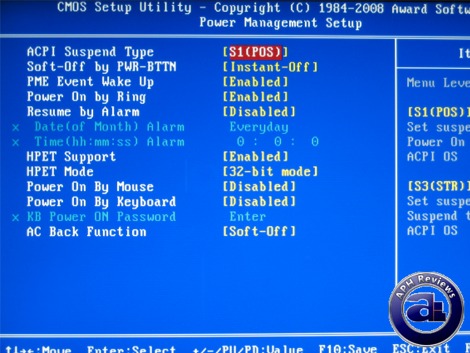
The Power Management page.
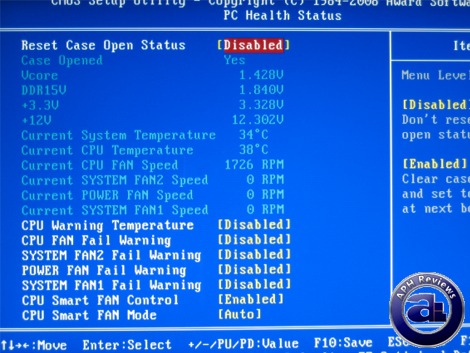
The PC Health Status page, for quick BIOS checks of temperatures, voltages, and fan control options. As far as fan control options, I find it a little less robust than all the Asus motherboards I've come across, but other than that to my personal preference (Quietness) it works nearly as well for slowing down the fan over the CPU heatsink.
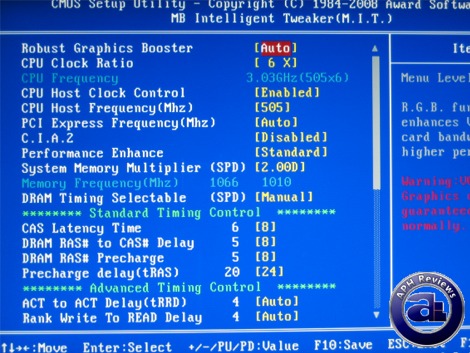
Let's move on to everyone's favorite -- the overclocking options page, otherwise known as the "MIT" page (Is there a pun intended? Haha), which, apparently, stands for 'Motherboard Intelligent Tweaker'. That aside, a complete array of options are available for the enthusiast user, although I did find a few a bit awkward to use. Running through a couple options quickly allows me to set the multiplier and FSB of the CPU, and the resulting overclocking frequencies for both RAM and CPU will be listed on the same page, as you can see in the shot above. CPU FSB is set by the user entering an integer value, which saves a lot of time scrolling through long lists when overclocking.
The "System Memory Multiplier" section allows the user to define memory frequency in relation to FSB frequency, as well as FSB strap to Northbridge speeds. The options are listed on the side, where the FSB to memory frequency is listed as a ratio in decimal form -- at times I find that a bit weird. They are used in combination with letters A, B, C, or D to represent the Northbridge strap frequency labeled on the side, but regardless it took me more than a few understand to understand what Gigabyte meant in the BIOS.
The DRAM timings can be set manually once the "Manual" option is enabled for "DRAM Timing Selectable".

Scrolling down to the bottom reveals the rest of the overclocking options. Primarily are the voltage options; where many of the options are very flexible that should appeal most enthusiasts. Voltage options permitted includes:
RAM Voltages: 1.5V-3.05V
PCIe Voltages: 1.5V-2.25V
FSB Voltages: 1.10V-1.41V
MCH Voltages: Default 1.45V; 0.025-0.775 overvoltage - default ~0.2V undervoltage
CPU Voltages: 0.50V-2.35V
Generally speaking, those are some very generous voltage controls that's good enough to fry most of your hardware if set to the max. Remember guys, don't let your kids touch the BIOS if you have an X48T-DQ6. Results may be drastic!
As far as the Loadline Calibration goes, I found it extremely ineffective in use. This BIOS option is basically a vdroop reducer to allow CPU voltages to be more stable under load. During our overclocking tests, when we set the BIOS voltage to 1.4375V, the load voltage drops to 1.408V, which is not really optimal in my opinion.
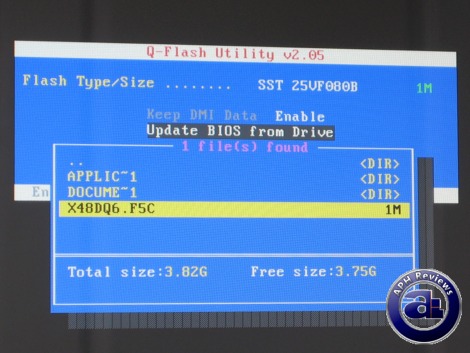
Like many modern motherboards, the BIOS can be flashed with an internal utility. The BIOS flash utility built into the Gigabyte X48T-DQ6 motherboard incorporates a relatively simple design. I used an USB flash drive with the BIOS file for flashing -- in which I experienced absolutely no problems in the progress of doing so. The default BIOS naming format is listed with the motherboard model followed by the BIOS revision as the extension.
The Gigabyte X48T-DQ6 is built with four ways -- to which Gigabyte refers to as "Quad BIOS" -- of retaining a copy of the BIOS. Of course, one of them is the BIOS chip, but there's a second one just in case a bad flash occurred and a quick recovery is needed. The third and forth BIOS recovery methods include CD and storage drive; which is more or less a marketing thing in my opinion to rank up the 'quad' name.
Page Index
1. Introduction, Features, and Specifications
2. Bundle, Chipset, BIOS
3. A Closer Look, Board Layout
4. Test System; Benchmark: 3DMark06
5. Benchmark: PCMark05
6. Benchmark: Cinebench R10, SuperPI 1M
7. Benchmark: EVEREST CPU
8. Benchmark: EVEREST FPU
9. Benchmark: EVEREST Memory
10. Benchmark: EVEREST Memory Latency, HDTach 3.0.1.0
11. Onboard Sound (RMAA 6.06) Analyzation
12. Overclocking and Conclusion


