Page 4 - Installation and Conclusion

Component installation into the NZXT H2 is a breeze. Starting with the motherboard, the standoffs came first, followed by securing of the motherboard itself in place. Standoff installation can be a pain sometimes, but not with the included tool to install them. It is little more than a socket wrench-esque attachment; however, instead of using a wrench, it uses any Phillips head screwdriver. Using the attachment ensures standoffs are installed securely, and could avoid problems in the future when removing the motherboard. Next up, I installed the Cooler Master Silent Pro M 1000W using the included screws. This was about the hardest part of the installation process -- and it wasn't very hard at all.
For this build, I chose to recycle all of my old parts, including my old OCZ Gladiator heatsink. Although this heatsink is not the tallest, it can be problematic in some cases. However, the NZXT H2 supports heatsinks up to 170mm in height, which would be just about right for tower heatsinks such as the Thermaltake Jing; specified 162mm in height.
Routing the rest of the wires is quite simple, although this may not have been the neatest cabling job (Actually, it's pretty terrible, haha. - Editor). It is possible to cable some of the things through the back using included cutouts for neater cabling. Despite that, there were some cabling issues for my power supply, since it has some unused cables that were not modular, and it took up space. On the other hand, the rest of the cabling job was easy, since the front panel connectors were already pre-routed through the back of the motherboard tray to the bottom cutout by the manufacturer.
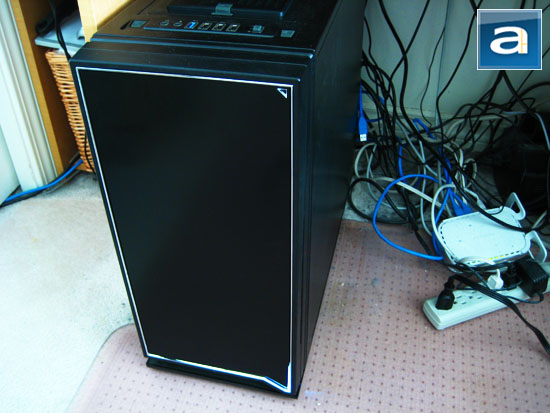
After looking at this picture, I noticed how messy my cables are. I've been meaning to work on this for a while, but I guess today would be a great day to get it fixed and looking spick and span.
After completing full installation of the parts into the NZXT H2, it still looks about the same on the outside as before. The one difference is when the whole system is powered on, a white LED shines from the bottom right corner. That little V shaped cut illuminates the area, similar to what one would expect to see from a nightlight. Its corresponding white HDD activity LED is located at the top. This just screams clean and class to me, and instead of using the usual blue LEDs, they chose to use white, which works quite well with the theme of the case. It really does show how well built the case is; however, the only problem I can foresee is the front panel being a fingerprint magnet. It seems like everything that looks good nowadays is a fingerprint magnet, and the front panel is no different.
With the included three level fan controller, noise on this chassis is not that big of a deal. On a scale from 0.0 to 10.0 where 0.0 is silent and 10.0 is the loudest, the fans at the highest setting would come in at around a 2.0 in my personal opinion. It barely produces any sound when running, and only has a slight buzzing noise when putting your ear next to the case. Of course, this is all subjective, but for some people, turning down the fan speed can help in further noise reduction.
-----------------------------------------
All in all, the NZXT H2 is a great case, from the clean design right down to the decent build quality of the overall chassis. Even though it may not be as refined as the Fractal Design Define R3 and Define XL, it still hold its own against its competitors. Looks alone do not define a case, but in this case (No pun intended), it certainly helps. I particularly enjoyed the aesthetically pleasing front panel, unique white LED, and different panels on top of the case. To top it off, not only is the outside spiffy looking, but the inside is as well. Despite the fact that the installation of the 3.5" and 5.25" drives are not truly screwless, they are still very easy to use and work with, like stealing candy from a baby (Not saying that I would or have ever done, haha). It may even be fair to say that these two systems are some of the best we have seen in all of our case reviews. In addition, there is an integrated SATA hard drive dock at the top of the case, which is well hidden by a plastic panel that can easily be removed as well. The most interesting aspect of the installation is the two front 120mm fans. They are magnetically attached, and are easy to remove and reattach to install 3.5" drives. The only downside is you cannot easily replace them with aftermarket ones. At the very bottom, there is also a big filter in order to prevent dust from entering the system, if you ever decide to place it in a spot with a higher concentration of dust. At first, I had wondered how it would be possible to outdo the NZXT Phantom, but after using the NZXT H2, I am pleasantly surprised to say that it could easily grasp the attention of users such as myself. Even for a case that is not as big as the Phantom, they were able to implement a three speed fan control system as well as a USB 3.0 port, which many cases nowadays are still missing. On the other hand, the case is still a fingerprint magnet, and the front panel only swings in one direction. Overall, it is hard to deny how commendable of an overall package the NZXT H2 is. Priced around $100 at press time, it is a very decent mid-tower -- especially for those who appreciate its slick appearance.

NZXT provided this product to APH Networks for the purpose of evaluation.

APH:Renewal Award | APH Review Focus Summary:
8/10 means Definitely a very good product with drawbacks that aren't likely going to matter to the end user.
9/10 means Excellent product with very minor drawbacks that does not affect the overall product.
-- Final APH Numeric Rating is 8.1/10
Please note that the APH Numeric Rating system is based off our proprietary guidelines in the Review Focus, and should not be compared to other sites.
If you are looking for a good quality, clean looking, fully featured, and noise optimized chassis that's not bland to look at, the NZXT H2 is the case you have asked for.
Do you have any comments or questions about the NZXT H2? Drop by our Forums. Registration is free, and it only takes a minute!
Page Index
1. Introduction, Packaging, Specifications
2. Physical Look - Outside
3. Physical Look - Inside
4. Installation and Conclusion


