Page 5 - Configuration and User Interface, Part II
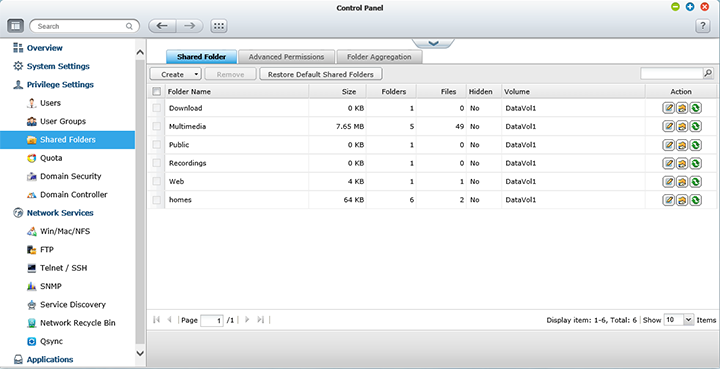
Continuing in the Control Panel, under the Privilege folder tree are six options: Users, User Groups, Share Folders, Quota, Domain Security, and Domain Controller. The Domain Security section provides different authentication options, including local user, active directory, and LDAP authentication. Domain Controller allows you to enable or disable this feature, as well as change its AD server name, domain name, domain username, and password. In the Users screen, a table lists all users in the system, as well as their respective independent disk quota and account options. You will also have the option to search, create, multiple create, and delete accounts here. Four icons represent four different account functions; of which they are Change Password, Edit Account, User Groups, and Private Network Share. In the Shared Folders screen, it lists an array of folders on the system, similar to the table displayed for the Users screen as shown above. It also shows each folder's size, folders within, number of files, and if it is hidden in their respective column. Again, there are three management options for each folder: Properties, Access Permissions, and Refresh. Pulling up the Properties menu gives you the option to set the folder's path (If you have multiple single disks installed, you can also set which drive it belongs to), hide or show the folder, as well as locking the file. You can also enable write-only accesses over FTP. The Quota screen allows you to configure universal disk quotas. Individual disk quotas can be set in the Users section.
Next up on QNAP's TVS-463 web configuration menu tree in Control Panel is Network Services. This includes Win/Mac/NFS, FTP, Telnet/SSH, SNMP, Service Discovery, Network Recycle Bin, and Qsync. Other than Qsync (Another pseudo menu item that actually opens a new window, which we will talk about later), each item should be self-explanatory -- most of them are just enable or disable the service, and configure a couple settings such as default port number. Particulars that are more interesting under Microsoft Networking, which you can configure it to be a standalone server, Microsoft AD Domain member, or LDAP Domain Authentication. Here you can configure its server description and workgroup. You can also enable WINS server or use specified WINS server. In the Service Discovery function, there are two tabs: Enable/disable UPnP discovery service, and broadcasting services through Bonjour. These services include NAS Web, SAMBA, AFP, SSH, FTP, HTTPS, and DLNA.
Lastly, the Applications submenu shown above is quite straightforward as well. Most of the listed sections, as you can see in our image above, are simply used to enable or disable their respective services. Features such as Station Manager lets you enable or disable Photo, Music, File, Download, and Surveillance stations. Download Station allows you torrent things through the QNAP TVS-463, and Surveillance Station works in conjunction with compatible camera models. The TVS-463 is licensed for up to four cameras out of the box. In the Web Server screen, you can enable or disable its HTTP server, set its default public port, enable/disable WebDAV, and turn on php.ini maintenance. One to note in particular is the MySQL server -- the QNAP TVS-463 has built in PHP and MySQL support, as well as an option to install phpMyAdmin using the App Center, in which we will talk about later.
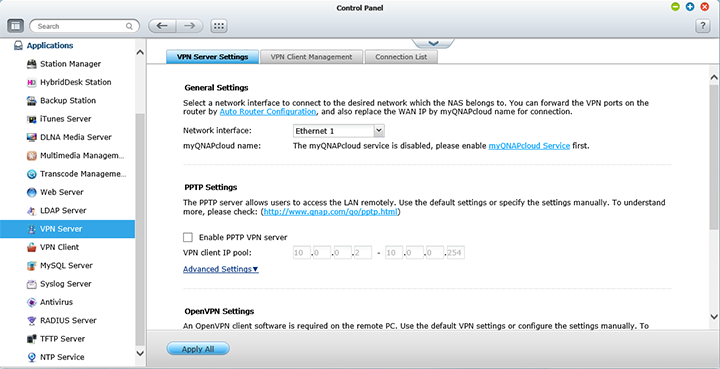
Other applications of interest include Syslog, RADIUS, and TFTP servers; along with a built in antivirus for an extra touch on security. The RADIUS server is an integrated version of the open source FreeRADIUS software; while its antivirus feature runs off ClamAV. Our screenshot above shows the VPN service configuration screen on our NAS. The Transcode Management application allows you to transcode videos on your QNAP TVS-463, but you are probably better off doing it on your desktop with more processing horsepower. This is not to mention the system cannot handle 4K videos.
Earlier on in this review, I have conveniently skipped over the Photo Station, Music Station, and Video Station. With Web Server and application stream enabled under the Bonjour tab in Network Service Discovery on your NAS, you can stream media directly from your file server to your Apple iOS based device through QNAP's Qmusic app (Available for free in the App Store). The app is available for Android as well in Google Play. Qmusic works over WiFi and data, so as long as your network attached storage is web accessible, you can access your music from anywhere with internet access. Where data coverage may be unavailable, you may also cache songs onto your mobile device ahead of time. Other available applications include Qfile, Qmanager, Qmobile, Qremote, and VMobile. Using the right program, you can upload images, manage files, and view surveillance footage using your favorite mobile device.
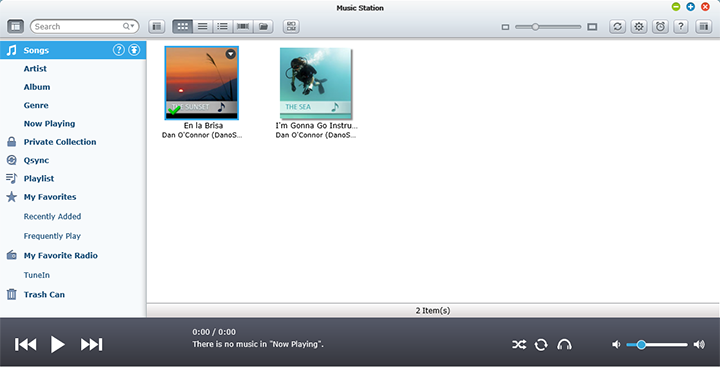
The Music Station is a built in music player with full-fledged library functions, and a clean user interface. Our screenshot above demonstrates this functionality; it is almost like running a desktop media player straight from your computer. Music Station supports streaming from other UPnP devices on your network, as well as internet radio support. You can even use it to share some music with your friends; just watch out for the copyright police.
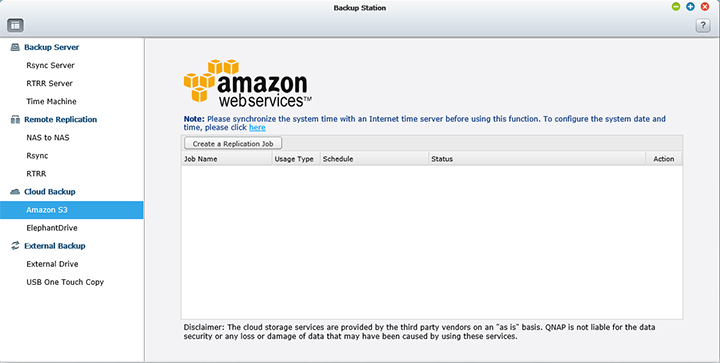
The Backup Station window has four subsections. These include Backup Server, Remote Replication. Cloud Backup, and External Backup. NAS to NAS lets you configure your QNAP TVS-463 to copy data to a remote server of the same NAS series, and backup from remote server to the local server as well. You can also set its port number, and allow/disallow remote Rsync server to back up data to the local system. RTRR can be enabled, as its name suggests, for Real Time Remote Replication. Cloud Backup provides support for Amazon S3 and ElephantDrive, where you can upload data from your NAS to the respective services, and vice versa.
The TVS-463 also has Apple Time Machine with Mac OS X support. Once enabled, you can use the NAS as one of the Mac OS X Time Machine backup destinations. In the External Drive screen, you can back up select data on your NAS to an external drive connected via USB. Last, but not least, is USB One Touch Copy, which configures the function of the front one touch copy button. You can use it to copy data from an external drive to a specific directory on the NAS, or copy data from a specific directory on your NAS to the external drive. Other options include Smart Import, which only copies items changed since the last operation, as well as an external storage device, which treats the front connection as an external storage drive like it is connected to the back.
Page Index
1. Introduction, Packaging, Specifications
2. A Closer Look - Hardware (External)
3. A Closer Look - Hardware (Internal)
4. Configuration and User Interface, Part I
5. Configuration and User Interface, Part II
6. Configuration and User Interface, Part III
7. Performance and Power Consumption
8. Conclusion


