Page 2 - A Closer Look
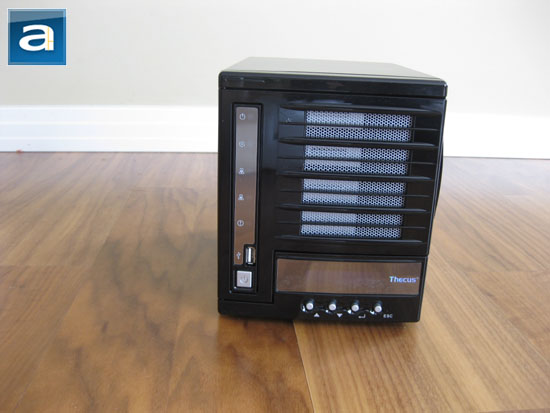
The Thecus N4100PRO incorporates the physical attributes of a standard network attached storage type device. The looks and dimensions are quite common amongst products of this nature; in my opinion I found that the QNAP TS-409 NAS device to be much more visually attractive across the board. But what the QNAP TS-409 does not have that the N4100PRO does is the array of front panel buttons, and a unique status LCD screen next to the Thecus silver logo strip. I can tell you right off the bat that the N4100PRO is more practical in this area. Plus, who looks at their network appliances while in use, anyway? I know I don't -- mine is residing happily in my basement.
While the black-and-grey Thecus N4100PRO NAS may appear boring at first, there are a lot of things to like about it. The silver strip that extends from the top to bottom on the let side has an array of LEDs, an USB port, and of course, the power button. The front USB port allows easy and convenient one-touch backup of USB mass storage devices such as USB flash drives. Each LED indicates different information, such as power status, drive activity, two LAN port status/activity (There are two Gigabit ethernet ports), and an error indicator. The blue-backlit LCD in front presents interesting information right off the bat such as "Booting" when you start the device, and scrolls between fan RPM, temperature in Celsius and Fahrenheit, date and time, uptime, hostname, WAN IP, LAN IP, and RAID status automatically when loaded. While the LCD screen displays an excellent amount of information during the boot process and in regular usage, I feel that it is recessed too much behind the thick front panel, it is impossible to view the entire screen unless looking at it directly. On the positive side, the text are sharp and distinct.
The four buttons (Up, down, Enter, and ESC) below the LCD screen allows the user to navigate the LCD screen. For example, the shutdown sequence goes as pressing the Power button, and the press "Enter" -- all instructions displayed on the screen.
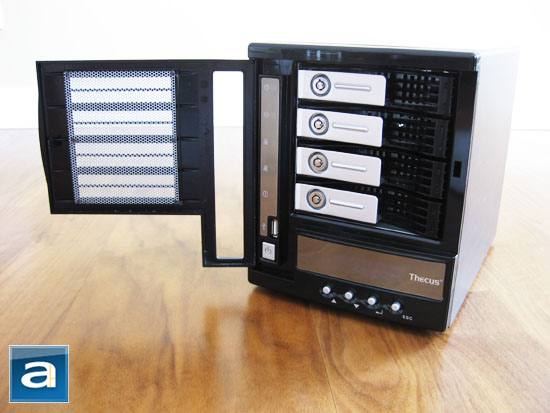
Nearly the entire front fact of the Thecus N4100PRO network appliance is made of plastic. The plastic case door swings to the left; where locks are implemented on each hard drive tray rather than the door itself. This discourages easy theft of hard drive more effectively in my opinion than having a lock on a flimsy plastic door. The four hard drive trays are well ventilated with carefully designed openings placed at the front of each tray; while individual lock levers 'secures' them inside. A plastic mesh can be seen at the front of the network attached storage for ventilation as well.
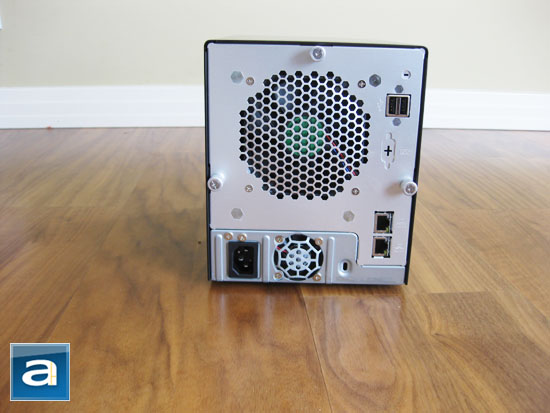
The back panel of Thecus' N4100PRO NAS is built entirely of steel, as juxtaposed to the material used in other parts of the case such as the front and the shell cover. Three thumbscrews are implemented at the back for easy chassis cover removal. It's interesting how the non-removable thumbscrews allows the user to disengage pretty much the entire "guts" of the NAS, slide it out a bit, to release the one-piece panel cover. Nevertheless, there's no annoying and useless warranty seals that prohibits the end user from taking the N4100PRO apart -- which I definitely appreciate -- not to mention that it's completely done tool-free.
There are two additional USB ports at the back of the Thecus N4100PRO; as this network appliance is not only designed for storage -- it can also act as a print server, as well as relating to USB WiFi dongles for wireless usage. Below it are two Gigabit ethernet ports; the top is a WAN port while the lower is a LAN port, as designated by Thecus. Distinctively, a 200W power supply covers almost the entire bottom of the N4100PRO, with a small 40mm fan for heat exhaust. The main unit is cooled by an 92mm ADDA AD0912MX-A76GL ball bearing fan, hidden behind a cut honeycomb grille. ADDA's the same company that manufacturers fans for many excellent and silent Seasonic power supplies.
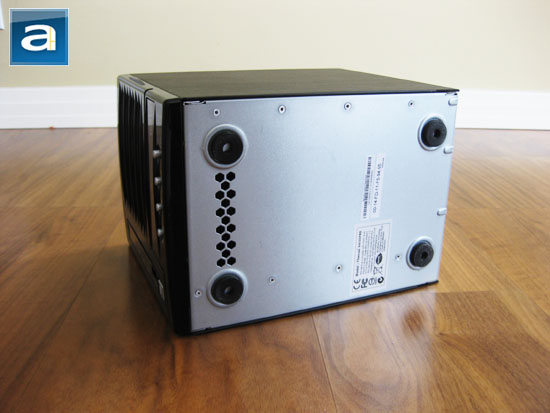
The bottom of the N4100PRO is supported by four black rubber feet to prevent surface scratching as well as reducing vibrational noise. A small honeycomb grille is cut into the steel surface for additional ventilation. Additional stickers are placed here to show the MAC address, serial number, and other certifications. Like the back of the N4100PRO chassis, the bottom is made of steel; while the shell cover is composed of quality, brushed aluminum painted black.
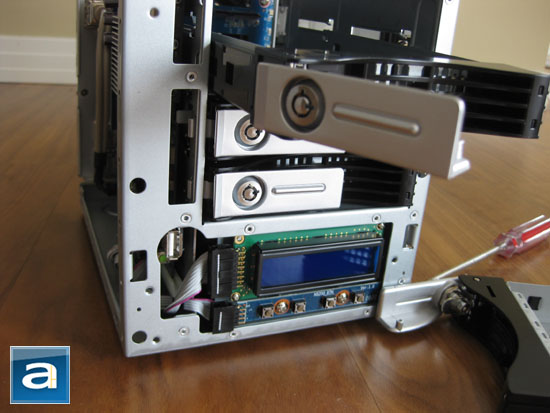
Removing the covers and front panel reveals the base construction of the Thecus N4100PRO. The entire frame is constructed out of steel for structural rigidity, but comes at the cost of being heavier and reduced temperature dissipation ability. The front LCD and its PCB are shown above, with its corresponding cables. Like all standard designs goes, the NAS has a large undivided hard drive cabinet to accommodate up to four Serial ATA hard drives. A combined total of 4TB storage support is guaranteed, with disks able to be configured in RAID 0, 1, 5, 6, 10, or JBOD. Each tray can be locked independently of each other, as mentioned earlier. Pulling an unlocked lever on the hard drive tray out disengages it from the main unit.
Installing hard drives is easy. Using included screws, simply apply four to the bottom of the SATA hard drive. Slide it back in, and the physical installation is complete.
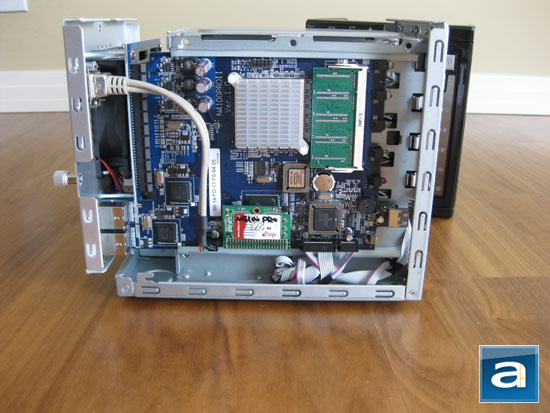
A proprietary motherboard is installed vertically on the left side of the Thecus N4100PRO. A small, passive aluminum heatsink cools the AMD Geode LX800 central processor unit. It is equipped with a removable 256MB DDR2 SODIMM memory out of the box, but that can be easily upgraded. Upping the memory size should give better performance in RAID 5 and 6 modes; as well as SOHO multi-user scenarios. The operating system is stored on a separate 128MB flash card as seen connected to the motherboard via an ATA interface.
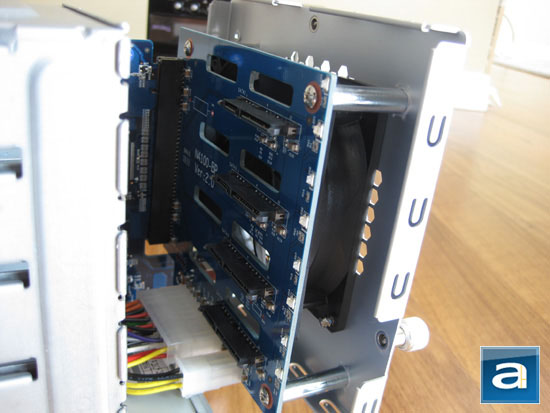
The motherboard is connected to the SATA connector board at the back by a right angle. The fixed SATA data and power connectors are implemented in a standard fashion, while ventilation holes are cut on the PCB above to allow air to flow over the hard drives. As a result, the connector board is installed on top of four risers; just so to allow the fan to fit between it and the back panel.
Page Index
1. Introduction and Specifications
2. A Closer Look
3. Configuration and User Interface
4. Performance Benchmarks
5. Final Thoughts and Conclusion