Page 4 - Installation and Conclusion
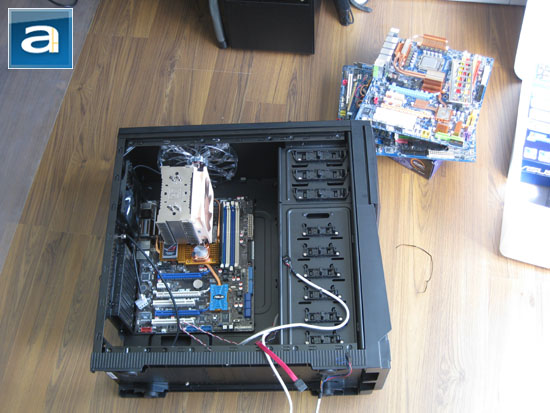
The Thermaltake Armor A90 is surprisingly roomy to work with, so it really does not matter if you install the power supply or motherboard first. Out of personal preference, I dropped in my motherboard prior to the power supply just to get the biggest component out of the way. Screwing in three risers and leaving the rest to integrated tray bumps, the Armor A90 exhibits absolutely no 'gotchas'; making installation as painless as possible. Meanwhile, I also pre-routed the front panel I/O, audio, eSATA, and USB cables to ensure everything is neat and tidy before the power supply comes onto the scene. The front panel connectors actually don't require much work -- but the trick to getting the top panel connectors down neatly is to clip it behind the 5.25" drive bays through a small opening at the top.
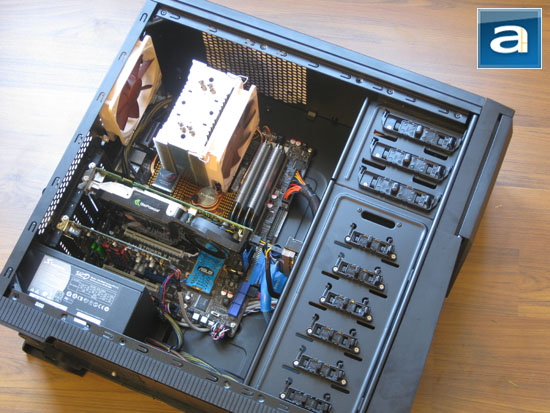
The power supply was a bit more challenging to get in, due to two upper clips implemented to ensure a tight fit. Once installed, then the real wiring fun begins. For the motherboard 4-pin ATX/8-pin EPS connector, it is wise to route it along the expansion card slots and behind the rear fan for maximum concealment. The rest of them are particularly easy to work with, since there is a huge amount of room behind the 3.5" drive rack, so zipping up the cables and tucking them into this space will effectively do its job. It would be highly beneficial if Thermaltake has integrated cable guides around the case, and a bigger gap between the motherboard tray and its adjacent panel to allow the user to pull cables from behind. For thin case wires such as switches and LED cables, you can get away with running them behind the motherboard easily. The above is not exactly the cleanest cabling work I have done in the past, but the Armor A90 is reasonable enough to work with -- especially considering the fact that I used a non-modular power supply with thick cables.
Again, hard drive and optical drive installation is extremely simple thanks to the tool-free installation system. If you want the drives to be installed securely, however, I highly recommend you to go the old fashioned route and attach screws from both sides. The expansion card slots are not tool-free, and getting the blanks out will require some practice at first.

After plugging in everything, our system configured inside the Thermaltake Armor A90 chassis was ready to roll. I hit the large and stylish triangular power button, and my computer came to life as the LED fans emit a sleek blue glow from behind the grille. Your finished system will resemble what I have above to an extent, and here's the subjective part of it: If you look at it and you like it, face, window, and all, then the Thermaltake Armor A90 is a solid choice -- both literally and figuratively -- to consider on your next shopping list.
On a scale from 0.0 to 10.0 where 0.0 is the silent and 10.0 is loudest, the fans would come in at 3.5 subjective sound rating in my opinion. I am quite sensitive to perceived sound volume, and as a quiet PC enthusiast, the stock components inside the Armor A90 is actually pretty good, even if you are kind of picky. Integrated fan controllers to slow down the fans on user preference would give it a few extra checkmarks in my books though!
-----------------------------------------
Let's be honest here. It is absolutely undeniable that Thermaltake offers tremendous value with the Armor A90; coming in at around $70 retail after rebate at press time is quite a deal for a case that tries to be truly different in design... and against all odds, actually does it right. (For the most part, anyway.) But looks is not the only thing the Thermaltake Armor A90 offers. The chassis features refined construction and solid build quality, combined with lots of room as far as a mid-tower is concerned, features and designs catering to the enthusiast, as well as beautiful matte black painted panels all around, makes it an absolute pleasure to work with. The fans are even surprisingly quiet acoustically in operation! We can talk about its shortcomings, such as nearly useless air filters, no real cable management features, poor tool-free installation design, lalalala, but these are not the reasons why the Thermaltake Armor A90 is not my chassis of choice. If my opinion is worth anything, it is easy to make this brilliant looking case a true winner in the books. Firstly, make the side panel window bigger -- drop the fan opening, and just make a much larger window that comes in a unique shape. Secondly, make an included accessory so the user can close off the top air vent if no fan is installed in this location, in order to prevent dust from entering the system. Make these two changes, as well as a few minor refinements I pointed out during this review, would make my "APH Networks edition" dream of the Thermaltake Armor A90 a true reality.
Special thanks to Ramsom over at Thermaltake for making this review possible.

APH equal.balance Award | APH Review Focus Summary:
8/10 means Definitely a very good product with drawbacks that aren't likely going to matter to the end user.
7/10 means Great product with many advantages and certain insignificant drawbacks; but should be considered before purchasing.
-- Final APH Numeric Rating is 7.5/10
Please note that the APH Numeric Rating system is based off our proprietary guidelines in the Review Focus, and should not be compared to other sites.
The Thermaltake Armor A90 is a chassis that tries to be truly different in design -- for the most part and against all odds, has actually been done right, and priced right, all at the same time.
Do you have any comments or questions about the Thermaltake Armor A90? Drop by our Forums. Registration is free, and it only takes a minute!
Page Index
1. Introduction, Packaging, Specifications
2. Physical Look - Outside
3. Physical Look - Inside
4. Installation and Conclusion