Page 3 - Configuration and User Interface
Unlike some of the routers we have reviewed in the past, the TP-Link Deco M5 sells on the basis of not having advanced firmware and features, but rather for its ease of use for the general consumer. The Deco M5 actually has no advanced configuration page, nor is there a browser interface page to access features. To begin, you will need to connect one Deco M5 node to the internet. Next, you can download the TP-Link Deco app from the Apple App Store or Google Play Store. Your phone communicates with the nodes via Bluetooth. Following the onscreen instructions, you can initialize your system and add all of the nodes. Overall, the process is pretty straightforward, though it is pretty slow going. Besides setup, the Deco app controls things like guest access, parental controls, device prioritization, and more. In addition, you will always need Internet access for your Deco M5 to work with the application, even if you are just trying to create a local network. You will also need a TP-Link account to use the app. While TP-Link really does guide you step-by-step to add routers, I felt like it was unnecessary to force users to have both Internet access and a phone to unlock the features of the Deco M5, even if it is probably a nonissue for most people.
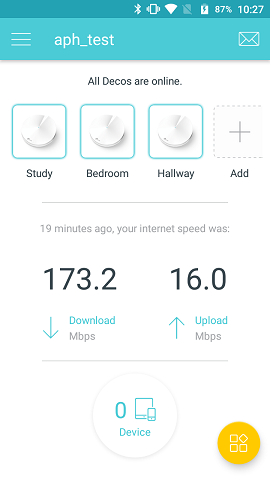
After setting it up and connecting all the nodes, the above screenshot was shown on the main page. All of the screenshots were generated with the Android version of the app, but according to TP-Link, the iOS app is not too different. Overall, the layout of the app is decent, though I did not personally enjoy having multiple places for menu items, including both the side hamburger menu and the bottom yellow button, which is a menu as you will see shortly. I would have preferred all of the menus to be consolidated in one location. Otherwise, the white and blue theme is easy on the eyes. At the top, we have the name of the network with the three Deco M5 nodes shown as connected. If any of them do have any issues, they would individually show up with warnings here. Current download and upload numbers are also displayed here. Finally, the number of devices connected to the network is shown underneath. Pressing the yellow button in the bottom right corner exposes the main functions, which includes Wi-Fi Settings, Parental Controls, Antivirus, QoS, Advanced, Updated Deco, and Managers. I will cover most of these items individually in a moment.
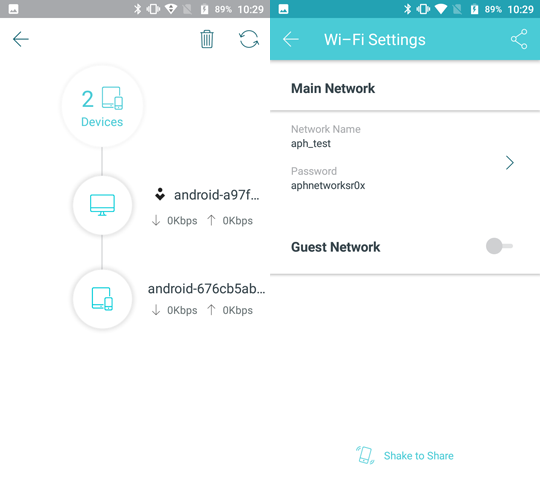
Before doing so, you can tap on the devices button on the front, which displays all the wired and wireless devices connected to the network. This will also show the current instantaneous upload and download speeds of each device. When you tap on the device, it will then show more information including the local IP address and MAC address. On the right screenshot is the Wi-Fi Settings page, where you can configure the SSID and encryption key. There is only one setting for both the 2.4GHz and 5GHz network, and choosing between the two is done automatically. I find it interesting the password is not actually hidden here, which is generally the norm for most passwords. A guest network can be setup here if you desire. You can also shake your device here to share your main or guest network with other users.
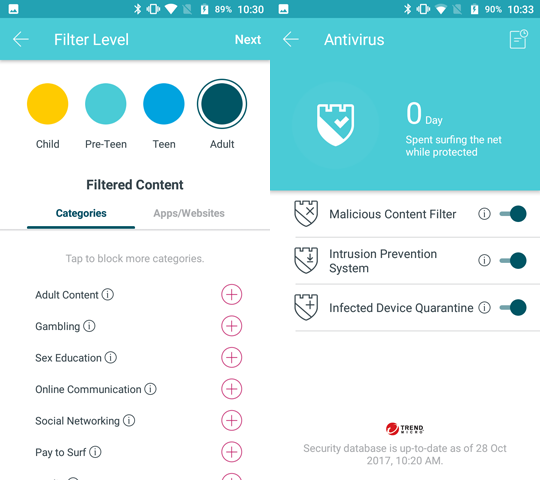
On the left screenshot is the Parental Controls section, which allows you to create profiles for blocking devices for content. You can also setup internet scheduling here to set access times and days of the week for specific devices. Moving to the Antivirus page on the right side, this is a system setup in partnership with Trend Micro to provide virus protection for up to three years of the device's life. Afterwards, you would have to refresh the subscription if you so desire. You can also turn off the antivirus altogether if you do not want it.
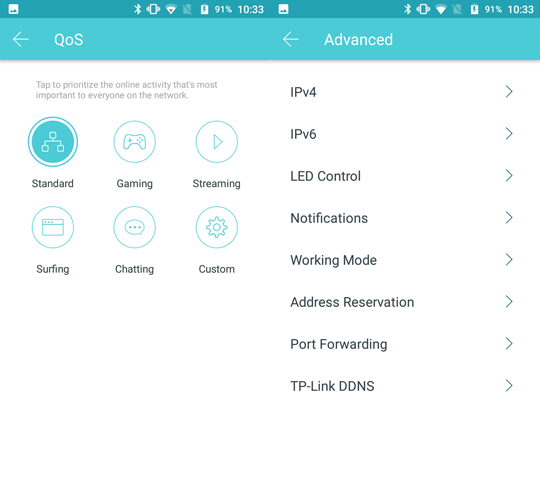
On the QoS page, this is where you can prioritize certain types of traffic over others for different devices. This is not limited to specific applications and is generally a primitive system, but it is also easy to use. Instead, it groups types of activities and prioritizes certain categories over others. On the Advanced page, you can see we have even more options available here. IPv4 and IPv6 is where you can adjust the WAN settings for both protocols. LED Control is where you can turn off the LED on all of the Deco M5 nodes over a certain time period, such as the night time. Notifications allows you to adjust the types of notifications you receive from your phone, such as when a new device connects to your network. Working Mode allows you to choose between making the TP-Link Deco M5 act like a router or as an access point to extend the wireless coverage of your current router. Address Reservation allows you to hold certain IP addresses for specific devices. Port Forwarding allows you to set up rules to enable this feature between internal and external ports. Finally, TP-Link DDNS allows you to enable or disable the DDNS, as well as change the domain name if you so desire.
In addition to all this, the TP-Link Deco M5 can also be setup to work with IFTTT, or If This Then That, as well as with Alexa. IFTTT listens for triggers such as a new device connecting and allows you to do different things with it, such as changing the priority of the activity. This can also be connected to other actions within the IFTTT ecosystem. As for Alexa, this integrates voice commands to allow for customizing your network. Both of these features are coming to other TP-Link routers, but it is pretty cool to see this sort of integration. Overall, the TP-Link Deco app is pretty straightforward to use on my Android device. Unfortunately, there is no browser-based interface to make these changes, even after the system has been configured. I think TP-Link should allow for some sort of web backend to do more changes, so users do not always have to go back to their phone to modify settings.
Page Index
1. Introduction, Packaging, Specifications
2. Physical Look - Hardware
3. Configuration and User Interface
4. Performance Tests
5. Conclusion