Page 2 - A Closer Look, Installation

Screws are not pre-attached to the Vizo Milano's cover out of the box -- since you have to install the hard drive into the enclosure anyway. Quickly taking off the aluminum cover reveals the internals of this media enclosure. Both covers are aluminum, but being that, a good portion of the Vizo Milano is unfortunately made out of plastic. Being an insulator rather than a heat conductor, this may negatively impact heat dissipation away from the hard drive to a certain extent.
A metal frame is included for mounting the hard drive inside the Milano; in which we'll go over in just a second. A quick glance over the inside of the Milano will reveal two separate PCBs; one for the physical buttons on one end of the Milano itself as well as another board for the controllers and processing media. While this may not be anything out of the ordinary for experienced users, we can foresee groups of people that would find it a bit uncomfortable to identify the back of a circuit board, with the circuits showing through, located right below where the hard drive is to be installed.
The hard drive connectors are located on one end with a single Molex and PATA connector. That's right, no mention of SATA -- for a product especially in this category in 2007/2008, I was actually quite surprised when it came to its lack of compatibility with Serial ATA hard drives as it has been the standard for new hard drives for quite a while already.
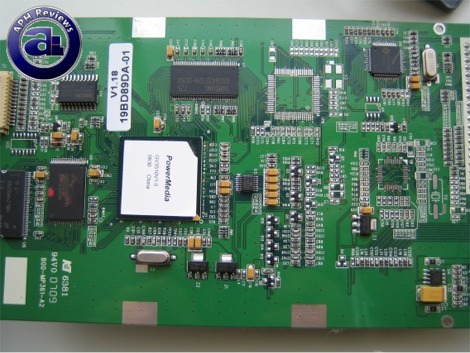
An overview of the PCB. With the connector panel that leads out one side of the Vizo Milano, we can see a location where a possible network port and network controller could have been implemented is not on -- it would actually have been a nice feature on the Vizo Milano to have a simple NAS function as well.

Spansion flash memory is used to store the integrated applications.

The label over the advertised chip is surprisingly hard to remove -- it simply cracks and chips the second you attempt to remove it as shown above. Regardless, with some effort it will reveal a Sigma Designs EM8511LF chipset as advertised on the box. The chip is clocked at 200MHz with video memory of 16MB.

The above picture is used so we can look cool. Please make us feel that way.

The aluminum frame as described earlier is to be placed around the hard drive you want to install; which creates a perfect fit for any standard 3.5" desktop hard drives. Four screws are attached to the side of the hard drive's standard screw locations. Afterwards, just connect the power and PATA connector to the hard drive and place it into the enclosure. Clean, easy and simple.

The next step involves placing the hard drive with the attached frame into the Vizo Milano, and aligning it with the screw holes on the enclosure shell and the frame on all four sides. Pop on the the aluminum cover.

The next step, I would not have figured out without the manual -- is to flip it around and then attach the screws. That way the screws are installed on the reverse side of the enclosure so it does not interfere with the aesthetics on top. Personally, I find this design to be done with great thought and great application -- the only downside is that I had a hard time popping on the aluminum cover on the other side on properly, I actually had to use a bit of force and snapping before it aligned itself properly with the rest of the shell and allow the screws to be attached and hold the entire unit together.
Rubber plugs are included to seal off and hide the screw holes to improve the looks -- which is again excellent in my opinion. All mounting and installation accessories are included in excess of one, just in case you lose one of them.
Page Index
1. Introduction, Packaging, Specifications
2. A Closer Look, Installation
3. Using the Vizo Milano
4. Performance & Conclusion