Page 2 - Physical Look - Hardware; Installation

The Cooler Master MasterLiquid 240L Core ARGB White looks exactly what you might expect for a white AIO cooler. This includes a 240mm radiator that is connected to the pump and water block combination with tubing. All these elements are white, while the connection points between these parts are light gray. I do appreciate that even the cables and headers have this matching color, as this might be one area to easily forgo. There are still black portions on the liquid cooler, including the bottom portion of the CPU block, but mostly everything that is exposed to users matches this color scheme. Branding on the unit is present, especially on the long edges of the radiator and pump head. Otherwise, the materials used are as expected with a large aluminum radiator, rubber tubing lined with a mesh material for a distinctive look, and plastic exterior on the pump head.

The radiator of the Cooler Master MasterLiquid 240L Core ARGB White is as expected with fins placed in this manner to come into contact with liquid running through. As the liquid runs through, the heat is transferred from the liquid to the wavy set of fins through the contact points. Fans are attached to the radiator to dissipate heat. This liquid is transported around from the water block to the radiator via tubing. This is made from rubber and sleeved for a good looking finish. The tubes measure 350mm in length and should fit in most standard mid-tower cases if you are able to mount the radiator close by. In my situation, as you will see below, I found the tubes to be a bit tauter than I would like. I think Cooler Master could have increased this length here to prevent any concerns. Even so, the tubes are strong and flexible and should not form any kinks. These pivot on the water block to allow for easier maneuverability when required.
The radiator measures 277mm long, 119.6mm wide, and 27.2mm thick. These are standard dimensions for a 240mm all-in-one liquid cooler. This size plays a significant role in cooling, as a larger surface area will result in better heat dissipation. The radiator is made out of aluminum, which offers decent heat transfer qualities. However, the primary advantage of using aluminum is for its low mass, which should reduce the strain placed on the case where this is mounted. Overall, the build quality is good on the Cooler Master MasterLiquid 240L Core ARGB White, as there were no defects or nicks to be concerned about. However, I would have liked to see more protection under each mounting hole location to ensure if users accidentally screw in mounting screws too far, it does not penetrate the radiator fins underneath. If you use the hardware provided here, the screws just contact the fins below, so I would have been a bit more at ease if there was just a layer of metal to shield the area.

At the other end of the tubing is the water block and pump combination of the Cooler Master MasterLiquid 240L Core ARGB White. This block measures 81mm in length, 76mm in width, and 47mm in height. Otherwise, the top half of the unit is white, while the bottom half reveals the black finish. The base underneath that contacts the processor is composed of copper, as you can see by its color. The base is flat with only a light bit of milling marks at the bottom. A plastic label is placed on this area for protection during shipping, so be sure to remove it prior to installation. The plastic rim around this area includes mounting holes for the arms that keep the pump block on top of the processor. Internally, the water pump exists here to move water between the radiator and the CPU block. It is powered by a 3-pin header, operating at 12V and just under 4W of power consumption. It has a specified lifespan of approximately 70,000 hours, which is just under 8 years of 24/7 operation.

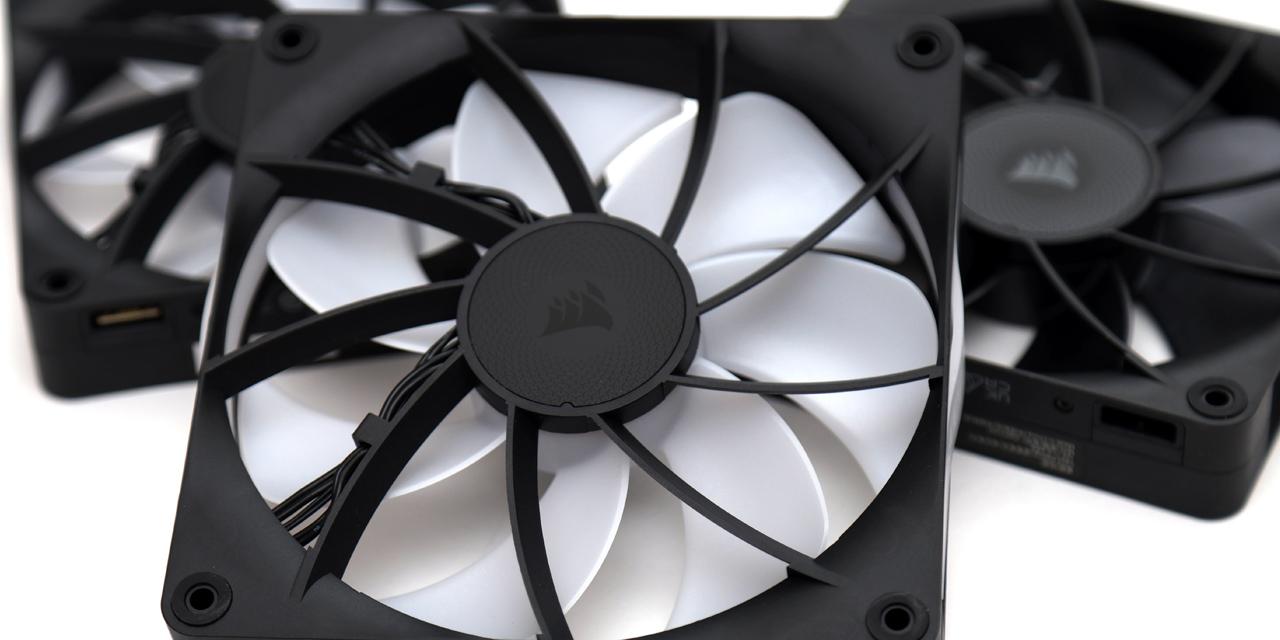
As indicated by the name, it should be no surprise we have addressable RGB fans included with the Cooler Master MasterLiquid 240L Core ARGB White. These two fans have rifle bearings inside with a specified lifespan of 160,000 hours. The rated noise level is a maximum 27.2 dBA, but we will see what this means when we evaluate noise levels. In terms of other numbers, each fan produces a maximum air pressure of 1.86mm H2O with an airflow rating of 71.93CFM. Each fan also has rubber dampeners in each corner to soften vibrations between the fan and radiator. Finally, these fans have two cables extending out. One is a 4-pin PWM header and the other is a 3-pin standard addressable RGB header. Cooler Master has included a 2-in-1 fan header cable and a 3-in-1 ARGB header cable so users can power and control the fans and the lighting elements with a total of two headers on the motherboard.

Installing the Cooler Master MasterLiquid 240L Core ARGB White is a straightforward process. With the Intel 1700 socket, you can start by picking the right backplate and mounting the double-ended screws on the other side to keep this plastic piece in place. Afterwards, you can install the correct mounting arms on the block of the cooler. For AMD users, you can install the correct brackets with retention holes and use the integrated backplate from your motherboard.

The next step would be to either install the fans and radiator in the case or mount the water block onto the motherboard. I chose to go with the former and mounted my radiator with fans attached to the side of the case first. After mounting the radiator at the side of my case, I applied enough thermal paste, which is included from Cooler Master and mounted the water block and pump combination on top of my Intel processor. Before I did this, I removed the plastic protective sheet on the bottom of the block. Based on the instructions, Cooler Master recommends screwing this in using a cross pattern to ensure even tightening and pressure applied to the processor. As expected, I was able to complete the installation without any issues.
Page Index
1. Introduction, Packaging, Specifications
2. Physical Look - Hardware; Installation
3. Test Results
4. Conclusion