Page 3 - Physical Look - Inside

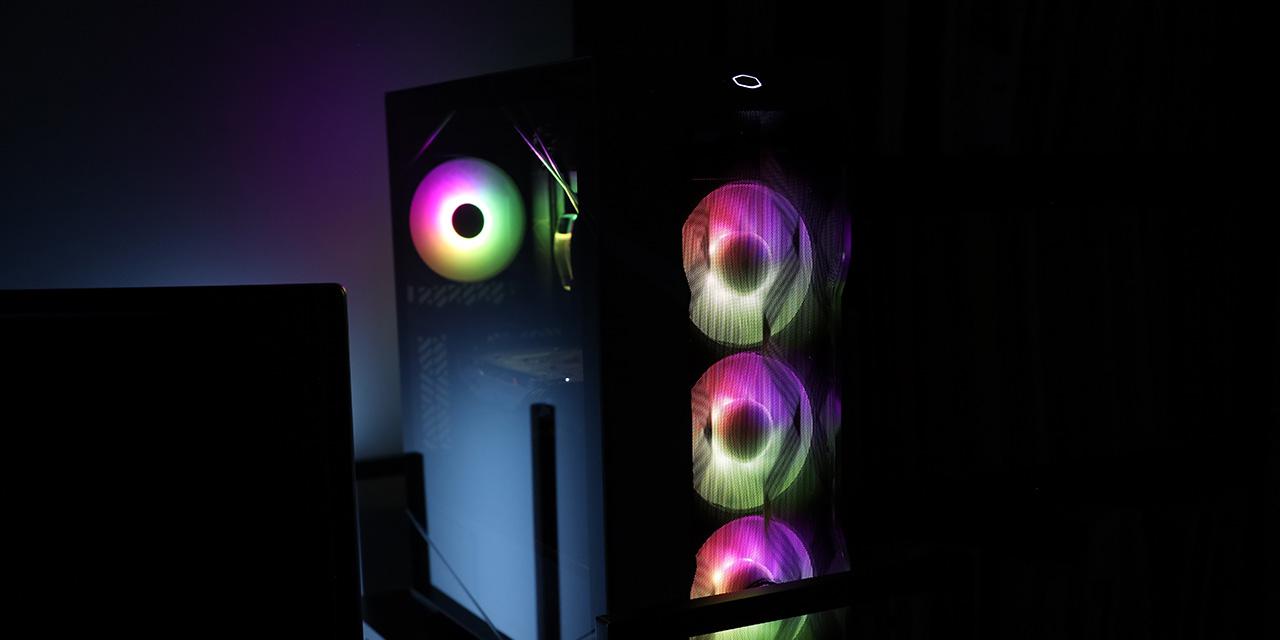
After removing the side panel, I was greeted with a nice, open interior. The entirety of the interior is black, just like the outside. Even though this is not a case to show off your internal components, I appreciate that the interior color matches the outside. The side panel comes off without any issues, and the inside of it is covered in, according to the manufacturer's website, special wavy foam padding for noise absorption. This padding is found on both side panels. As for any computer with an aim to be silent, the padding will only do so much; the more important bit is to create less noise. The absence of any drive cages at the front of the case provides an unobstructed airflow to almost all of the internal components. The two included 140 mm fans should do the trick for air intake. Other than that, the common cover for the power supply is found, which provides two different temperature zones and allows for easy cable management. Speaking of cable management, there are two large cutouts to the right of the motherboard, two smaller cutouts along the top, and one below the motherboard for all your motherboard connectors.

Here is a better view of the internals, more focused on the rear area. The installed motherboard can be up to an ATX size. From the factory, none of the motherboard standoffs are installed, but SilverStone included all the necessary screws to make installing the standoffs a breeze. The rear exhaust fan is a 140 mm fan. This causes a tight fit for installing the motherboard I/O shield, which I could not fit in. I ended up having to remove the fan, install the shield, and then reinstall the fan, after which everything fit properly. In this picture, you can also see the wavy foam padding along the side panel. Moving a bit higher, the top has room for two 120 mm fans or one 140 mm fan. SilverStone also included a dust filter at the top that stays put magnetically. All of the dust filters are made well, and are either on rails or have magnets. The case can also support a CPU cooler with a height of up to 163 mm, which is measured from the processor's surface to touching the wavy padding. On the manufacturer's website, they say the limitation to the cooler can be up to 172 mm, but they do indicate that the 163 mm is to the wavy padding's surface. It is important to note if a CPU cooler is installed with a height higher than 163 mm, it will start to squish the padding, and potentially put more pressure on the processor. Just to avoid any issues with height restrictions and to stay on the safe side, I would not install anything higher than 163 mm.

The power supply cover does not have any holes, which helps to keep the two temperature zones separate. The cover is also completely black with no other markings; not even a logo. From this view, the cable management hole for the motherboard connectors can be seen. It is a little small, and during installation I had some trouble reaching to the far end of the motherboard using that hole. Particularly for the HD Audio connector, I was not able to route it through the bottom cable management area. Luckily, the case does not have a window, which would reveal my lackluster attempt at cable management in the front. There are seven expansion slots, with an interesting mechanism to remove them. There are two screws that can be removed on the rear of the case, allowing a panel to slide out, which holds the covers in place. The two screws were really tight from the factory, and I almost stripped them when I was trying to remove them. The annoying part of this system is that all the slots can fall out once the panel is removed, and it is difficult to replace the panel, while stopping the other covers from falling out.

The front of the SilverStone Kublai KL07 has unobstructed airflow, and houses two included 140 mm fans. The other option for front intake is three 120 mm fans. After popping off the front panel, there is a magnetic dust filter with a plastic frame. The magnet at the top of the dust filter is loose, and if you remove the dust filter, it is possible to lose the magnet. On the inside of the front panel, we find some more special wavy foam padding to reduce noise emissions. The emphasis on air intake from the front of the case ensures positive air pressure inside, as opposed to negative air pressure. Positive air pressure is important so that dust is only able to enter from the area where the air is being sucked in. On the other hand, negative air pressure means more air is exhausted than there is being taken in, causing air to be sucked in through as many of the little holes or gaps in the case as possible, potentially drawing more dust inside the case.

The back of the motherboard tray has a big cutout to easily mount the CPU cooler. There are also Velcro straps along the main cable management route to better hold all the cables down, which is really important for this case. The case is completely covered, so from an aesthetic standpoint the cable management does not really matter, but from a being able to close the side panel perspective, it is very important. There are a couple of other cable loops located throughout this area. Cable management is relatively easy in this case, but the special wavy foam padding on the back panel reduces the amount of room for cables by quite a bit. I tied down the cables as much as possible, and still struggled to close the side panel. The cutout in the top right for CPU power is slightly cut off by the frame of the case, which meant I was not able to route the power cable through there. This is due to my CPU power connector being pretty big, but for fan cables with smaller connectors, the frame should not stop you from routing them through there. Luckily, there is another cutout right beside it that allows the cable to reach the right plug-in.
Also found on the back are three 2.5 inch mounting areas along the left side, and three more 3.5 inch and 2.5 inch mounts in the basement area. The 2.5 inch mounts are all very easy to use. The mount is moved slightly outward on a hinge, then the SSD is to be slid in without any tools, and easily clicks back into place. It is similar for the 3.5 inch mounts, however they are on rails. The internals for this case are fairly standard. There are plenty of cooling options, and most of it seems fairly straightforward. However, it does aim to be quiet, so let us find out on the next page exactly how well it does in this regard.
Page Index
1. Introduction, Packaging, Specifications
2. Physical Look - Outside
3. Physical Look - Inside
4. Installation and Conclusion