Page 2 – A Closer Look – Hardware (External)

In my opinion, the Thecus N2560 is what I would call the prettiest looking NAS we have reviewed at APH. Of course, beauty is in the eye of the beholder, but I would say this is the Megan Fox of network attached storage systems. It is sleek, shiny, and white. The rounded edges on the side provide a less industrial like design we see in other boxes, such as the QNAP TS-470 and ASUSTOR AS-202TE. Also, unlike the QNAPs and ASUSTORs of this world, the drive trays are not immediately available to the user, and are instead hidden behind a push door that opens up on a spring. The entire outer shell is a glossy white plastic, which adds a lot of pizzazz, but is also prone to scratches; especially surface swirls. Thankfully, due to the color, you will not actually see any fingerprint marks, unless you are closely looking for them. Thecus keeps the entire front panel clean by removing all words, even their own logo. In terms of actual build quality, I really wish that Thecus went with aluminum or another metal rather than plastic. While this will add some weight, the plastic cheapens the device, and takes away any premium feel it might have had in terms of aesthetics.
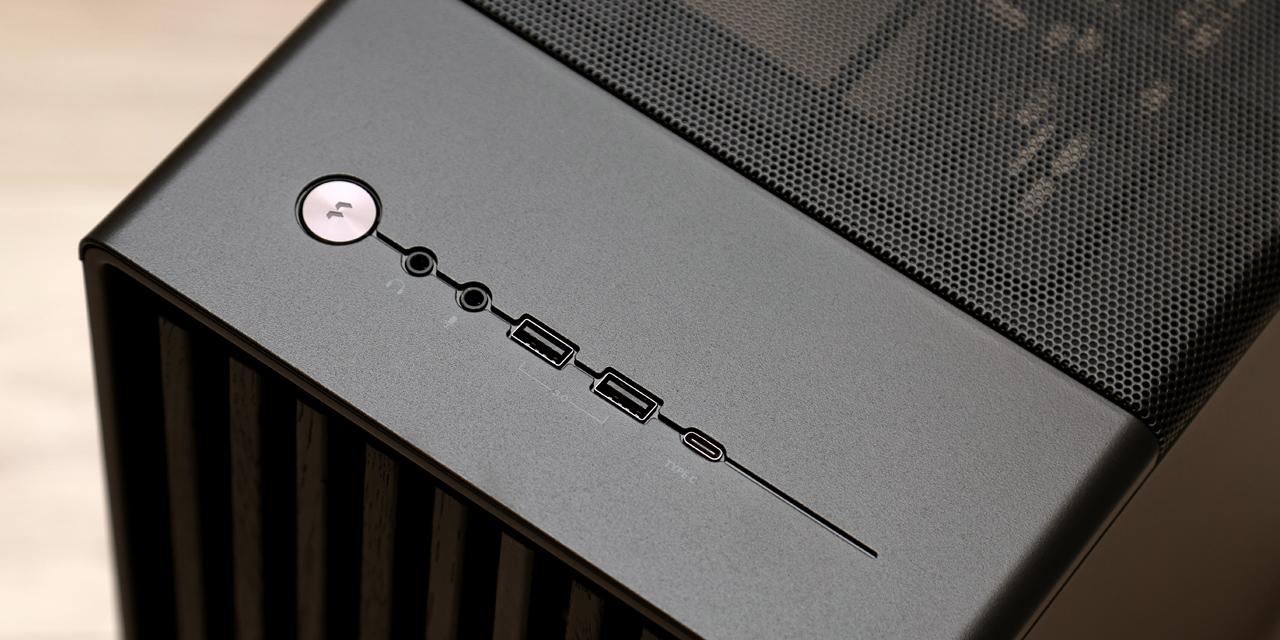
The grey bar down the right side includes five white LED status lights for various functions. The top “i” is to indicate the system status for diagnostic modes. Underneath are two indicator LEDs for the left and right hard drive, depending again on which is being utilized. These lights will turn on white when a hard drive is attached to the corresponding side. If it ever turns red, there is a failure in the hard drive. Below that is an activity indicator for the LAN status. And finally the bottom indicator LED for the USB, which turns on when the USB is plugged in. Located underneath the lights are two buttons; one for power, and one for what Thecus calls a quick copy button. The power button glows blue when the NAS is on, and it is pretty obvious in what it does. The quick copy button is used to directly copy a USB drives’ content when it is plugged into the front USB 3.0 port, which is located right underneath the power button. This will be covered in detail later on.

Flipping the Thecus N2560 to the back, and we can see a fan exhaust. This fan measures in at 80mm in diameter, and is the only form of cooling for the NAS. Underneath this fan exhaust vent is a single S/PDIF audio out, and an HDMI out for media playback. Beside the HDMI cable is a recessed button to reset the entire system, in case of an emergency. Underneath that is a Gigabit Ethernet port with two USB 2.0 ports to the right. Finally, at the bottom is the power connector that interfaces with the AC adapter, since the power supply is not inside the N2560. The inclusion of the HDMI is seen on other competitor products, as it allows users to plug in an external display with speakers to take advantage of its media capabilities. However, the real nice addition is the digital audio out, which is not found on many NAS boxes, even more expensive ones. Located at the back are more Phillips head screws to disassemble the Thecus N2560, but there are definitely more to it than this. We will look at the internals on the next page.

If you tip the Thecus N2560 over like tipping a cow, you will reveal the bottom. At this point, you will probably think this is pointless, and there is no reason to be looking at the bottom. On the contrary, you will find some certification stickers, as well as several other vents to allow for heat to flow out. Also on the bottom are four rubber nubs acting as feet. On both carpet and hardwood flooring, the N2560 was stable and had no issues with keeping the device upright.

Pushing and opening the door of the Thecus N2560 allows us to look at the two hard drive bays. Each of the drives is supported by a mounted daughterboard at the back, controlled by a SATA controller native to the device. The layout of the disk slots are quite odd, as slot number one is actually on the right side, closest to the power button, while slot number two is on the left. Conventionally, we would assume it goes left to right in terms of order, which is a bit odd. While Thecus does not necessarily provide the user with a tray, they include plastic bars to attach to the hard drive for easy sliding and removing. This feature only works if the users utilize 3.5” hard drives, rather than the smaller 2.5” units. If one decides to put in a solid state drive or laptop hard drive, they will have to connecting the drive to the daughterboard without much stability or security. This is highly inconvenient, and Thecus should have designed a better way to implement their drive bays. In addition, these plastic bar mounts seem to be mislabeled, as the “HDD Left” bar are made to go on the right side, and vice versa. At this point, along with its backwards drive bays, one must conclude the N2560 must have Australian roots. On a side note, the Thecus N2560 supports single disk, JBOD (Linear Disk Volume), RAID 0 (Disk Striping), and RAID 1 (Disk Mirroring). The N2560 also supports AES 256-bit encryption for those who have something to hide in their NAS... or for those who are looking for better security by encryption.
Page Index
1. Introduction and Specifications
2. A Closer Look - Hardware (External)
3. A Closer Look - Hardware (Internal)
4. Configuration and User Interface, Part I
5. Configuration and User Interface, Part II
6. Configuration and User Interface, Part III
7. Performance and Power Consumption
8. Final Thoughts and Conclusion