By: Devin Chollak
January 13, 2012
Congratulations, you have made it to the final year of this world, or as typical, normal people would call, 2012. Now, assuming you are not some death-craving Mayan preparing for the end of the world, here at APH Networks, we have a review for you on liquid cooling. To be more specific, the Thermaltake Bigwater 760 Plus CPU cooler. I always find it interesting how many people find liquid cooling something for hardcore enthusiasts. This isn't completely true. While back in the late 90's it would be a true statement, today, many high-end gaming rigs come with liquid cooling, and you can even buy chassis with built-in systems as well. Not to mention there are many products out there you can easily get your hands on to instantly put in liquid cooling. However, one of the major hurdles for consumers to adopt liquid cooling amass is the fear of leaks and other unknowns. Fortunately, those who have played with any liquid cooling know that leaks are very rare when done properly, and you can always test to make sure it will not go wrong before installing it. The advantages of liquid cooling are quite large, but for your average all-in-one liquid cooling solutions, the best benefit you can get is removing that large aftermarket air cooler from your computer, and replacing it with something easier to fit. Now, I'm not here to give lectures on the benefits of liquid cooling, so let's take a look at the Bigwater 760 Plus CPU cooler.

When looking at the above picture, try to guess which box the Thermaltake Bigwater 760 Plus shipped in. If you looked at the big brown corrugated cardboard box and thought that was too big to hold a CPU cooler, think again. Surprisingly, Thermaltake shipped two power supplies in the smaller box; yes, let that concept blow your mind for a second. Fortunately, none of the boxes shipped by Thermaltake were damaged on their way up to our Calgary offices. Traveling in from California via UPS Standard, the Bigwater 760 Plus took virtually no damage. While this is fairly common, occasionally there can be large dents or scrapes, but thankfully today was not one of those days. Well, time to open it up and see why the Bigwater 760 Plus is in the bigger box.
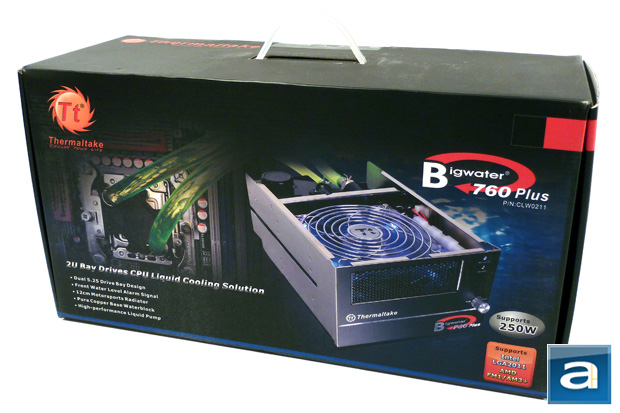
Like most Thermaltake retail boxes, the box is black with some red. This is something I like about Thermaltake's retail boxes; they are consistent and easy to distinguish when looking for their products. While the Bigwater 760 Plus has no earth and outer space in the background like the Frio OCK, it does display the product installed on the front. This is a great way to show off a product on the retail box, because it shows the consumer a little bit into how it will look when they have it installed. While the images fail to show how large the CPU cooler is, I think the box itself gives you a pretty good idea. (Hint: It is big.)
Notable features are listed in front includes an icon indicating Intel LGA 2011, AMD FM1, and AM3+ socket support. This is a great feature, since processors for these sockets have recently been released onto market, and I'm sure those who have these processors might be looking for a liquid cooling solution already. Additionally, the front of the box also shows off a couple of prominent features such as the dual 5.25 inch drive bay design, water level alarm, 12cm motorsports radiator, pure copper base water block, and a high-performance liquid pump. The last notable feature shown in front is the ability for it to handle 250W of heat. I find it rather odd that the manufacturer's website doesn't indicate this anywhere. It is almost as bad as not mentioning anywhere how much horsepower your car has when you buy it. Not something I would call being nice to the consumer, but I can live with one piece of information missing. However, you can find the following information on the features and specifications below, as obtained from the manufacturer's website:
Features:
-Dual 5.25” Drive Bay Design: Liquid Cooling System in-a-box to save the space in the chassis and simplifies installation.
-Front- VRTM control knob, adjusts fan speed conveniently without having to reach to the back or inside of the chassis.
-Mesh front bezel allows cool air to be accelerated into the cooling radiator to increase thermal efficiency.
- Easy to install and gain access to the unit for refill or regular system maintenance.
- Built-in Water Level Sensor With Alarm
- 12cm Motorsport Inspired Radiator:
1. Dimple Tube Technology swirls the coolant within the radiator to increase thermal transfer.
2. An all-aluminum radiator featuring expanded outer fins and tube for maximum performance.
- Pure Copper-Base Waterblock with high efficiency channel design ensures heat is removed away from the heat source for maximum thermal protection.
- Ultra-low noise fan: silent variable fan with blue LED (1600 ~ 2400rpm) – power when you need it; silence when you want it.
- High-performance Liquid Pump:
1. Silent and powerful P500 (500L/hr) pump provides superb performance and reliability.
2. Ceramic bearing design significantly extends the life-expectancy of the pump for years of worry-free operation.
- Universal Socket Compatibility & Accessory Package
1. All-in-one back-plate design, support all Intel and AMD platform 2. Universal socket support : Intel: LGA 2011*, LGA1366, LGA1156, LGA1155, LGA775 AMD: AM3, AM2+, AM2
- 3/8” UV Sensitive Water Tube:
Industrial-grade material to prevent wear & tare from being clogged up or over-bending.
Specifications:
2U Bay Drives
Dimension: 232mm(L) x 148.6mm(W) x 85mm(H)
Weight: 1.245(kg)
Application
CPU: AMD AM3/AM2+/AM2, Intel LGA 2011*/LGA1366/LGA1155/LGA1156/LGA775
Water Block
Material: Copper (Base)
Dimension: 80mm(L) x 52mm(W) x 27mm(H)
Quick install connector: For 9.5mm ID (3/8”) tubing
Weight: 75.9 (g)
Pump
Dimensions: 75(L) x 70(W) x 75(H) mm
Bearing: Ceramic bearing
Maximum Capacity: 500 L/ hr
Rated Voltage: DC 12V
Input current: 600 mA
Connector: 4 pin
Noise: 16 dBA
Life time: 80,000 hr (MTBF)
Radiator
Dimensions: 153(L) x 120(W) x 28(H) mm
Material: Aluminum
Tube Design: Aluminum, Dimple
Fin Design: Aluminum, Louvered
Quick install connector: For 9.5mm ID (3/8”) tubing
Fan
Dimension: 120(L) x 120(w) x 25(H) mm
Fan Speed: 1600~2400 RPM
Rated Voltage: 12V
Noise: 29.4 ~39.9dB
Life Expectancy: 30,000 hr
Connector: 3pin
Liquid Tank
Dimensions: 72.4 (L) x 70.5(W) x 69.4(H) mm
Capacity: 130 c.c.
Quick install connector: For 9.5mm ID(3/8”) tube
Tube
Dimensions: 9.5mm ID(3/8”) tube Material: Green UV
Coolant
Capacity: 500c.c.
Major Material Ingredient: Propylene Glycol
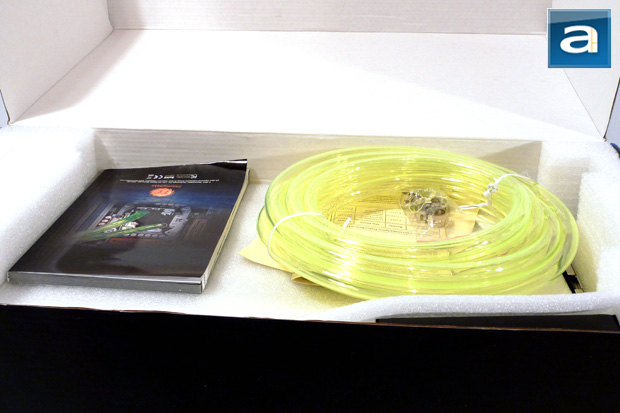
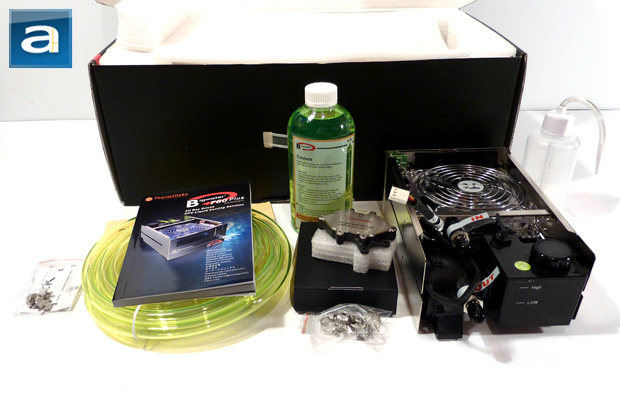
While being a product reviewer can be a busy and long job, it is always nice to have a new product box to open up and play around with. Sometimes, you get to play with awesome products, and other times, not so awesome products. However, I can never get over the satisfaction of opening something new; it is like having Christmas presents all year round. First thing that you will see when opening the Thermaltake Bigwater 760 Plus is the bright yellow-green tube surrounded by Styrofoam. There are other things, but that tube just stands out, and you can't help but look at it and say, "cool". I admit the tube is a bit on the bright side; fortunately, it does not hurt your eyes to look at, so no sunglasses are required while installing this cooler -- but it would look pretty cool if you did. The next item in the box is the installation manual. Now I assure you it is not a long read. It covers fourteen languages with pictures for each, taking up about eleven pages per language, so you can easily imagine that makes for a pretty big manual. I suspect it would be a pretty good fly swatter after I'm done reading it. Additionally, Thermaltake was kind enough to print off the warranty registration, and warning about running a pre-installation test. The last piece you will find on the top layer of the retail box is a tiny little package containing some screws and tube clamps for the installing the cooler. Now that we have gone over the top layer, it's time to dig even deeper into this cooling solution.
Below the top layer, you will find the liquid coolant bottle containing Propylene Glycol, which has many applications, but today it will be used as the main ingredient in the coolant for the liquid cooling system. There is also a convenient squeeze bottle for handling the coolant safely, which is odd, because Propylene Glycol has a low toxicity. Also, on the bottom layer of the box, you can see the radiator, pump, liquid tank, and mounting bracket all put together for you. This is very handy, because it greatly reduces the amount of work required for the consumer when installing the water cooler. Additionally, you can find the water block packaged away with extra padding. I don't really think the extra Styrofoam padding is necessary, but it does keep the water block in place during transit. Finally, there is the black box; this box contains all of the required parts for mounting the water block to your motherboard. I have to say this is quiet a large number of parts, but as with a liquid cooling kit, it is expected to have more parts in it than an air cooler. Well, now that we know what we got ourselves into, let's take a closer look at the details.
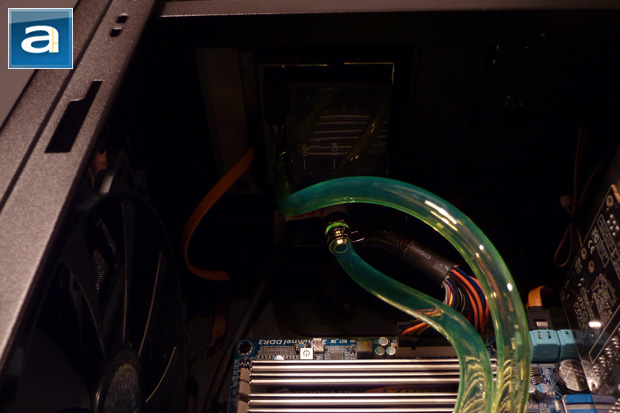
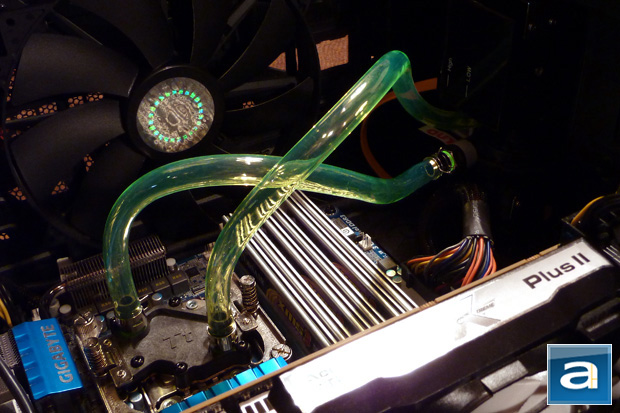
The first piece I want to talk about is that yellowish tube. While I wasn't able to figure out exactly what material the tubing is made of, I will have to take Thermaltake's word on it being, uhh, "Green UV" (In reality, it's just some sort of plastic). The tubing itself is very interesting. It provides resistance to folding, but remains easy to bend. The real pain with it is that the tube doesn't like to change the direction it bends. You can see it has been coiled up, so when you start to work with the tubes, you will need to take into consideration its "natural curves". The Bigwater 760 Plus comes with plenty of tubing for you to install the liquid cooler. I was able to wrap it around my full-tower chassis twice with plenty to spare, so unless you are trying to run this water cooler to another room, I'm very certain you will have more than enough to work with. A very important part of the tubing is its internal diameter. If the diameter is too large, the pressure in the tub will drop, and this means you won't be able to let the tubes travel vertically very much. On the other hand, if the diameter is too small, then the flow will be restricted and slows down the coolant, which gives it poor circulation. Ideally, you will want to use 10-13mm internal diameter tubes for optimal flow in most mid to high end setups. You can get away with smaller tubes in smaller configurations. In the case of this all-in-one cooler, which will just be running across my CPU, the 9.5mm tubing should be more than adequate. The UV reactive tubing is used for those who has UV lighting in their cases, and will give a cool green glow when used with the right equipment.
Thermaltake seems to be quite secretive about what types of chemicals are used in their coolant. The only information provided is the main component of the coolant being Propylene Glycol, which is a colorless, viscous, clear, and nearly odorless liquid. However, the coolant is far from viscous and colorless, which has led me to believe it is mostly water and something extra added. Of course, being mostly water is fairly typical and cost effective. For those who are unaware, 500cc is the same as 0.5L, so they do give you a reasonable amount of coolant to use for the cooler. In my installation, I ended up using about 3/4 of the coolant bottle, which removes almost any worry of running out. This assumes you are not going to drink it, which you shouldn't do anyways, because I am sure it will not be healthy and probably tastes nasty.
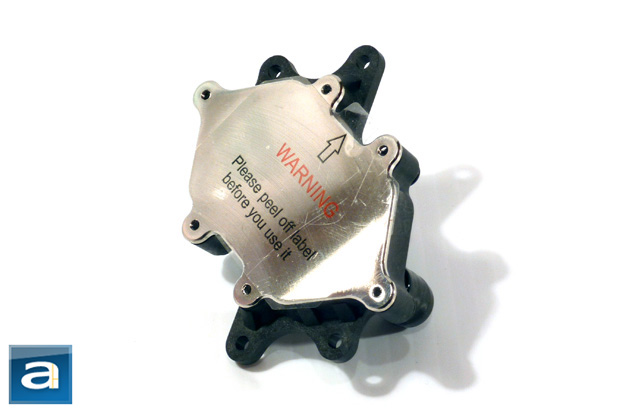
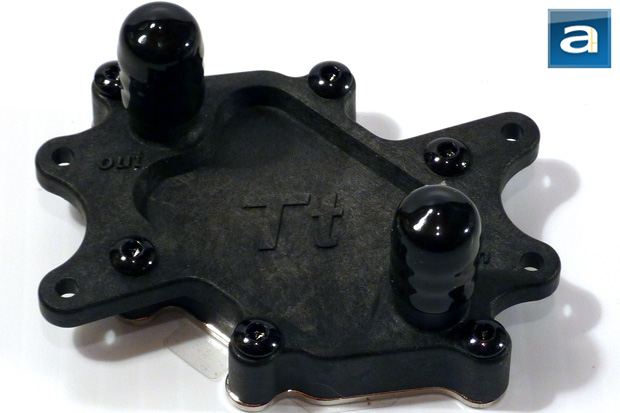
The backplate and mounting parts provided are exactly the same as the Thermaltake Frio OCK. If you are interested in seeing exactly how it looks, feel free to scroll down to the installation section images. When it comes to all the parts you need, Thermaltake was kind enough to provide you with a well separated and easy to access box. This eliminates any ambiguities you may have about which screws to use, or if you have all the required pieces. I am a big fan of how the parts box was designed, and in my opinion, any companies that use only plastic bags should be shot. Not only is it a pain to rip open every one of them or peel the seal apart each time, but it is a hassle to find the right thing you are looking for. The tube clamps provided have left me slightly worried, because in their normal position they can almost slide around on the tubing without much effort. This isn't ideal, because they should be a bit smaller, so they apply a reasonable amount of pressure when clamped. Fortunately, the tube does expand when you attach it to the radiator and water block, but it still is not as reassuring as I would have liked.
Liquid cooling, at a high-level, is a lot like how air cooling works. You are using a fluid to move heat from the processor to its surroundings. The advantage of liquid cooling is that you can transfer heat more efficiently over greater distances, even outside of your chassis, without having to worry about large heatsinks or fans. Some liquid cooling solutions can be passive without the need for fans; however, many use fans to assist in removing heat by blowing air through a radiator. When it comes to the radiator for the Thermaltake Bigwater 760 Plus, I was surprised by the choice of going with an all-aluminum design. While this makes for a lighter radiator, it offers less thermal conductivity compared to an equivalent copper version. Utilizing dimple tube and louvered fin design is a fairly common practice. It is good to see Thermaltake is following well-known design practices that have been around for quite some time. Overall, the radiator seems fairly reasonable for a budget water cooling system, but I wouldn't expect much out of this one.
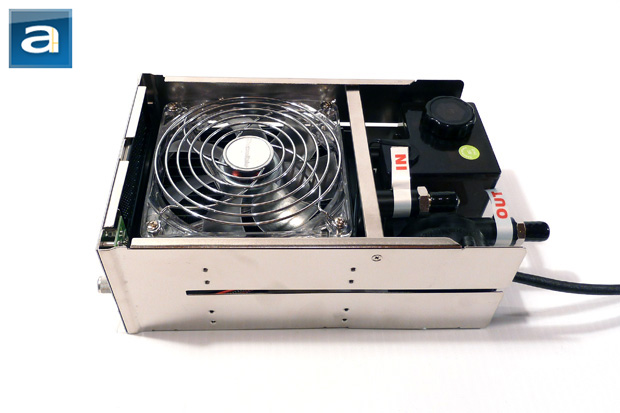
The 120mm fan that comes with the Thermaltake Bigwater 760 Plus offers plenty of airflow. However, it proves to be very loud at full speed, so you might not want to run it on the highest setting. The design of this cooling solution allows for the fan to be easily swapped out with a different model. This could be when the fan wears out, or you happen to own a different 120mm that you prefer to use in your setup. Either way, this is a great design consideration. The next component of this dual drive bay design is the liquid tank, which I find to be a bit smaller than it should be, but 130cc (130mL) is a fairly respectable amount. The liquid level label on the tank is very handy when you are looking inside your computer case. It allows you to quickly look to see if you need to refill the tank without waiting for the front indicator to turn red. The refill hole is located at the back of the bay drives, which is very handy, because you can easily refill without having to remove the system from your computer. Additionally, the hole is air-tight to ensure it will not leak during operation -- something you would expect from a water cooling system. Finally, the last part of this component is the pump itself, offering a maximum flow rate of 500L/hr. This should be more than sufficient for a CPU cooler, with plenty of power to boot. I was a bit surprised at the 80,000 hour lifetime on the pump, as many other liquid cooling pumps don't typically offer that high of a lifetime rating. I certainly won't be able to validate if that number is accurate for this review, so I'll also have to take Thermaltake's word on it.
The last and probably most important part of this whole system is the water block, or as some call, the cooling block. Being made out of copper, it offers the highest level of thermal conductivity for metals of the price range, and is nickel plated to be corrosion resistant. While extremely high-end blocks may be gold or silver plated instead, they do not come cheap. Instead, many high-end blocks are nickel plated, because corrosion is a major problem down the road for pure copper metal contacts. The cooling block provided by Thermaltake's Bigwater 760 Plus attaches very securely to the mounting bracket, and is labeled with input and output connectors. When looking at the design on the inside, you will find it has a number of fins that allows for a large surface area to transfer heat from the processor to the fluid. While the size of this is fairly small, it looks like it should provide a reasonable cooling performance. Overall, it appears the parts are relatively decent and nothing seems to be completely unusual. This means it is time to go over the installation process.
-----------------------------------------
Installation
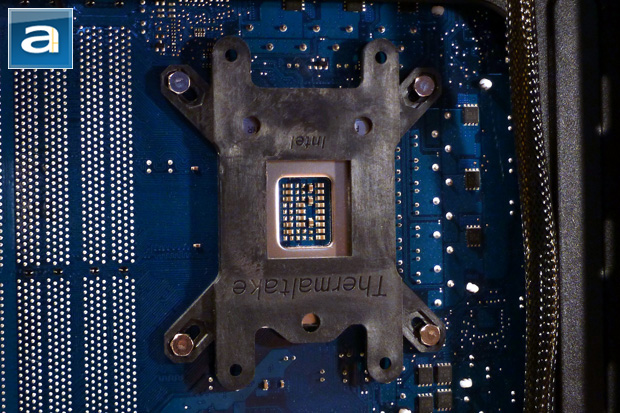
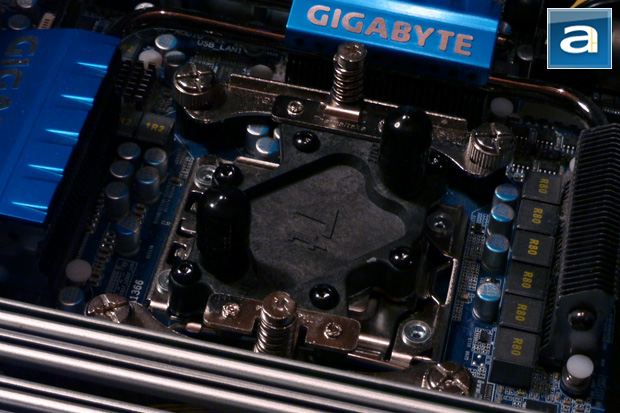
Obviously, the first task for installation is removing the old cooler, and cleaning off the processor. Of course, before running the system with liquid inside of your computer, you should always test it outside, just in case. The last thing you want is come coolant to be spilling onto your hardware, unless you enjoy shorting it out and damaging your computer. I haven't met someone like that yet, so I'm going to stick with running a test outside of the system first. Installing the backplate and front brackets was a fairly easy task that didn't require anything out of the ordinary. I really do like the design for the backplate, and the ability to read the brand for which type of socket you are installing for. This really eliminates any doubt about what you are doing when installing the backplate. However, the mounting bars do not have any grooves for aligning the screws when securing them to the motherboard. I really don't like this, and find it rather irritating this issue has still not been addressed by Thermaltake. While it is a minor issue, proper alignment is always recommended, and without grooves, you can easily be off without noticing.
The next stage was to place the radiator and tank inside your case, and find out how much tube you will need to run from the pump to the water block. I found I needed roughly two one-foot long tubes after attaching the water block lightly to the processor, and sliding the cooling unit into the drive bays. Cutting them a bit longer than necessary, I then ran the tubes inside, and continued to trim them down to a good fit. I made sure they had a reasonable amount of slack, so that it wouldn't be pulling on the system, and not too much slack so that they would be sticking out like spaghetti. Next, I put the clamps onto the ends of my "perfectly" sized tubes, and pushed the ends of the tubes onto the connectors of the water block. They slipped on easily, and were very secure even without the clamps. Lastly, I used pliers to move the clamps onto the connectors, and repeated the process for the cooling unit. With everything in place, it was time to pull it out, and test for any leaks.
First thing that needs to be done is fill up the coolant tank. Next, you will need to power the pump, so that it can fill the tubes. While it is pumping, you need to continue to fill the coolant tank until there is no air in the tubes, and the tank level is at its maximum level. The very first thing I noticed about the system when I turned on the pump is that the coolant was flowing extremely fast, in fact, it was probably flowing too fast. The issue with the fluid flowing too quickly is that it doesn't allow enough time for heat to transfer from the water block to the fluid. After letting the system run for a few minutes, and seeing that no parts were leaking, I powered it down and transferred it into my computer. Applying a thin layer of thermal paste provided, I secured the water block down, and screwed in the dual drive bays. The only thing left is to test it out and see how well it performs against an aftermarket air cooler... the Frio OCK from Thermaltake themselves.
-----------------------------------------
The Tests
Tests are conducted on the computer with the following specifications:
CPU: Intel Core i7 920 @ 2.66GHz (Hyper-Threading enabled)
CPU Cooling: Thermaltake Bigwater 760 Plus
Motherboard: Gigabyte GA-EX58-UD5
Graphics: ASUS Radeon HD 6950 2GB
Graphics Cooling: Arctic Cooling Accelero XTREME Plus II
Memory: Corsair XMS3 PC3-10666 6x2GB
Chassis: Cooler Master Storm Trooper
Power: Corsair HX1000W
Sound: Integrated (Motherboard)
Optical Drive: Samsung SH-S223Q 22X DVD Writer
Storage: Seagate Barracuda 7200.11 1TB; Samsung Spinpoint F1 1TB
Operating System: Microsoft Windows 7 Ultimate x64 SP1
Compared Hardware:
- Thermaltake Bigwater 760 Plus
- Thermaltake Frio OCK
To ensure a controlled environment, the test machine was kept in the same location at a constant room temperature of approximately 20c. Each test was given sufficient time to allow for the thermal interface material to set properly. The Thermaltake Bigwater 760 Plus was compared to the Thermaltake Frio OCK as a baseline reference. The Bigwater 760 Plus was tested at both the lowest fan speed (1600RPM), as well as the highest fan speed (2400RPM). The Frio OCK was also tested at the lowest (1200RPM) and highest (2100RPM) fan speed.
For the idle tests, the system was turned on and idling for at least 30 minutes before taking measurements. For the load tests, Prime95's in-place large FFTs test with eight work threads was run for 30 minutes. The results of the tests were taken from Core Temp using data provided by the CPU's internal thermal sensor. The load test was run for a minimum of 30 minutes, and once the highest core temperature had been sustained for more than five minutes, it was recorded. The highest temperature among the cores was taken, and the results were cross-checked with Real Temp for verification of the readings.
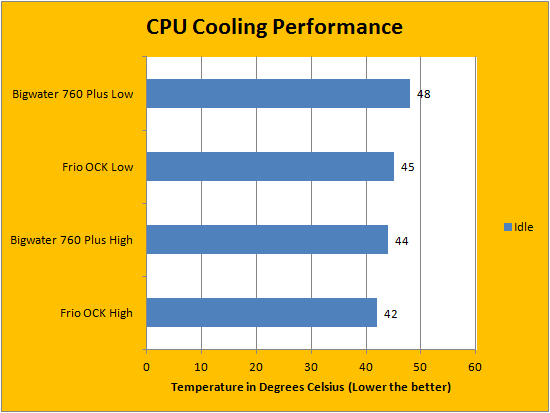
During the idle tests, I have noticed at start up, the Bigwater 760 Plus was running a very cool 30 degrees for a short while. But as the system continued to run, I had to wait quite a while before the temperature balanced out at 44 degrees at full fan speed. This wasn't surprising, as the liquid cooling system takes longer to heat up compared to a heatsink. What did surprise me was how it was, uhh, almost -- yes, you read that right -- almost as cool as the Frio OCK on its lowest fan speed. With only a single degree deference, it was definitely not impressive for the amount of noise being generated by the Bigwater 760 Plus. Getting the Frio OCK roaring at full fan speed, it was running noticeably cooler then the liquid cooler. Of course idle tests are not really the selling point for any cooler. Therefore, next up are the load tests.
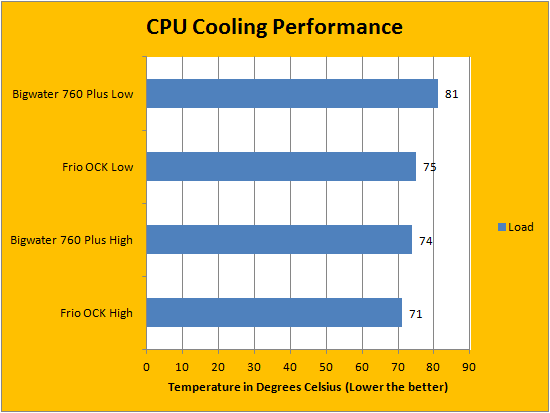
As we have seen with the idle tests, the Thermaltake Bigwater 760 Plus just does not seem to match the Frio OCK, which is just an air cooler. It is actually rather disappointing that it barely can beat the company's own Frio OCK running at the lowest fan speed. When the liquid cooler was running at the lowest fan speed, the temperatures were just downright unacceptable at a blazing hot 81 degrees at full load. The end result was not what I was expecting, but the numbers are hard to argue with. As far as sound goes for the CPU cooler, I would have to say at the lowest fan speed it is very quiet, but I'm not convinced the reduction in noise is worth the extra heat. On the APH Networks sound scale of noise, with a value of 0 being complete silence and 10 being a F1 engine revving in front of you, I would say at the lowest fan speed, the Bigwater 760 Plus comes in at a 2.5 out of 10. That's pretty decent. It is quieter than my case fans, and really doesn't make a ton of noise. However, at full fan speed, I would rate it at 5 out of 10, because it is easily the loudest component of my system, and is noticeably audible anywhere in the room.
-----------------------------------------
Unfortunately, this product fails to impress. It certainly does provide a large benefit over stock cooling, but that's not really the point. It fails to beat Thermaltake's own high end air cooler, the Frio OCK. With a retail price of $149.99 at press time, you would expect significant cooling improvements over an aftermarket air cooler of almost half the price. One major advantage of the Bigwater 760 Plus is that it will fit into chassis that the Frio OCK might not be able to, or if you own a case with inherently poor airflow, the water cooling kit can be really useful. However, most cases I've worked with have been able to handle the Frio OCK just fine, and good airflow is pretty much a given nowadays, so these point are not completely valid. On the positive side, the external fan control is very handy, because it allows you to adjust the fan RPM between times you are stressing the computer, and other times when it is just sitting idle. The bad news is with the fan at full speed, cooling is slightly improved at the cost of a very significant amount of noise. Ideally, you probably will not want it running at full blast all the time. The LED indicator on the front is handy for when you need to add more coolant to the system, but the LED fan is fairly bright, and lights up my room more than my CM Storm Trooper chassis itself. The ability to turn off the fan is definitely a desirable feature. One thing to note is the Bigwater 760 Plus does offer room for adding additional liquid cooling components, but that was not a feature advertised by the product, which seems to be more of just a CPU cooler. Overall, I see few valid reasons for the price tag other than to say that you have liquid cooling. The end result is a product which fails to meet expectations in most cases, and is not something that I would recommend buying over the alternative air cooling products available. The bottom line: Get it only if you are intending to hook up more than one system component to a budget water cooling system, and you own a compact case with very poor airflow.
Thermaltake provided this product to APH Networks for the purpose of evaluation.
APH Review Focus Summary:
5/10 means An average product with no real advantages; drawbacks and advantages just seems to cancel each other out.
4/10 means With disadvantages that slightly outweigh its advantages, you should not get this product unless there are no product alternatives that does its job.
-- Final APH Numeric Rating is 4.8/10
Please note that the APH Numeric Rating system is based off our proprietary guidelines in the Review Focus, and should not be compared to other sites.
Liquid cooling is in and the Thermaltake Bigwater 760 Plus provides, but it comes at a steep cost, with not a whole lot of performance if you are just trying to cool your CPU.
Do you have any comments or questions about the Thermaltake Bigwater 760 Plus? Drop by our Forums. Registration is free, and it only takes a minute!


