By: Jonathan Kwan
April 16, 2010
I will be absolutely honest here. As a silent PC enthusiast, we don't normally take Thermaltake seriously all the time. While it is undeniable that Thermaltake is probably one of the largest players specializing in computer thermal management components and beyond, the focus of their products are typically more value oriented rather than focusing on ultimate silence or overclocking performance. In the past, we definitely liked the Thermaltake Aguila computer case, and power supplies such has the Thermaltake Toughpower Cable Management 650W also delivered superior performance at low audible noise levels. But let's not forget the Thermatale RX-K8 heatsink way back then, which, to be honest, isn't quite a brilliant product, haha. That said, the Thermaltake Silent 1156 one of our Technical Editors Anthony Kwan recently reviewed delivered generally good performance at a very affordable price tag. When Thermaltake asked if I wanted to take a look at their latest creation, the Thermaltake Frio cooler, it really got me interested. Featuring a total of five wide diameter 8 mm U-shaped heatpipes, swappable fans, and what appears to be a solid design, I won't even try to deny the fact that I am extremely excited to give it a shot and see how it performs in the real world. Is the Thermaltake Frio a high performance cooler that will appeal to overclockers and silent PC enthusiasts alike, or is it oversaturated 'just another heatsink' market? Does a cooler having a name that means 'cool' in Spanish translate accordingly to every other language? We have one tested here at APH Networks for you today!

Our review unit of the Thermaltake Frio CPU cooler came in a relatively large, brown corrugated cardboard box from Thermaltake's American offices at City of Industry, California. Using UPS Standard, the package appeared to be handled appropriately with no signs of shipping damage at all -- everything arrived in excellent condition into our hands here in Calgary. Interestingly, they didn't bother filling the shipping box with packing peanuts or other packing material, haha. After all, it is a heatsink, and the retail box does a fine job at protecting its contents for our review today.

Thermaltake has taken a relatively fresh approach when designing their retail box for their new Frio CPU cooler. With a package shaped more like a power supply box than traditional heatsink/fan box implementations, the corrugated cardboard package is actually very visually appealing in my opinion. At the front of the box, we have a black colored background, with a grid of ice blue blocks shining across the center to accentuate its 'cool' motif. Situated at the upper left corner is Thermaltake's logo as always; placed in center offset is the word 'Frio' in modern stylized text -- as shown in our photo above. An array of three icons reside at the bottom right corner of the front to show that the Frio has two 120mm fans included, features five 8mm heatpipes, and support for Intel sockets LGA 1366, LGA 1156, LGA 775 as well as AMD sockets AM2, AM2+, and AM3. Meanwhile, a table of specifications is placed on the left side of the box, and feature highlights with a matrix of photo thumbnails are located at the back. Generally speaking, I believe Thermaltake has done a brilliant job in designing a modern and stylish package for the Thermaltake Frio, giving it a lot of class, as well as excellent first impression for the consumer.
Before we move on, let's take a look at the specifications of the Thermaltake Frio, as obtained from the manufacturer's website:
Compatibility:
Intel® Latest 6-Core Processors
Intel® Core i7 Extreme (Socket LGA1366)
Intel® Core i7 (Socket LGA1366/LGA1156)
Intel® Core i5 / i3 (Socket LGA1156)
Intel® Core 2 Extreme (Socket LGA775)
Intel® Core 2 Quad (Socket LGA775)
Intel® Core 2 Duo (Socket LGA775)
Intel® Pentium D (Socket LGA775)
Intel® Pentium 4 (Socket LGA 775)
Intel® Pentium (Socket LGA775)
Intel® Celeron D (Socket LGA775)
Intel® Celeron (Socket LGA775)
AMD® Phenom II X4/X3/X2 (Socket AM3)
AMD® Phenom X4/X3 (Socket AM2+/AM2)
AMD® Athlon 64 FX (Socket AM2+/AM2)
AMD® Athlon 64 X2 (Socket AM2+/AM2)
AMD® Athlon 64 (Socket AM2+/AM2)
AMD® Sempron (Socket AM2+/AM2)
Heatsink Dimension: 139(L) x 98(W) x 165(H) mm
Heatsink Material: Aluminum Fins; Aluminum & Copper Base
Heatpipe: Ø 8mm x 5
Fan Dimension: 120(L) x 120(H) x 25(W) mm
Fan Speed: 1,200 ~ 2,500 RPM
Bearing Type: ----
Noise Level: 20 ~ 43 dBA
Max. Air Flow: 101.6 CFM
Max. Air Pressure: 4.2 mmH2O
LED Fan: ----
Power Connector: 3 Pin
Rated Voltage: 12 V
Started Voltage: 6 V
Rated Current: 0.5 A
Power Input: 6W
MTBF: 50,000 Hrs @ 40℃
Weight: 1,042 g

The retail box opens via a flap at the top, giving the user full access to its internal contents. You will be first greeted by a couple of documents, including an installation instructions poster, and a warranty form. Clipped between two large Styrofoam brackets is the Thermaltake Frio CPU cooler itself; with one of two included 120mm fans preinstalled on the heatsink for you already. A second 120mm fan is clipped on one side, while the other side is a small white box holding all the mounting accessories.
Like Noctua, Thermaltake has done an excellent job in organizing the installation accessories. Four individual bags labeled 'A', 'B', 'C', and 'D' holds different mounting parts for different sockets; while a fifth bag has common accessories such as the washers and thermal paste. This really made installation easier, because it eliminates a lot of frustration in gathering digging through piles of metal and plastic just to get the right parts for the intended socket!

The Thermaltake Frio is probably the most aesthetically pleasing and visually refined cooler I have seen in a while. Traditional heatsink/fan designs are always designed with function over form; usually very little to no attention is given to the way it looks. The same does not go for the Frio. A black tinted plastic cap with the Thermaltake logo covers the entire top of the heatsink; two red bars run vertically across to give it a sharp, distinct look -- taking design cues from the company's flagship Level 10 chassis and the Element Q mini-ITX case. The rugged plastic frame extends full circumference around both sides of the heatsink as well; creating a solid, symmetrical appearance in the finished product. But it is not all show and no go. The latter are actually removable plastic fan brackets for easy installation and removal of 120mm fans, in which we will cover in detail in a short moment. The Thermaltake Frio is capable of accommodating two 120mm fans (Included) for a performance push/pull configuration; the front fan is already preinstalled for you out of the box.
The Thermaltake Frio incorporates a total of 48 aluminum fins, for a total surface area of approximate 1 square meter according to my measurements and calculations. Each fin is 0.4mm thick. This is surprisingly close to the giganormous Noctua NH-D14 heatsink, without doubt this figure is still impressive in magnitude. However, because the fin density is quite high, and the edges the fins are completely flat, the aerodynamic characteristics are less than optimal. This simple fin geometry contributes to increased air resistance as well. During our tests, we noticed a considerable level of air turbulence noise, even when tested with a single Noctua NF-P12 installed in place of stock Thermaltake fans.
It is also interesting to note the weight of Thermaltake's Frio CPU cooler is listed at 1,042g -- which I would assume that this statistic is with one fan installed (Because heatsink dimensions are specified with one fan installed as well) -- this figure is actually surprisingly close to the Noctua NH-D14 at 1,070g with one 140mm fan installed, haha. Fundamentally speaking, the combination of material composition of both heatsinks is different -- the Noctua has a more generous use of aluminum -- while the Thermaltake features wider diameter heatpipes and more decorative material to add to the weight. I still find it interesting how a heatsink can weigh almost as much as something nearly twice the size though!

One of the biggest highlights of Thermaltake's Frio processor cooler comes down to its use of heatpipes. Featuring five 8mm wide diameter U-shaped heatpipes leading away from the contact base, they travel in two opposing directions for ten effective heatpipes through the aluminum fin array for heat dissipation. These heatpipes are also placed in alternate alignment for better heat distribution between the inner and outer parts of the heatsink fins for maximum effectiveness. Heatpipes are very commonly used because they can efficiently lead heat away from its source due to the low heat of vaporization (Phase change energy) of alcohol. In the case of the Frio, wide diameter heatpipes increases the quantity of fluid and flow rate available for heat transfer, therefore takes further advantage of fluid thermodynamic properties.
As aforementioned, the Thermaltake Frio is capable of accommodating two 120mm fans for a push/pull configuration; where the front fan pushes air into the heatsink fins, and the rear fan mounted in the same direction pulls air away from the heatsink for faster heat dissipation. The photo above should give a clearer picture of the Frio's fully symmetrical design and fan mount implementation. Meanwhile, measuring in at 139mm across and 165mm in height, these dimensions are fairly standard for a 120mm tower style cooler. Its 98mm front-to-back specification is taken with one fan installed, so basically add 25mm to that number if you want to count the second fan, or subtract 25mm for configuration without the front fan installed. Generally speaking, the dimensions of the Thermaltake Frio are within average as far as a 120mm tower heatsink is concerned, and should not interfere with nearly components such as memory modules.
However, if you own a motherboard with RAM slots in close proximity with the processor socket such as the Asus P7P55D-E Premium (The heatsink's front fan will extend over the memory slot closest to the left), thankfully the Frio has relatively high clearance between the heatsink contact base and the bottom fin -- therefore the fan, mounted in sync with the fin array, will not cause any significant problems. You will just need to use RAM with low profile heatspreaders, or simply remove high profile heatspreaders to eliminate any clearance problems.
It is important to note that, because the fan brackets align the fans fully in sync with the coverage of the fin array, no airflow is directed directly over the area between the most bottom fin and CPU contact base. This may cause some heat congestion here; that's not to mention that the Thermaltake Frio features nothing to divert some air to nearby motherboard components for cooling -- as they may rely on side flowing air provided by stock coolers.

The Frio features a relatively flat base, and should exert reasonably good contact with your processor. As discussed earlier, five 8mm wide diameter heatpipes lead away from the contact base, as shown more clearly in the photo above. Like the Noctua NH-U12P and NH-D14, the Thermaltake Frio is a copper/aluminum hybrid heatsink electroplated with nickel. The vital parts such as the base and heatpipes are built using mainly copper for best heat transfer ability with a thermal conductivity of 401 W/mK, and some mix of aluminum to reduce weight. The heatsink fins utilizes only aluminum as its material due to its lightweight properties as juxtaposed to copper -- this is to allow the construction of larger heatsinks without stressing too much on the motherboard due to weight. Aluminum has a thermal conductivity of 237 W/mK which is not as optimal for heat transfer as it retains more thermal energy.
While this is all quite interesting information, visually speaking the Frio from Thermaltake has none of the copper color with its copper heatpipes and base. According to the specifications, the Thermaltake Frio -- like the Noctua heatsinks we have reviewed in the past -- is electroplated with nickel on top of its copper; which has a thermal conductivity of 90.9 W/mK. While nickel has a lower thermal conductivity than copper which may limit heat transfer, the electroplated layer is very thin and should not directly affect performance to a significant degree -- but it is likely related to the corrosion allowance factor. Nickel and nickel-base alloys generally have desirable properties that can withstand corrosive environments and high temperatures -- which are especially beneficial for a heat dissipation device.
The reason why nickel has such a property is because of nickel's ductility and toughness all the way up to the melting point of 1455°c measured at non-standard pressure. Nickel's face-centered cube crystal structure is virtually unaltered all the way up to that temperature. Nickel, like titanium, is highly resistant to corrosion therefore corroded material won't build up on the surface in the long run. It's surely a good sign because the Frio will be less prone to losing its cooling performance over time as juxtaposed to a corroded copper surface.
Additionally, all the joints are cleanly soldered at the base, as well as the fact that the heatpipes are soldered to the fins so that it does not lose contact over time. Lower quality heatsinks offer high initial performance, but degrades over time as contact between metals decreases due to thermal expansion and contraption. Overall, the Thermaltake Frio appears to be built very solidly.
Installation is relatively simple at this point. Simply find the right mounting brackets designed for your socket, and attach them to the main heatsink unit with two screws on each side. Use included black colored washers at the threads that crosses over to the other side of the motherboard.

Thermaltake includes two 120mm fans out of the box, where one of them are already attached to the Frio already. These fans run from 1200rpm to 2500rpm; and can be adjusted via an integrated variable resistor knob on the fan cable. I found this very convenient during usage, and definitely a nice touch by Thermaltake. My only complaint is that Thermaltake doesn't include any 3-pin Y-split connector out of the box for both fans to connect to the same motherboard CPU fan header.
Fan installation is a relatively simple process. As aforementioned, one of them are preinstalled for you already; so you don't need to worry about that, unless you need to swap it out. If you want to install a second fan, remove the bracket from the back of the heatsink -- note that the following procedure is identical for both sides, since it utilizes an identical mounting mechanism. The fan bracket will unclip easily if you give it a light pry with a screwdriver. Meanwhile, align the fan and pull the vibrational dampeners through the mounting holes. It will take some practice to get it right, but once you get the hang of it, the procedure is also pretty easy. These brackets feel solid, and covers the entire outer perimeter of the fan, making this process a pleasure to execute. Reattach the fan bracket to the Thermaltake Frio, and you are good to go!
Finally, we will mount the Thermaltake Frio onto the motherboard over the processor. A proprietary backplate is supplied by Thermaltake, which installs over the stock plate for optimal weight distribution -- the inertia of the >1kg heatsink is really something that needs to be addressed accordingly, otherwise it may simply fall out, or otherwise cause excess stress on the motherboard. For the most part, the system is implemented well, but has one major flaw: It is fastened by four nuts at the back of the motherboard. This means that, unless you have opens on your motherboard tray, you cannot remove the heatsink at all until you remove the whole motherboard. Good luck changing processors or reapplying thermal paste! Additionally, the nuts are also quite small, making them quite a challenge to handle for users with larger hands. No puns intended, by the way.
-----------------------------------------
The Tests

The fan on the Thermaltake Frio is easily swappable -- so feel free to use your favorite.
Our test setup as follows:
CPU: Intel Core i5-750 (Stock settings; Intel SpeedStep and Turbo Mode enabled)
Motherboard: Asus P7P55D-E Premium
Graphics: Gigabyte GeForce 8800GT TurboForce
Memory: Patriot Extreme Performance PC3-14400 2x1GB
Chassis: Danger Den Torture Rack (1x Thermaltake 120mm LED Fan)
Power: OCZ EliteXStream 800W
Sound: Integrated (Motherboard)
Optical Drive: Liteon 16X DVD-ROM
Hard Drive: Western Digital Caviar 7200RPM 80GB 8MB Cache
Operating System: Microsoft Windows 7 Professional x64
All tests were run in our custom built test platform, and run in open configuration for uncapped heatsink performance. The computer remained in the same location in the same room throughout all tests. The room temperature in our testing lab is around 20c. Stock thermal paste respective to both coolers were used to rate its performance; all pastes were given a proper amount of time for them to fully settle. This means that Thermaltake's tube of included paste was used for the Frio, Noctua's NT-H1 thermal paste for the NH-D14, while preapplied paste was used for the Intel stock cooler. The fans on all heatsinks were directly connected to the motherboard's 4-pin connector. Computer was turned on and idling for at least one hour for the idling tests. High CPU load results were obtained using the Prime95 in-place large FFTs test with four worker threads for a minimum of 30 minutes.
I did not compare this heatsink against a bunch of other heatsinks because in my opinion, a heatsink is important in areas such as engineering, build, noise and performance in relation to idle/load. It's hard to simulate the exact two scenarios -- the same amount of paste, application pressure, and other temperature influential factors -- including time of day, airflow and circulation of room, as well as maintaining a constant temperature. For careful representation, we have spent a lot of time to carefully simulate the exact same scenario in each case to ensure accurate temperature measurement when be compared this heatsink against the Noctua NH-D14 and Intel's stock cooler are used as a reference result.
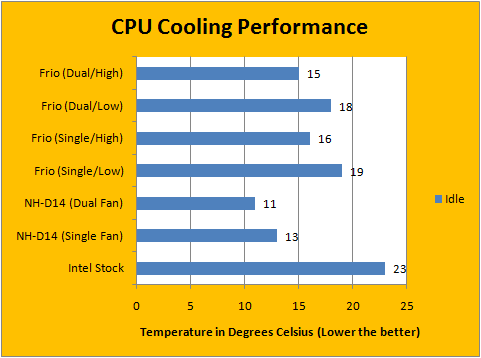
Your first reaction may question the idle temperature readings, and so did I, haha. Our recent review of the Intel Core i5-750 shows that the processor only uses 2W in idle state, so the amount of heat generated is very little. These readings are taken from Core Temp to obtain the core temperature of the processor from the Digital Thermal Sensor, and the temperature of the highest core is recorded. The results are cross-checked with Real Temp and EVEREST Ultimate Edition 5.5 with correct Tjunction Max values. These results is generally much more accurate than the motherboard sensor. Is it actually possible for air cooling to actually go below room temperature? Technically no; but since the Thermaltake Frio and the Noctua NH-D14 both relies on a serious array of heatpipes that works on the principle of continuous evaporation and condensation of a liquid to make this a possibility. For example, your skin can actually reach below room temperature due to perspiration. Additionally, I made sure that the entire heatsink is heated properly beforehand to verify the idle state temperature after a full load cycle. Combined with a relative large surface area for heat dissipation, our results above show very clearly what the Thermaltake Frio in particular is capable of doing, relative to each other. When combined, the heatpipe array and large surface area is beyond capable of transferring the heat away from the processor faster than the net 2W power consumption is able to generate. I also physically felt the heatsink when the CPU is idling and under load to get a rough verification of the heat dissipation effect of the Thermaltake Frio CPU cooler.
In the lowest setting, the Thermaltake Frio's fans spins at around 1300rpm, whereas the maximum RPM is around 2500rpm according to our motherboard readings. When comparing to the Noctua NH-D14 in our idle graph above, it is generally safe to say that the noise level of the Noctua at regular setting is comparable to the Frio at low (Actually, the Noctua is a bit quieter -- we'll detail noise characteristics in just a second), making the contrast of these results practical for evaluation. Overall, the Thermaltake Frio provides pretty decent performance in this area as far as its significantly smaller physical size is concerned, but let's see how it stacks up under the real stuff -- the load tests.
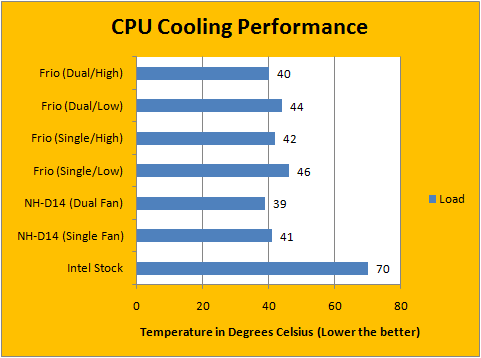
I am actually quite impressed by the load test results, as the Thermaltake Frio reduces the gap with the Noctua NH-D14, despite having less than half the physical surface area. The Thermaltake Frio with a single fan on the lowest setting is only 5 degrees over the Noctua NH-D14 at 46c; whereas with two fans installed at the same speed, the gap remains the same at 5 degrees for a final temperature of 44c -- as shown in our graph above. If you max out the fans at full RPM, the gap reduces to only 1 degree Celsius at 42c and 40c for single and dual fans, respectively.
The noise aspect is probably the most interesting of the bunch, as we have asked at the beginning of this review. Does this high performance cooler appeal to overclockers and silent PC enthusiasts alike? While perceived loudness is very subjective and varies from person to person, I am quite a picky person on noise; and the loudest component in my entire system is pretty much my hard disk. On a scale from 0-10, where 0 is silent and 10 is the loudest, I would rate the Thermaltake Frio with a single fan on low to be at 4.0/10, and two fans on the same setting to be at 4.5/10. Blasting it to full RPM, well, this one is kind of funny haha. As shown in our result charts earlier, a faster fan does improve temperatures by a few degrees, but it simply sounds like a turbine at full speed! I would rate it to be 8.0/10 for a single fan, and 9.0/10 for two fans with this setting. It is simply way too loud to be practical in running the fans pedal-to-the-metal style haha. Additionally, because of the completely flat edges and tight fin spacings, air turbulence noise can certainly be heard if you are a silent PC kind of guy -- this is held true even if you are using a high performance aftermarket fan like the Noctua NF-P12. If Thermaltake improves the heatsink fin geometry, they could not only reduce noise, but also increase airflow between the fins to improve overall cooling performance.
-----------------------------------------
Scroll down a bit and read the numerical score first. "What? Isn't it clearly a much better cooler than the Thermaltake Silent 1156? Why is the score just a notch lower?" Well, technically yes, the Frio is a undoubtedly a far superior heatsink/fan -- but in the same way we won't be comparing a Ford F-150 to a Lamborghini Gallardo, the price and intended market niche of these heatsinks are absolutely crucial to the final score given. The Thermaltake Frio retails for around $60 USD at press time, making a relatively high end cooler intended for performance enthusiasts. And for the most part, I can definitely say that Thermaltake has done a brilliant job with the Frio. Its refined look, excellent build quality, and great utilization of parts and materials makes a very good performing CPU cooler in the long run. Our results posted in the graphs above speaks for itself! Unfortunately, it has two fundamental flaws. The big one is that its overly simple fin geometry and implementation causes high air resistance and noticeable air turbulence noise. It would also be excellent if the included fans could be undervolted further for a lower minimal RPM. I understand that the Thermaltake Frio is designed for overclockers, but that does not mean that it should not appeal to silent PC enthusiasts at the same time, since a high performing cooler has higher potential of accommodating slower fans while retaining acceptable processor temperatures. Secondly, putting final securing fasteners at the back is extremely inconvenient for the end user, as the user is unable to remove the heatsink from the socket until direct access to the backplate is attained -- and this usually involves removing the entire motherboard. Generally speaking, the Frio is definitely a great heatsink, but there are a few refinements needed to make it even better -- and we would love to see these suggestions for improvements implemented in the future!

Special thanks to Ramsom over at Thermaltake for making this review possible.
APH Review Focus Summary:
8/10 means Definitely a very good product with drawbacks that aren't likely going to matter to the end user.
7/10 means Great product with many advantages and certain insignificant drawbacks; but should be considered before purchasing.
-- Final APH Numeric Rating is 7.5/10
Please note that the APH Numeric Rating system is based off our proprietary guidelines in the Review Focus, and should not be compared to other sites.
The Thermaltake Frio is an aesthetically pleasing, relatively compact, and great performing cooler -- but suffers from air turbulence noise.
Do you have any comments or questions about the Thermaltake Frio? Drop by our Forums. Registration is free, and it only takes a minute!