By: Jeremy To
May 27, 2011
Ching Chang Ping Pong Chan Zhou and Jing. I wonder, if you had to take a guess, would you say that those random sounds and letter combinations are of Chinese origin? Well, you have guessed right. In fact, nowadays, with a population of over 1.3 billion Chinese in China alone, estimating to over 19% of the world's population (Wikipedia for the win!), it is no wonder that such sounds have become daily Chinese stereotypes in North America. So, when I heard I was reviewing the Thermaltake Jing, I raised an eyebrow. As you know, much of the staff here at APH Networks is Chinese. With this, a sense of pride comes when a manufacturer names a product that we can relate to. When the Jing was released, my main focus was not directed towards the product name however, but it was geared towards how it would compare against its loud brother. Actually, the Chinese character "Jing" simply means silence or quiet, and so today's heatsink review on the Thermaltake Jing takes on an entirely different approach from its older brother, the Thermaltake Frio. When Jonathan, my fellow colleague, reviewed the Frio back in April of 2010, the conclusion was made that the heatsink could be so obnoxiously loud, that it unfortunately made the unit not as practical for silent PC enthusiasts and overclockers alike. This time however, Thermaltake decided to tame the little shy brother, Jing, creating a smaller but hopefully more practical unit for the mass. Can the Jing beat its older brother with Kung-fu and other fu's? Scroll down to find out!

The Thermaltake Jing came to our offices the same time as several other Thermaltake products arrived for reviewing. Using UPS Standard, Thermaltake shipped everything from their American office down south in California. The corrugated brown package swiftly made its safe trip to our Calgary office without much harm. If you have not already noticed in several recent Thermaltake reviews, the packaging photo has been upside-down. What can I say? We here at APH Networks are always enthusiastic about new Thermaltake arrivals that we would rather open the goodies before doing the duties, haha. (No, that's only because you're reading this in Australia. -- Editor)
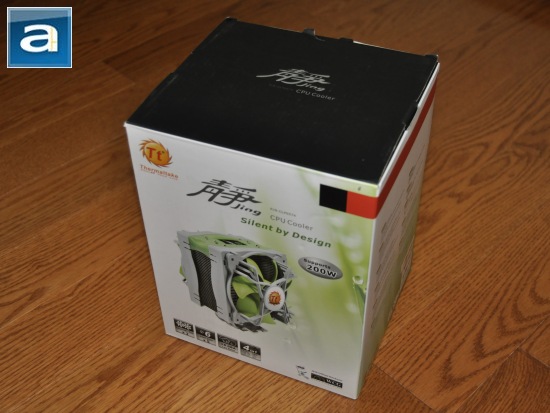
The design approach of the retail box for the Thermaltake Jing is quite pleasing to the eyes. As seen on some of the newer Thermaltake products, the retail packaging seems much more simple and refined. Placed on the front is the unit itself below its name, and the words "Silent by Design." The background composition on the box is made up of a blended combination of lush-green colors, which further demonstrates that Thermaltake is taking a large step in another direction -- hopefully for the better. On the bottom left corner are a series of icons indicating certain features of the unit. Around the rest of the box is where the specifications and other more detailed features and images of the unit are found.
Before we move on, let's briefly take a look at the features and specifications of the Thermaltake Jing, as obtained from the manufacturer's website and the product packaging:
Features
Optimized cooling performance:
- Large Aluminum fins with five Φ6 heat-pipes offers good cooling capacity. It supports to OC 4.0G in i7 CPU.
- All nickel plated fins, copper base and heat-pipes for better heat transmission.
2 extremely silent 120mm VR fans, speed from 800~1300RPM:
- Ultra quiet operation with 16 dBA under minimum fan speed.
- Dual unique inhale-exhaust 120mm reverse fan design generates greater air flow to enhance thermal performance.
- Vibration-absorbent gaskets decrease noise while operation.
Universal Socket Compatibility & Accessory Package:
- All-in-one back-plate design for accelerated installation.
- Universal support: Intel socket LGA 1366/1156/775 and AMD socket AM2/AM2+/AM3.
- Superb thermal grease maximizes heat transfer.
Specifications
- Compatibility: Intel LGA1366, LGA1155/1156, LGA775 & AMD AM2, AM2+, AM3
- Heatsink Dimension: 131(L) x 123(W) x 162(H) mm (with 2 Fans)
- Heatsink Material: Aluminum fins, Aluminum & Copper Base
- Heatpipe: 6mm(x5)
- Fan Dimension: 120(L) x 120(H) x 25(W) mm
- Fan Speed: 800 ~ 1,300 RPM
- Bearing Type: ----
- Noise Level: 16 dBA @ 800 RPM
- Max. Air Flow: 42 CFM
- Max. Air Pressure: Air Intake = 0.85 mmH2O, Air Exhaust = 1.43 mmH2O
- LED Fan: ----
- Power Connector: 3 Pin
- Rated Voltage: 12 V
- Started Voltage 6 V
- Rated Current: 0.2 A
- Power Input: 2.4 W
- MTBF: 50,000 Hrs @ 40℃
- Weight: 920 g (with 2 Fans)
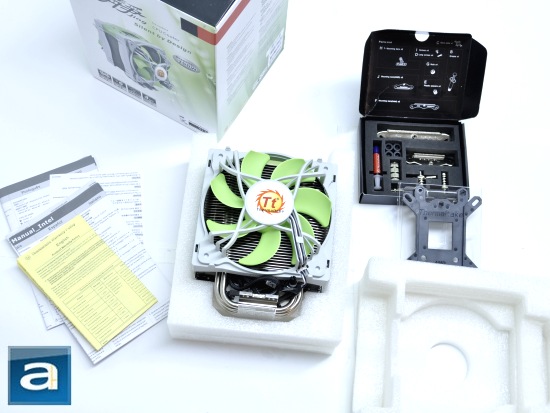
The retail box opens through a standard flap at the top. Once opened, one would expect to find the accessory box, the unit itself, several manuals, and the warranty information. The Jing is housed below the accessory box surrounded by two Styrofoam pieces that do a very nice job in keeping the heatsink safe and unharmed. The accessory box is actually quite a nice touch, as it includes all the necessary installation components within it, making installation much more organized. Also, one would not have to worry about where the components would go when uninstalling the heatsink. Within the accessory box contains the backplate of the Jing, which is used for both AMD and Intel processors. Also, Thermaltake has provided the user with a tube of stock thermal compound, some rubber grommets for vibration reduction, Intel and AMD installation brackets, and several different types of screws used during installation.
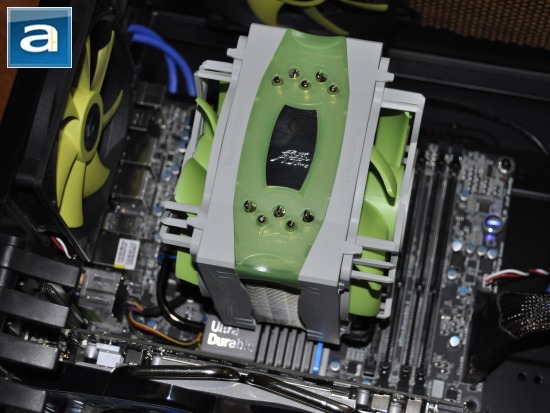
At first, I was questioning the fan placement of the Jing, because of the way it was hinged onto the heatsink. Of course, this small misunderstanding was soon resolved, as you can easily see Thermaltake has decided to switch one of the fans to face the other way to create the push-pull air cooling combination. Unlike other heatsinks, where it is usually clearly indicated which fan is pushing and which fan is pulling just by the bearing orientations, Thermaltake decided to have the orientation of the fans seem as if they are both pulling air. Thankfully, this is not the case; and in fact, I must admit that Thermaltake is actually quite brilliant as the fan orientation gives the Jing a more symmetrical look.
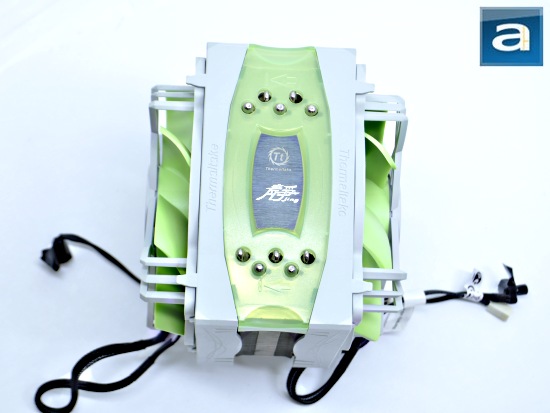
Thermaltake has always been known to have great cooling peripherals with a tinge of "flashy-ness" for enthusiasts. The Jing is no exception. The name itself definitely gives an atmosphere of quietness and calmness with its stunning green-jade look. I am actually quite surprised that Thermaltake has made such a beautiful heatsink! Of course, aesthetics is a slippery topic, as it is firmly based upon an individual's opinion. However, I just cannot see why anyone would say that the Jing is downright ugly. Accompanied with the heatsink are two 120mm fans with green fan blades, cool. The Jing does not use the traditional fan clips seen on some heatsinks like the Noctua NH-D14, and instead uses a bracket that is integrated onto the fan itself before attaching the entire bracket over the side of the heatsink. I am not entirely a huge fan (No pun intended) of this, especially when this portion is made of plastic. Several times, I found that taking the fans on and off seems very harsh and forced, and I feel it could potentially shatter or break if I used too much force. Also, another small drawback of the fan mounting system on the Jing is the 120mm fans are integrated onto the mounting bracket explained earlier. This merely means one would not be able to mount their own 120mm fans, and would have to stick with the two supplied ones. This is not such a large problem, since the fans perform very well, but having this option would still be much appreciated.
The Thermaltake Jing includes a total of 41 aluminum fins. Since the fin density is quite high, and the edges of the fins being flat, the aerodynamic characteristics are lacking a bit compared to other heatsinks like the Noctua NH-D14. Also, the flat fin geometry has a tendency to have increased air resistance, and could generate a fair amount of noise from air turbulence. However, with a total surface area of around 0.89 square meters, the Jing definitely has a fair amount of overall fin surface area, which is definitely a good feature to have. The weight of the heatsink with both fans on is roughly 920g, making it a little lighter than the Frio. This is to be expected, since the dimensions are 131mm in length, 123mm in width, and 162mm in height, so it is a little smaller than its older brother.
The Jing includes two 120mm fans out of the box. These fans run from 800rpm to 1300rpm and can be adjusted using an integrated variable resistor knob found on the fan cable. The knob is quite convenient, but it would have been better if Thermaltake included a 3-pin Y-split connector for both the fans to connect them to the same motherboard CPU fan header.
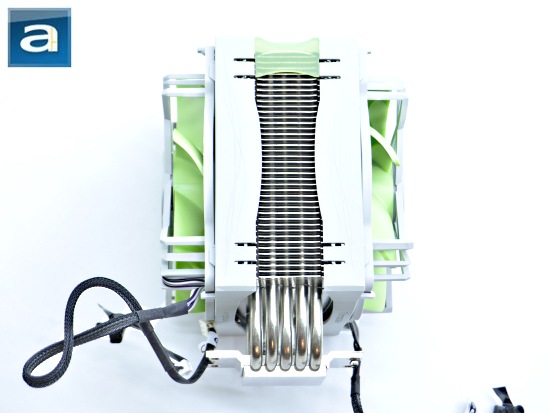
The Thermaltake Jing has quite a unique heatpipe design. The heatsink incorporates five 6mm U-shaped heatpipes that travel in opposite directions for a total of ten effective units. They are orientated in an alternating fashion for better heat distribution between the inner and outer portions of the heatsink fins. Nowadays, most aftermarket heatsinks use heatpipes, because they can efficiently lead heat away from its source. I have noticed that the Jing does not have the widest diameter of heatpipes, but in this case, the heatpipes are definitely not lacking for this standard heatsink tower.
Like the Noctua NH-D14 and the Thermaltake Frio, the Jing is a copper/aluminum hybrid heatsink electroplated with nickel. If you are wondering, the base and heatpipes are made out of copper, which as a thermal conductivity of 401 W/mK. Aluminum is used mainly for its lightweight properties, with a thermal conductivity of 237 W/mK. This is not the best for heat transfer, as it retains more heat than that of copper. The heatsink does not have any copper color visible on the base or on the heatpipes, because the Jing is electroplated with nickel on top. The thermal conductivity of nickel is 90.9 W/mK. Of course, nickel has lower thermal conductivity than copper, but overall performance should not be hindered significantly, since only a thin layer of nickel is applied to the unit's vitals. In fact, the nickel plating will help prevent corrosion -- a definite must to retain performance in the long run.
As seen on many high-end heatsinks, all the joints are cleanly soldered at the base, with the heatpipes soldered to the fins. This ensures the performance of the unit will not degrade over time. Other heatsinks that have fins pressed onto the heatpipes rather than being welded onto them like the Arctic Cooling Freezer 13 Pro offers high initial performance, but will inevitably degrade over time, as contact between metals decreases after many thermal expansion and contraption cycles.
-----------------------------------------
Installation

I have found the overall installation process is quite straightforward for the Thermaltake Jing. As aforementioned, all of the installation components are located in the included accessory box. Even though the components used to install the heatsink for Intel and AMD sockets are placed together, Thermaltake has taken the time to label clearly which pieces are used for what socket, as seen in the organized installation manual and on the pieces themselves. Thermaltake has also decided to be fairly efficient in materials, creating a backplate that fits both the Intel and AMD sockets, depending on which way the backplate is facing.
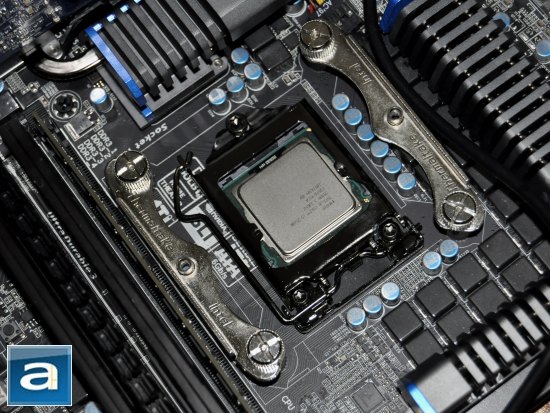
To install, simply orientate the backplate to face the correct direction towards the user. For me, I have an Gigabyte GA-P67A-UD5-B3 motherboard, so I would need to place the backplate so the word "Intel" could be seen right side up. Flipping it around would read "AMD", which in my case, would be wrong. Lastly, place the four bolts into the holes; one at each corner, and either flip the motherboard around, or screw in the provided rubber washers provided, since the bolts are not fixed.
A total of four mounting brackets are provided in the box of accessories. Two of them are for installing the heatsink for AMD sockets, and the other two are for Intel sockets. All four brackets are labeled either Intel or AMD, so one would not be confused during installation. Once the rubber washers are screwed into the bolts, the brackets are then placed on top of them. Lastly, a set of four metal screws are added on to fasten the entire setup.
Installation is not yet complete, as the heatsink itself is missing the screw system used to mount onto the brackets. Using a small screwdriver, one can easily accomplish this; it is important to note that the 120mm fans have to be removed in order to simplify this process.
Securing the heatsink onto the brackets is most likely the easiest part of the entire setup. Simply place the heatsink on top, matching with the holes on the brackets, and use a screwdriver to tighten the premounted heatsink screws onto the brackets. Of course, we would need to apply thermal compound before this step. Something to note is that because the heatsink fins are fairly low, the 120mm fans may have a tendency to get in the way of higher profile RAM heatspreaders.
-----------------------------------------
The Tests
Our test setup as follows:
CPU: Intel Core i5-2500K @ 4.50GHz (Overclocked, Turbo Boost disabled)
CPU Cooling: Thermaltake Jing
Motherboard: Gigabyte GA-P67A-UD5-B3
Graphics: Gigabyte Radeon HD 6850 1GB OC
Memory: OCZ Platinum XTE PC3-16000 4x2GB
Chassis: In Win Dragon Rider
Power: OCZ ZX Series 850W
Sound: Integrated (Motherboard)
Optical Drive: LiteOn iHAS224-06 24X DVD Writer
Storage: OCZ Vertex 2 60GB; 2 x Western Digital Caviar SE 320GB AAKS RAID1
Operating System: Microsoft Windows 7 Professional x64
Compared Hardware:
- Thermaltake Jing (Approximately $70 at press time)
- Intel Stock
All tests were run on a custom built test platform. The platform remained in the same location for all of the tests, with an approximate room temperature of around 21c. Stock thermal paste respective to both the Thermaltake Jing and Intel's stock cooler were used to rate the performance and given the proper time for them to fully settle. This means that Thermaltake's provided thermal paste was used for the Thermaltake Jing, and Intel's pre-applied paste was used for the stock cooler. The fans on all heatsinks were directly connected to the motherboard's 4-pin connector. Our test bench was turned on and idling for a minimum of one hour before the idling tests. High CPU load results were obtained using the Prime95 in-place large FFTs test with four worker threads running for a minimum of ten minutes until the temperatures were deemed stable.
Today, I have not compared the Jing against a number of heatsinks. This is because it is hard to simulate twin scenarios. For careful representation, we have spent a lot of time to carefully simulate the exact same scenario in the cases provided to ensure accurate temperature measurements using the Intel stock cooler as a reference.
The readings seen on our graphs above and below were the CPU temperature readings taken from Core Temp -- data provided by the processor's Digital Thermal Sensor. In the tests, the core with the highest temperature was recorded with the results being cross-checked with Real Temp to ensure the most accurate temperature readings. Also, I have made sure that the entire heatsink is heated properly beforehand to verify the idle state temperature after a full load cycle.
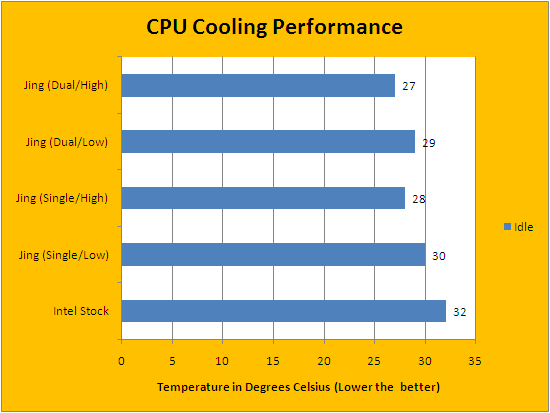
From the above results, we can see what the Thermaltake Jing is capable of doing. I found that the overall test has allowed the Jing to come quite close in temperatures, no matter the configuration. As predicted, we can see that the Jing with a dual fan push-pull combination running at the highest RPM setting of 1300rpm has the lowest temperature at 27 degrees Celsius. Surprisingly, the single fan configuration actually did quite well when compared to the dual fan setup; trailing only one degree behind its respective dual fan setup.
One reason for having such close results could be because of the rig I am testing with. Usually, it is most optimal to have a heatsink cooled using two fans (Push-pull). I have noticed with the Jing, the rear 120mm fan will end up being so close to the 120mm exhaust fan in my In Win Dragon Rider case that when the left 120mm fan is removed (Single fan setup used in the tests), there will still be a fairly effective push-pull combination from the 120mm push fan of the Jing in conjunction with the pull fan from my chassis' exhaust fan. In this sense, for most cases, the Jing will be able to perform relatively well with a one fan setup, so long as an exhaust fan is relatively close by.
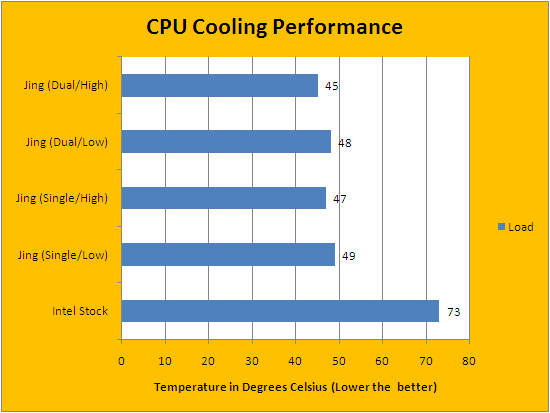
Under load conditions, we can see the true performance potential of the Thermaltake Jing. In this test, the Jing blows the stock cooler out of the water, keeping temperatures relatively cool in the mid to high 40's. Again, much like the results seen in the idle tests, the dual fan setup come out ahead with the 1300rpm fan settings, allowing the processor to reach 45 degrees Celsius, with the single fan setup at the same RPM trailing by just 2 degrees. Again, all of the temperatures above are quite close.
Noise is quite an interesting topic when reviewing a heatsink. Since testing temperatures on a heatsink relative to other heatsinks depends so much on the scenario and rig, noise is something that can thankfully be compared as a constant. We here at APH Networks are known for being quite sensitive to sound. On a scale from 0-10, where 0 is silent and 10 is loud, I would rate the Thermaltake Jing with a single fan at low would be at 3.5/10, and two fans on the same setting at 4.0/10. In the same way, I would rate the Jing with a single fan at high as being 4.0/10, and two fans on the same setting at 4.5/10. I would have to admit the Jing is decently quiet, as its name in Chinese suggests. In fact, I would sometimes not be able to tell the difference in fan noise from low to high settings. This could be because it was more apparent that the heatsink produced more air turbulence noise than fan noise, due to the simple fin design as discussed previously.
-----------------------------------------
So, is the Thermaltake Jing worth your hard-earned money? Well, retailing at around $70 USD at press time, the Jing is quite a spectacular looking heatsink in my personal opinion. Comprised of 41 aluminum fin design for a surface area of approximately 0.89 square meters, a 120mm dual fan push-pull combination setup with variable resistor knobs, and five copper-aluminum heatpipes welded and soldered onto the fins, there is quite a bit to like about this heatsink. There are still a few things to work on. First off, I found the mounting system for the fans to be somewhat fragile. The Jing is also missing a 3-pin Y-split connector for those who do not have as many motherboard fan connections. The relatively simple fin geometry has a tendency to create air resistance, which affects cooling potential. Also, this simple fin geometry adds a lot to the sound as the air turbulence noise created is, at times, louder than the fan motors. Additionally, the integrated bracket fans prevent the user from replacing the stuff that comes out of the box. Lastly, something that may not be seen as a con, but still something to note, is that a dual fan setup on the Jing may unfortunately not increase performance as much so long an exhaust fan from a case is close by to act as a pull fan. Thermaltake has created a CPU cooler that molds performance and sound together to create a more balanced heatsink. So, is the Thermaltake Jing better than the Frio? Well, it is quite a hard decision, and is one that will not and cannot be answered. What I can say though, is that Thermaltake has done an amazing job with the Jing, so weigh it out according to your needs. In the end, I will leave the mystery of Jing vs. Frio for you to decide, since it definitely deserves the exact same rating.

Thermaltake provided this product to APH Networks for the purposes of evaluation.
APH Review Focus Summary:
8/10 means Definitely a very good product with drawbacks that aren't likely going to matter to the end user.
7/10 means Great product with many advantages and certain insignificant drawbacks; but should be considered before purchasing.
-- Final APH Numeric Rating is 7.5/10
Please note that the APH Numeric Rating system is based off our proprietary guidelines in the Review Focus, and should not be compared to other sites.
Whether you are a silent PC enthusiast, a hardcore overclocker, or a raging gamer, keep the Thermaltake Jing high on your list of considerations.
Do you have any comments or questions about the Thermaltake Jing? Drop by our Forums. Registration is free, and it only takes a minute!