Page 3 - Physical Look - Inside
Removing the panels on the Cooler Master MasterBox 5 is as straightforward as unscrewing the two thumbscrews for each side, and sliding the panels off. Unfortunately, these thumbscrews do not remain with the panel, and this is a disappointment considering many cases now have this small but helpful feature. The panels are as standard as they come, with a solid black finish. They have no side ventilation of any sort, and are identical to each other, so you could swap them around if you like. In addition, there is zero sound dampening material anywhere on this case, which will affect noise performance, but we will see what it is like later on. Just to note, a side panel with a window is available for the MasterBox 5, but this is sold separately from the case.
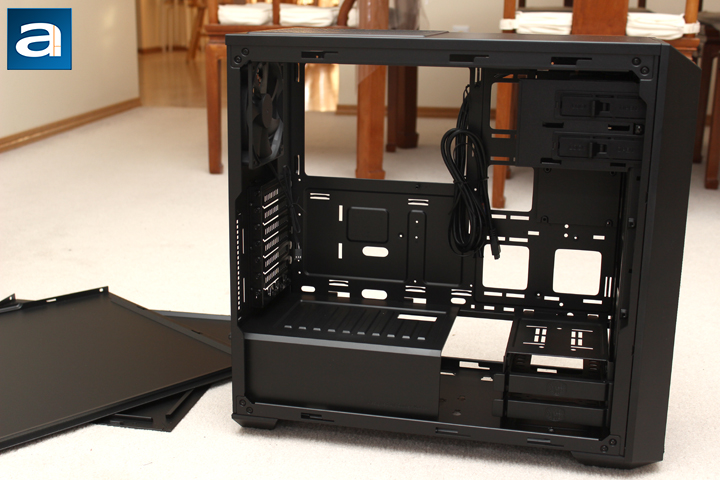
Inside, we have a pretty standard layout to speak of. By default, the Cooler Master MasterBox 5 has a somewhat divided interior, with the top portion for all the space for the motherboard and components, while the bottom houses the power supply. A plastic divider is provided here should you want to hide your power supply. The MasterBox 5 is capable of holding motherboards as large as Extended ATX, and as small as mini-ITX. Thankfully, even with the drive cages mounted as shown, there is still quite a bit of unrestricted airflow to the motherboard and other internal parts, which should result in cooler temperatures during operation.

From the back, we have a standard setup. The aforementioned generic 120mm Cooler Master fan is already mounted for you here. On the bottom is the larger than normal motherboard opening, which is great to see. As the Cooler Master MasterBox 5 is meant to accommodate for large and small motherboards, it makes sense for the cutout at the back to be suited for the largest size. This should allow for zero interference with third party CPU coolers mounting plates. Finally, at the top of the case is a large ventilated area. This is for mounting fans or radiators, and it can house either of the two, in sizes of 120mm or 140mm. It would have been nice to see some mesh filter at the top case, as leaving this area unpopulated will allow dust to fall into the case easily.

Moving to the bottom, we can see the seven expansion slot covers, including the StormGuard cover, in addition to the power supply shroud. Underneath, ATX PSUs can fit here, with a maximum given length of 180mm. Even with power supplies getting smaller, this should fit even the larger end of PSUs with ease. Underneath there are two foam strips to cushion the heart of the computer, while reducing any vibration between the MasterBox 5 and the unit. As we have pointed out before, underneath is a removable bottom filter for the PSU vent to prevent any dust from traveling into the crevasses.

The front of the case is where all the drive bays sit into the Cooler Master MasterBox 5. The top is the location of the dual optical drive bay, and it easily can mount any 5.25" drives without the need for tools. Sliding clips on each side make for a fast but secure mount. In the middle there is a removable sled to hold up to two 2.5" storage options. One drive mounts on the outside, while the other would be placed underneath. Finally, at the bottom, we have the dual 3.5" drive bay. The two sleds here slide out for easy access. It should be noted this bay can hold either 3.5" or 2.5" sizes, however both require a screwdriver to mount the respective drives. You can see a bundle of cables tied to the case here as well, and these are the front panel I/O cables. This package includes a USB 3.0 header, LEDs and power button connections, and a high-definition audio header. They are marked in all black, which blends in well with the rest of the case. One thing nice about the small pin connections are the fact they are all marked positive and negative, making for installation easier with less second guessing, as you will see later on in this review.
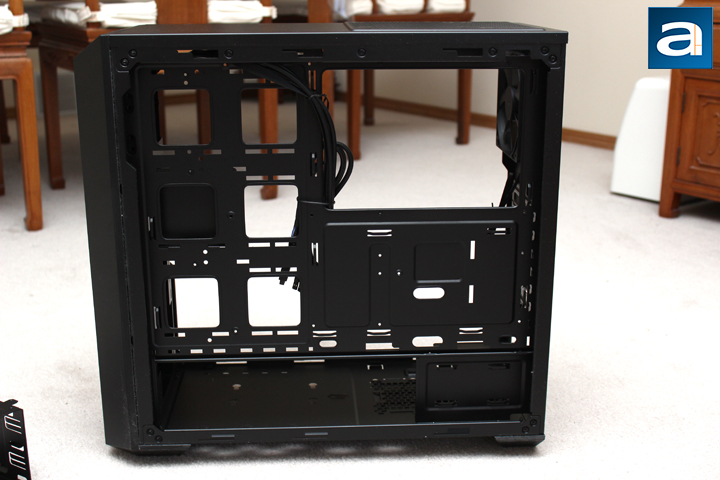
Looking to the backside of the Cooler Master MasterBox 5, and this case is very similar to others. Much like the rest of the case, the back is black. There is a lot of routing holes, which is great to see. Unfortunately, there are a few drawbacks to the MasterBox 5. First, the routing holes do not have rubber grommets lining them, making for a potentially messier cabling job. Grommets are nice to see, since the rubber flaps easily allow cables through, while hiding any empty holes when not used. Secondly, since the power supply shroud does not fully extend to the front, users do not have the luxury of hiding all their excess cables in the basement of the MasterBox 5. Finally, there is a lack of Velcro straps here, which would have been nice to see. Thankfully, Cooler Master has addressed all of these issues. Despite not having rubber grommets, the holes are smoothed out nicely, and should not cut into any cables passing through the openings. Secondly, despite having no hiding space for cables, there is plenty of space between the back and the right panel, with at least 25mm of gap space, and up to 35mm in some areas. As for the lacking straps, the MasterBox 5 does have a lot of cable tie points here, so you can use your own straps or ties here, should you so desire. Personally speaking, these three workarounds do a sufficient job, especially when you consider this is a more budget-minded case.
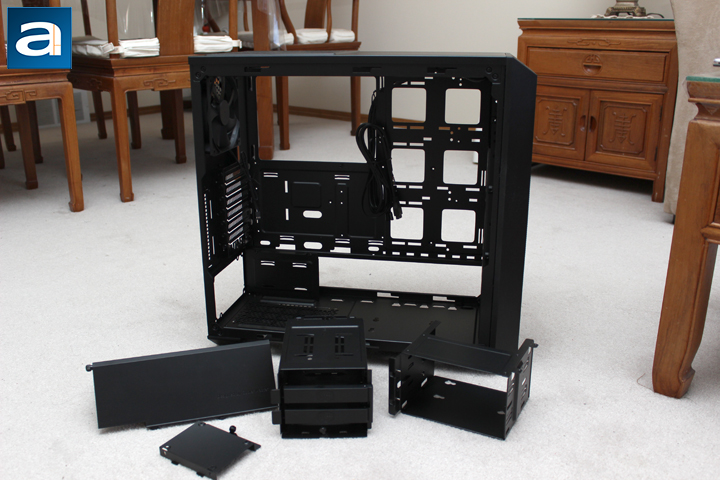
Normally, our internal inspection would be over, but Cooler Master has one more trick up its sleeve in the MasterBox 5. Personalization is something Cooler Master have emphasized over the past few products in their "Make It Yours" campaign, and the MasterBox 5 is no different. All of the storage drive bays and the power supply shroud is removable with either a thumbscrew in most situations, or at least with standard screws for the optical drive. This allows users to mix and match features they want for their build. It also allows users to move the bays around, depending on what fits better for them. For example, the 3.5" drive bay can be mounted in multiple places in addition to the 2.5" drive bay. This sort of customization is really encouraging to see, and it really lets users design what they want to see in their own system build.
Page Index
1. Introduction, Packaging, Specifications
2. Physical Look - Outside
3. Physical Look - Inside
4. Installation and Conclusion


