By: Aaron Lai
December 22, 2023
Over the past year, I learned a lot about constraints. Since January, a group of the youth in our church had been working on a musical to perform during Christmas. This started from the ground up, including creating the plot, writing songs with accompanying lyrics, designing set pieces, and memorizing all of the lines to speak and sing. It was a wild journey. As they were set to perform earlier this month, it was not until the latter half of the year where I started to feel the time pressure. Every week in September, we had rehearsals, set design prep, and digital artwork. I was in charge of the set design and the backstage crew, while my girlfriend was directing the whole thing. I think I felt the pressure the most during the week before the show, which is often referred to as "tech week". While working behind the stage, I also felt the space constraints of the area we were working in. We were only able to set up the backstage properly during tech week, so moving things like a couch or table from behind the curtains to the front was quite a learning experience. This was also made trickier with a lack of lighting, as we only could move props when there were no lights on stage. Finally, practically everyone backstage was new to doing this, so everything was learned on-the-fly. Thankfully, everything went well, and it was great to see everyone pull through despite the bumps along the way. Today, we have the Cooler Master QUBE 500 Flatpack, which is a compact ATX mid-tower with a slight twist. We have seen this similar sizing before from Cooler Master in the form of the MasterBox Q500L, and the real tricky part came with working in the limited space. How will the QUBE 500 Flatpack fare today, and what sort of modern twists and changes will we see today? Let us read on to find out!

Today's review unit of the Cooler Master QUBE 500 Flatpack came from Newegg's correspondence offices for Cooler Master in Eastvale, California. Traveling with UPS and their Standard ground service, this box arrived in pretty poor condition. There was a notable amount of bruising on the edges with a large hole on the opposite side. I can only hope that the internals were able to survive the beating this box took while in transit. I would have liked to see a second cardboard box around this one to protect it from damage as you see, but this was not the case and the product box doubled as the shipping container. Around the box, you will see some diagrams of the box itself. As well, you will see some specifications and features of the box. The overall box design is quite utilitarian with nothing really being attractive or standing out from the ordinary. However, one thing you will notice is how this box is indeed quite flat, as indicated in its name. One might be wondering what the Cooler Master QUBE 500 Flatpack entails, so I will continue on with the unboxing.
Before doing so, I have grabbed the specifications from the manufacturer's website for your perusal:
Model Number: QUBE 500 Flatpack White: Q500-WGNN-S00
Exterior Color: White, Black
Materials - Exterior: Steel, Plastic, Tempered Glass
Materials - Left Side Panel: Grey TG + Steel
Dimensions (L x W x H): 406 x 231 x 415mm (Incl. Protrusions), 380 x 231 x 381mm (excl. Protrusions)
Volume: 33.44L (excl. Protrusions)
Motherboard Support: ITX, Micro ATX, ATX, E-ATX (Width up to 296mm w/ SFX PSU, up to 273 w/ ATX PSU)
Expansion Slots: 7
3.5" Drive Bays: 4
2.5" Drive Bays: 3
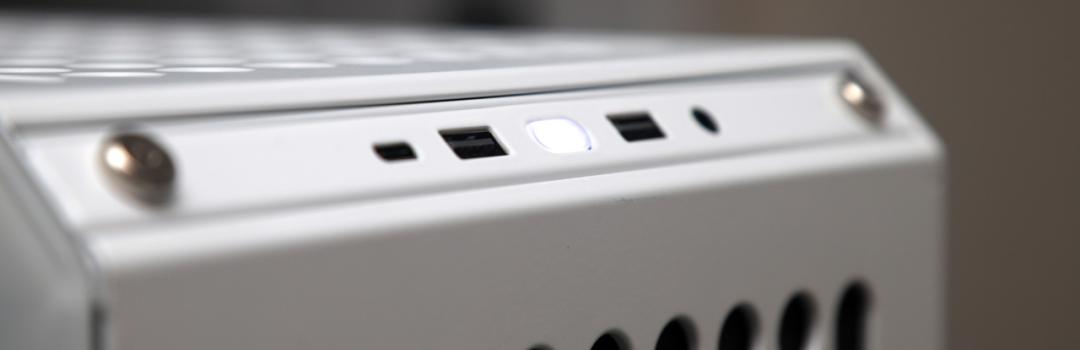
I/O Panel - USB Ports: 2x USB 3.2 Gen 1 Type A, 1x USB 3.2 Gen 2 x 2 Type C
I/O Panel - Audio In / Out: 1x 3.5mm Combo
Pre-installed Fans - Rear: QUBE 500 Flatpack White: 1x 120mm (1800 RPM) SF White PWM
Fan Support - Front: 1x 120/140mm (x2 if PSU is mounted in bottom)
Fan Support - Top: 2x 120/140mm
Fan Support - Rear: 1x 120mm
Fan Support - Bottom: 2x 120/140mm
Fan Support - Left side: 2x 120/140mm
Radiator Support - Front: 120mm, 140mm, (240/280mm w/ PSU in bottom)
Radiator Support - Top: 120mm, 140mm, 240mm, 280mm, (280mm can be used within 53mm thickness)
Radiator Support - Rear: 120mm
Radiator Support - Bottom: 120mm, 140mm, 240mm, 280mm
Radiator Support - Left side: 120mm, 140mm, 240mm, 280mm
Clearance - CPU Cooler: 164mm-172mm (Remove the water cooling bracket)
Clearance - PSU: 173mm to first GPU slot, 216 maximum space (w/o cable management space), 332mm space mounted in bottom (w/o cable management space)
Clearance - GFX: 365mm
Cable Routing - Behind Motherboard Tray: 29-32mm
Handle: QUBE 500 Flatpack White: Grey x 1
Gem Mini: QUBE 500 Flatpack White: Grey x 1
Dust Filters: Front, Top, Bottom, Right side
Power Supply Support: SFX, SFX-L, ATX
Warranty: 2 years
Series: QUBE Series
Size: Mid Tower

As it is no surprise by now, the Cooler Master QUBE 500 Flatpack comes almost completely disassembled. As such, our review will be a bit different from typical case reviews, as we will be building and inspecting at the same time. All of the panels are separate from each other. Instead, the expectation is for you to build the enclosure and your system out of the box. Cooler Master has laid everything out in their own separate layers so you can go through this process. Each layer is separated with cardboard and thick but sturdy foam that does not crumble during impact. After dealing with some mishaps with other cases, I am glad Cooler Master has chosen this type of foam that does not easily break.
Between each layer, there are QR codes printed on the side of the box for each step, giving you step-by-step instructions for building. There is also a separate paper manual if this is your preference. The side flaps also show the different layouts that are available for you to choose from, such as an inverted build or an open test bench mode. I will be building with the default layout. Otherwise, our Cooler Master QUBE 500 Flatpack came in white, but there is also a black version as well as a multi-color mint-pink-cream combination that Cooler Master calls their "Macaron" edition. That edition has multiple panels available in those aforementioned colors.
Page Index
1. Introduction, Packaging, Specifications
2. Assembly and Installation, Part I
3. Assembly and Installation, Part II
4. Physical Look - Outside and Conclusion


