Page 3 - Configuration and User Interface
Setting up the D-Link DCS-8600LH is a straightforward process. First, you will want to download the mobile application, which is available on both Android and iOS app stores. It is called mydlink and can be used for other D-Link security cameras, power plugs, and other home automation gear. D-Link has been growing its number of home automation products since our last review, so it is great to see their products integrated into a single application. Since our last review, D-Link has added a web browser experience, which addresses one of my concerns. While mobile is the way to go for the future, I am glad to see access through a traditional desktop or laptop computer. Even so, the mobile app still provides more functionality, so I did all of my testing on my Android phone. I would expect the iOS experience to be the same, if not very similar.
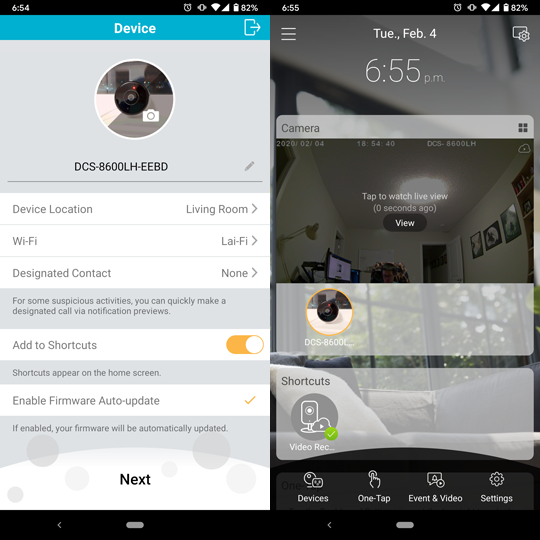
After plugging the DCS-8600LH into the wall, I launched the application and went to add the device. Once I powered on the unit, I scanned the QR code located on the power cable and it immediately synchronized with my phone. The camera connects to your wireless network through the application. Internally, the D-Link DCS-8600LH has 802.11b/g/n connectivity over a WPA or WPA2 encryption. I do find it odd that we do not have 802.11ac support, especially as some modern routers are already moving onto the even newer Wi-Fi 6 or 802.11ax. After you find the camera, you can set a label for its location as well as some Designated Contacts. This allows you to immediately notify other people about events triggered by the camera. Once you finish setup, the application allows you to add the device to your home screen for quick access. The home screen has been cleaned up a bit, with a live view directly on the front page for quicker viewing purposes. The cogwheel on the top right side is used to adjust what you want to see on the main dashboard. You can also add shortcuts on the front page of the application for quick triggers, such as starting or stopping video recording, or for manually setting your location.
Hitting the hamburger menu on the top left allows you to go through a few more configuration settings including setup of cloud storage. Just for your information, different cloud storage options are available through D-Link, but you can add up to 30 days of cloud storage for up to ten different cameras. They have both monthly plans and annual plans depending on how long you want to sign up for. The cheapest plan is a freebie of one day of cloud storage for up to three cameras. I think D-Link could offer at least three days of storage for free, but I guess this is their pricing model. You can set up different rules, such as triggering it through sound detection, motion, or both. This will then trigger different actions like recording or notifying users via a push notification on your connected mobile device.
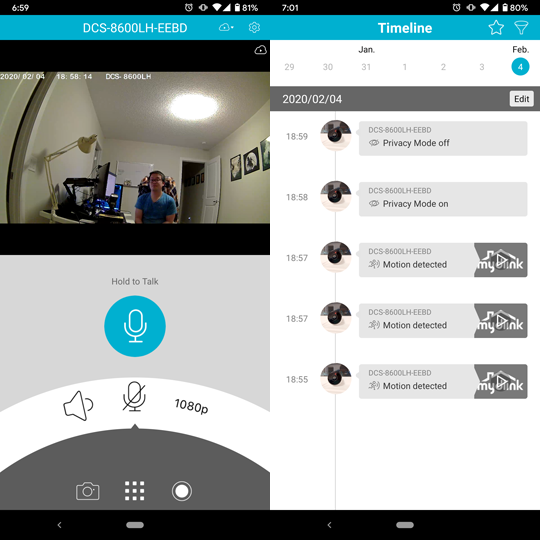
Going to the camera, the main page shows you a live preview of what the selected camera sees. From here, it shows a half screen image, though you can rotate your phone screen for a full-screen experience. You can change the recording settings, such as the resolution of the recorded video/image or if you want sound recording enabled. Strangely enough, even though I often set the recording resolution to 1080p, it would constantly revert back to 720p when I relaunch the application. You can also take a picture by selecting the camera or take a video recording by selecting the white circle. When either a photo or video is taken, it will be saved to your device rather than to the camera. Finally, with the microphone, you can hold to talk and say things to where the camera is. With the speaker on the side of the camera, this will speak out whatever you talk on the application. This is a pretty neat way to do two-way audio and potentially shock unexpected guests.
If you tap the play button near the top right side, you can see the timeline of past triggers and review the videos recorded from there. As you can see, D-Link has already picked me up multiple times from sitting here and moving around the room. This shows you the different triggers, whether by motion detection or sound detection. The timeline on the top edge lets you go further back in days, depending if you have the local storage installed or if you have a longer subscription plan. You can also delete captured videos with the "Edit" button the top right side.
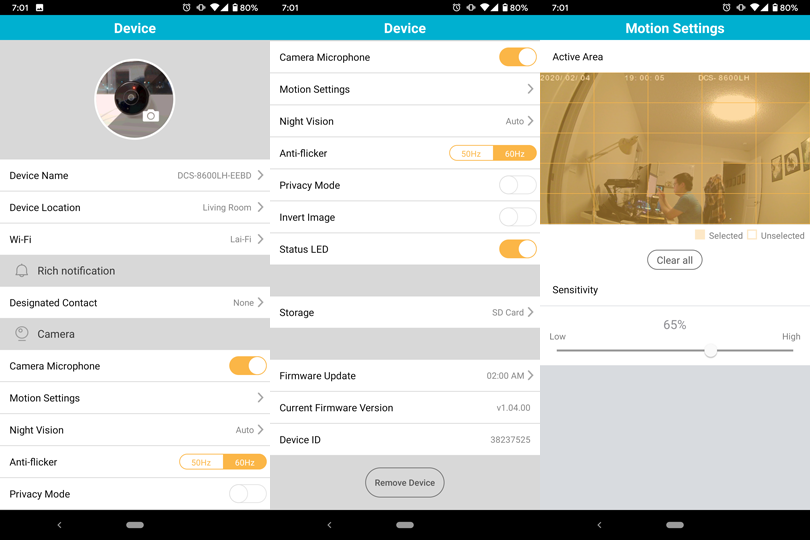
From the camera's page, you can select the cogwheel to go into the device settings. From here, you can change the settings of the microphone, motion settings, night vision, operating frequency, privacy mode, image inversion, and status LED. Most of these settings are pretty straightforward, except for privacy mode. Under privacy mode, no one can preview the images of the camera as it turns off live viewing. I am also glad to see D-Link let users completely turn off the status LED as an independent option, as this was a previous request. Otherwise, you can also select where you want the recorded data to be stored, whether it is on the cloud or in the external storage. However, you cannot select both of these options at the same time. This is important, especially for a camera this size, as any intruders could just take the whole camera unit. If this does happen however, the application will notify users when their camera goes offline, presumably when it loses power. Finally, you can schedule firmware upgrades here.
In the motion settings page, you can change the areas you want the motion detection to be active in. This can be helpful if you have pets at home, as you could block out the lower regions when you mount this camera on a higher area. You can also change the sensitivity of the selected areas, though you probably want to adjust this based on your own calibration.
Page Index
1. Introduction, Packaging, Specifications
2. Physical Look - Hardware
3. Configuration and User Interface
4. Sample Videos and Analysis
5. Conclusion


