By: Ben Joubert
July 5, 2024
New designs always require a certain amount of fine tuning. No matter what you are talking about, whether it is a piece of writing or the first go at a product, there always needs to be some sort of review. In writing, the first draft is never the final product, as it often requires multiple revisions before it is ready to be published. Similarly, with different products, the first in a new line or design may have unforeseen problems that only become clear as more people use it. After receiving feedback for these products, one can move forward with clarity about changes or improvements for a better second edition. This is even more true when the initial idea brings a brand new change to the market. Consider when Apple removed the headphone jack from their phones, or even when they added the notch at the top of the iPhone. At first, these decisions were heavily critiqued. It was a new and unwelcome change that would make a big difference to the market. But now, a few years later, almost every smartphone has removed their headphone jack and has a full screen on the front with a small notch or cutout. In the world of computer cases, majority of all designs are about the same. This means a large rectangular box that can accommodate all the different components with the same layout in each of them. However, there are different designs out there, especially when looking at smaller cases. Due to their compact size, case manufacturers have more flexibility with the layout to allow for large components in a smaller form factor. Today, we have the Thermaltake The Tower 300, which fits a micro-ATX or mini-ITX motherboard. It features a vertical construction, which is already quite different from the norm. Will it be a great case or bring struggles with this adjusted layout? Read on to find out!

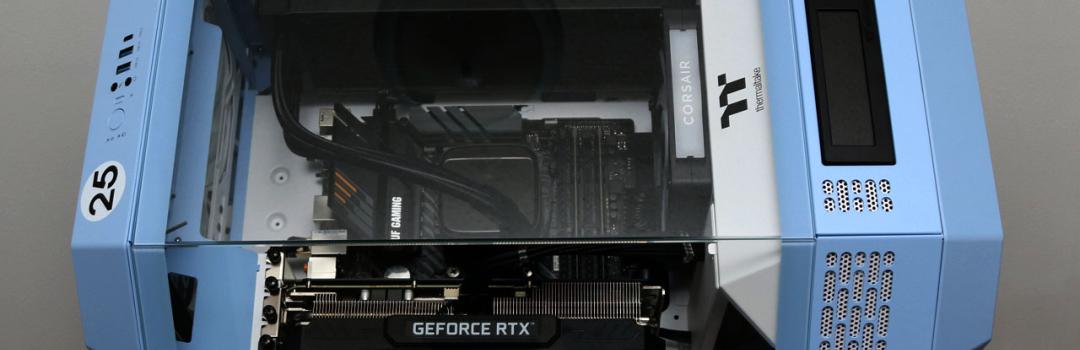
As usual with cases, the Thermaltake The Tower 300's shipping box is its retail box as well. The outside was in fairly good condition after arriving here in Calgary, Alberta from City of Industry, California via UPS Standard. There were no obvious dents or breaches here, which is a good sign. Otherwise, The Tower 300 has a box in full color, which is not usually the situation. On the front, we find an example image of what a computer may look like built in the case. The rest of the retail container continues with images of the case and the specifications of The Tower 300. Thermaltake also sent us two accessories that can be bought separately. One is a small LCD screen, which can be installed in The Tower 300 and programmed to feature different pieces of information; more on this later. The other is a stand kit to rest The Tower 300 on its side.
Before we move on, here are the specifications for The Tower 300 from the manufacturer's website:
Specifications
P/N: CA-1Y4-00SFWN-00
SERIES: The Tower
CASE TYPE: Micro Tower
DIMENSION (H X W X D): 551 x 342 x 281 mm, (22.5 x 14 x 11.5 inch)
NET WEIGHT: 8.3 kg / 18.3 lbs.
PANEL: 3mm Tempered Glass x 3
COLOR: Hydrangea Blue
MATERIAL: SPCC
COOLING SYSTEM:
Top(exhaust): 140 x 140 x 25 mm CT140 fan (1500rpm, 30.5 dBA) x 2
DRIVE BAYS: 3 x 3.5” or 3 x 2.5”
EXPANSION SLOTS: 4
MOTHERBOARDS: 6.7” x 6.7” (Mini ITX), 9.6” x 9.6” (Micro ATX)
I/O PORT: USB 3.2 (Gen 2) Type-C x 1, USB 3.0 x 2, HD Audio x 1
PSU: Standard PS2 PSU (optional)
FAN SUPPORT: Top: 2 x 120mm, 1 x 120mm; 2 x 140mm, 1 x 140mm
Right Side: 3 x 120mm, 2 x 120mm, 1 x 120mm; 3 x 140mm, 2 x 140mm, 1 x 140mm
Rear: 2 x 120mm, 1 x 120mm; 2 x 140mm, 1 x 140mm
Power Cover: 1 x 120mm; 1 x 140mm
RADIATOR SUPPORT: Right Side(AIO): 1 x 360mm, 1 x 240mm, 1 x 120mm; 1 x 420mm, 1 x 280mm, 1 x 140mm
CLEARANCE: CPU cooler height limitation: 210mm
VGA length limitation: 280mm(With power cover); 400mm(Without power cover)
PSU length limitation: 220mm

After opening up the retail box of the Thermaltake The Tower 300, the case is held in place by two large Styrofoam blocks. These keep the case stable through transportation and saves the case from large bumps or bruises. A plastic bag covers the case to prevent scratches. A manual is included, and the rest of the included accessories are found in a box inside the case.
Page Index
1. Introduction, Packaging, Specifications
2. Physical Look - Outside
3. Physical Look - Inside
4. Installation and Conclusion


