Page 2 - Physical Look - Outside
Just at first glance, the Thermaltake Element Q is definitely compact enough for any standard Mini-ITX build, yet has sufficient room to accommodate fully loaded and higher powered system configurations. Measuring in at 130 x 220 x 330 mm, it is certainly not among the smallest mITX case out there, but it features an internal power supply, one 5.25" opening, as well as one internal and one external 3.5" drive bay. There is certainly no doubt that this build will be small enough to fit in almost any space limited location -- whether it be your living room, or on a desk in an office setting. Thermaltake specifies the Element Q's weight to be 2.7 kg due to its SGCC construction. SGCC is fairly similar to SECC, except it is hot dipped in a zinc solution during manufacturing to prevent long term corrosion. The side effect is that it is heavier, as the metal is much thicker. Fundamentally, one of the biggest challenges in designing cases on the mITX platform comes down to the airflow factor. As heat becomes congested inside the chassis and has less space to move about compared to mid and full towers, airflow inside the Thermaltake Element Q must be good enough to pull out warm air and push in fresh cool air to circulate through the system. This is quite a common problem with many Mini-ITX cases, so we will take a look at how good the thermal design is on Thermaltake's Element Q in just a short moment.
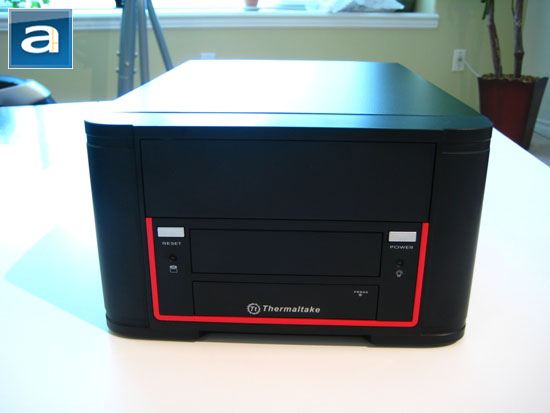
The Thermaltake Element Q takes on design elements inspired from the rest of the Element series in a more compact package. The first striking distinction is its signature red line that runs across the bottom of the removable plastic front panel, then extending in parallel about half way up the case on both sides. At the very top, there is an opening to accommodate one standard sized 5.25" device, such as a DVD burner or Blu-ray drive. Located directly below it is an externally accessible 3.5" bay for a card reader or floppy disk drive. The Element Q's reset button and HDD indicator LED resides between the 3.5" drive bay and its signature red line as aforementioned; while symmetrically opposing it on the right is the power button and power indicator LED, as shown in our photo above. While both buttons are both made out of plastic, they work very well -- they never felt flimsy or too small at any point. Situated at the very bottom of the chassis' front panel is a push-lock plastic cover. Opening it unveils two USB ports and two front panel 3.5mm audio jacks, which are labeled according to its purpose. The pair of audio jacks is located in the middle adjacent to one another, while the USB ports are spaced out on both sides of the 3.5mm connectors. This makes it easier to accommodate large USB devices, as there is more room between the ports, therefore providing more than adequate clearance on its sides at all times.
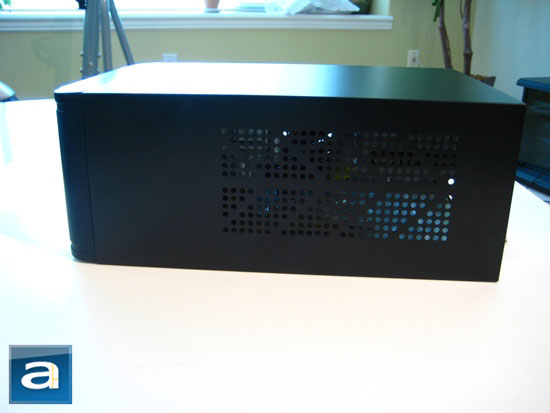
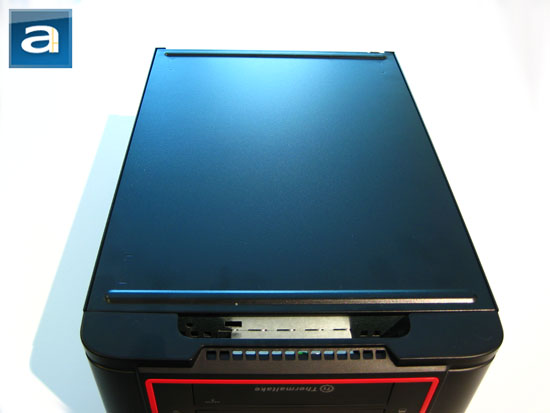
A shot at the right side of the Thermaltake Element Q. There isn't anything particularly exciting going on here, as there is just SGCC steel paneling -- but then this is crucial to its thermal design and implementation. As you can see in our photo above, a matrix of circular openings form an integrated mesh with a somewhat unique design pattern. The key of this mesh is to, of course, provide additional ventilation to the internal components. Chances are that the processor is close to this side of the case (Which it probably is, since the motherboard is so small), this could prove to be very beneficial. As we have mentioned before, every little bit of airflow counts to reduce heat congestion, especially when space is extremely limited inside the box. Speaking of which, due to the size constraints of this case, the whole top cover is just one big piece of SGCC steel bent into shape to cover every side of the Element Q, and needs to be removed to access anything inside. The left side of the Thermaltake Element Q is a mirror of the right side of the chassis.
Included with the case are four adhesive plastic feet to add to the bottom of the case, used to reduce vibration noise and protect the surface it resides on. Personally, I chose not to add them, as they would add additional height to the Element Q -- and that was not desirable for the location I was going to put the system in. It was nice to know that Thermaltake took into account the height of the case, and allowed the user to decide for themselves whether they want to add the feet or not to the case. In terms of build quality, the Thermaltake Element Q is certainly top notch. The SGCC steel is bent properly, and smoothed on the edges, leaving no sharp corners. Of course, the steel is also sturdier and more durable than aluminum built case. The zinc hot dipping further enhances its durability in protection against corrosion in the long run. The only downside is the added weight, but since the case is so small anyway, the additional mass probably isn't going to be a problem for most people. The removable plastic front panel is also solid and doesn't feel cheap at all -- although an aluminum front panel would have been nice, it probably won't carry over the Element series design of the chassis as effectively.
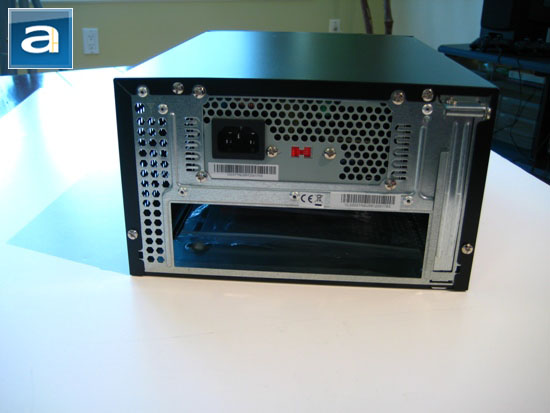
The back end of the Thermaltake Element Q features more openings for additional ventilation on the left hand side. The rest are required to accommodate other components. At the top is the included 220W small form factor power supply. The fan of the power supply is bottom mounted; so it draws air from inside the chassis and exhausts the heat out the rear opening of the unit. Surprisingly, the 220W power supply does not have automatic full range (100V-240V) AC line voltage selection, and requires the user to manually pick the right voltage by a switch at the back of the system. Four Phillips head screws are used to secure the power supply in place. Directly below the power supply is space for the motherboard back panel. Just in case if you haven't noticed, the motherboard is installed flat into the Element Q, and not vertically, haha. A single expansion card slot opening allows the user to install a full height expansion card.
Page Index
1. Introduction, Packaging, Specifications
2. Physical Look - Outside
3. Physical Look - Inside
4. Installation and Conclusion


