Page 2 - Physical Look - Hardware
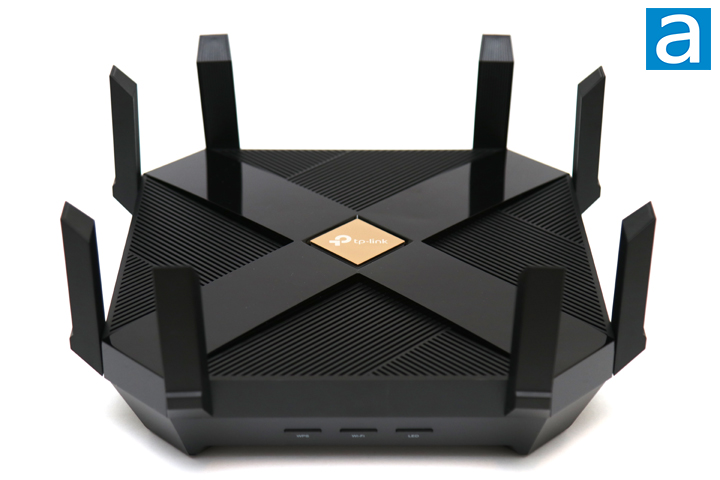
The TP-Link Archer AX6000 looks very similar to the last TP-Link router we reviewed, the Archer C5400X. We have a similarly large square-ish base with antennas coming up from the unit. Unlike the Archer C5400X, these antennas are fixed directly onto the body and they swivel up from the sides. Otherwise, the color scheme on the Archer AX6000 is much less eye-catching with a mix of glossy and matte black finishes with a gold middle area. Underneath the gold square is where the status LED for the AX6000 resides, which looks quite slick when illuminated. The whole router is made up of plastic, though this is par for the course overall. TP-Link branding is generally kept to a minimum with just the one logo on the middle gold center. In terms of dimensions, the TP-Link Archer AX6000 measures in at 261.2mm in both width and depth and 60.2mm in height. This increases to 114mm approximately in height when the antennas are fully extended. This makes the TP-Link Archer AX6000 a bit more compact than the aforementioned Archer C5400X in all dimensions. At a weight of approximately 1064g, this is also quite a bit lighter.
With such a wide base, the TP-Link Archer AX6000 sits completely flat and takes up quite a bit of space on your table. It is equipped with eight dual-band fixed antennas that swivel to point upwards or fold away. This should make for some crazy multi-user multiple-input and multiple-output wireless communications. As you can see from the photo above, the front of the router has three buttons. These are labeled WPS, Wi-Fi, and LED, and are used to toggle their respective functions on or off. Inside, the router is powered by a Broadcom BCM49408 system-on-a-chip with a powerful 1.8GHz quad-core CPU and 1GB of memory.

Looking on the sides of the TP-Link Archer AX6000, we can get a better look at the antennas attached around here as well as the array of ports and switches. On the side, we have a USB 3.1 Type-A port and a USB 3.2 Type-C port. At the back, we have a power on/off button, 2.5 Gigabit uplink WAN port, eight Gigabit Ethernet ports, 12V DC power input, and a reset pinhole button. The power supply that connects here is an external brick with a product number S050FU1200400 that is made in China. This is a 12V power supply specified for up to 4A of current. This means it can deliver a maximum wattage of 48W. Otherwise, this back shows some more ventilation slits for better cooling and airflow internally.
You might be wondering, why do we need eight antennas? As per the Editor-in-Chief Jonathan Kwan, the use of multiple antennas for communications has been the foundation of many modern wireless technologies; ranging from short range unlicensed bands such as Wi-Fi to long range licensed bands like 5G cell phone networks. The fundamental principle lies in the fact that multiple antennas allow the designer to enhance performance using beamforming and diversity techniques. Beamforming, in the simplest explanation, allows power to be directed towards a certain direction. Diversity exploits multipath -- where the same signal can arrive via different paths due to reflection and refraction in the propagation channel -- to enhance the received signal quality. Multi-user MIMO, otherwise called MU-MIMO, lets multiple antennas from multiple users to communicate with multiple antennas on base station. Obviously, the more antennas on the access point the better, but we are bound by the laws of diminishing returns.
The TP-Link Archer AX6000 is advertised as an AX6000 router. This operates at 1148Mbps on the 2.4GHz band via the 40MHz channels with four streams, while the 160MHz channels with four streams on the 5GHz band provides 1201Mbps each for a total of 4804Mbps theoretical throughput. We will evaluate the performance of this router shortly.

Underneath the TP-Link Archer AX6000, you can find even more ventilation slits to provide airflow for the internals. Four integrated plastic feet can be found here with rubber bottoms providing about half a centimeter of clearance between the router and the surface it sits on. Two mounting holes are located in between the feet, which will let you wall-mount the router if you so desire. In the middle of the base is a label showing information like the serial number, default SSIDs, and default Wi-Fi password. You probably will want to change your password and SSID, which is possible using the web configuration interface, but you will start off with these configuration settings.
Page Index
1. Introduction, Packaging, Specifications
2. Physical Look - Hardware
3. Configuration and User Interface
4. Performance Tests
5. Conclusion


