Page 4 - Installation and Conclusion
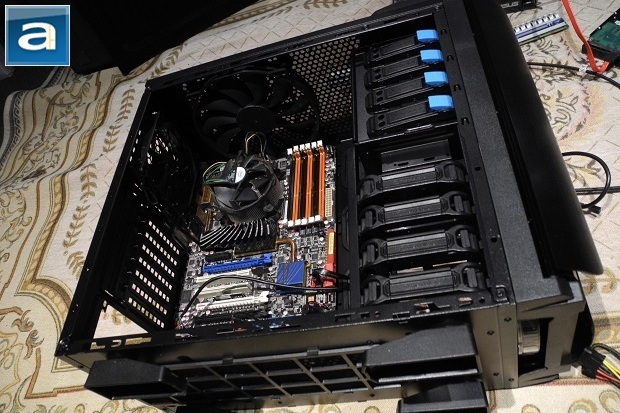
I have been using full towers for a while now, and well, they are some of the most spacious cases available, and I sort of expected to feel restricted and cramped when working with the Thermaltake Armor Revo Gene. Surprisingly, it was not the case. This made it easy for me to install my motherboard before my PSU. Before installing my power supply, I had rerouted the majority of cables to the motherboard through the cable management system openings, which was simple and serene, but my main fear is the PSU, as it is big and difficult to maneuver at times.
After finishing up with the motherboard, the power supply came in. I decided to mount my PSU with the fan facing down, which is the standard configuration. If I were to mount it with the fan up, the PSU will be sucking in the warm air produced by my video card, and potentially disrupt airflow pattern. It would also make the vents on the bottom of the case impractical if I mounted it in such a manner. As I proceeded on to mounting the power supply, I had to find the correct angle to slide the PSU in as the clip on the motherboard tray made it a little more difficult for me, but once it is in there, it is not going anywhere. It will be more than secure once you have the rear screws in.
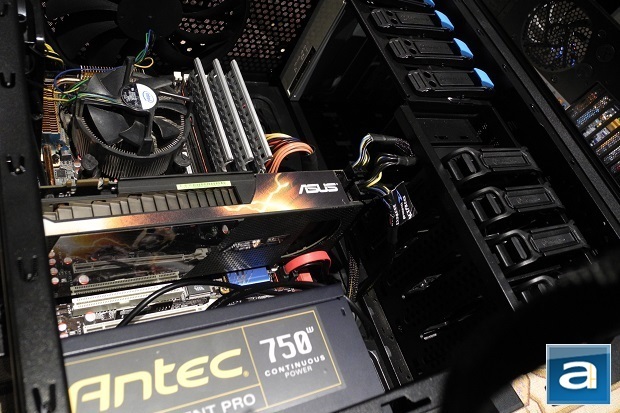
The real cabling starts after you screw in your power supply unit. I was able to fluently route most of them around the system for the cleanest setup, except for the 8-pin CPU connector. If you are wishing to have as little cable as I do, the trick I found for the CPU connector is to relay it behind the motherboard tray, and route it back through the upper right corner adjacent to the thumbscrew next to the rear exhaust fan, where there is a small opening where you can slide it through. If you are using a power supply with thick cables, you will have some difficulties, as you can only fit through the connector at a 45 degree angle. After you get them through, you will have to make a J-turn, which will induce quite a bit of pain to your thumb if you wish to follow through with this strategy. Putting that aside, cabling in the case was a breeze that made my experience far more enjoyable and far more less frustration compared to the previous experience I noted before. Sadly, my motherboard doesn’t support USB 3.0, so I had to leave the blue cable hanging.

Soon after I had moved the chassis to a suitable location, I plugged it in, flipped the PSU switch to on, and fired the baby up. The led intake fan came to life as it emitted a mesmerizing blue light from behind the black mesh. Looking at the Thermaltake gaming logo, my heart sank, as it remained dull grey, and decided that it must have been my wiring. Just as I was about to diagnose the problem, the logo slowly breathed its way to life. The logo emits a blue color with a lower hue, while the fan emits one of a higher hue. On a personal belief perspective, I think the facade would have been more eye candy if both led lights emitted the same hue.
As far as acoustics go on a scale of 0.0 to 10.0, with 0.0 being inaudible, and 10.0 being an A/C unit, the Armor Revo Gene receives a 6.5 in my personal opinion due to the sheer amount of vents for the installed and optional fans. With just stock components, the 200mm front intake fan is definitely audible, as it draws air towards the rear fan. If you are sensitive to sound, you may also hear the PSU fan whirling about as the side vent is located to the side of it. Obviously, the Thermaltake Armor Revo Gene is not designed to appeal to quiet PC enthusiasts, but being a gaming chassis and all, I don't think it really matters all that much.
-----------------------------------------
Honestly speaking, $189.99 is a price we cannot ignore when looking for a new case on the market. This price range can leave you with miles and miles of chassis to choose from -- yes, even full-tower cases -- but let’s just say you are hell-bent on getting the perfect mid tower for yourself. While the Thermaltake Armor Revo Gene is not draw-dropping when it comes to aesthetics in my personal opinion (Again, beauty is in the eyes of its beholder), the build quality and tool-free installation system is pretty good. For the price it commands, Thermaltake’s Armor Revo Gene is definitely a good choice, whether you are looking for a mid-tower case that will handle all the latest gaming components, or just to give your PC a new look. The Armor Revo Gene holds a lot of potential due to the enormity of the interior, and the versatility of fan setups you can achieve for maximum cooling efficiency. If you don’t like changing cases yet enjoy upgrading components, the Armor Revo Gene allows you to adapt in the long run. Bigger video card? Add a 120mm fan on the bottom. Too much heat build-up? Swap the 200mm exhaust fan on the roof, and replace with one 140mm and one 120mm exhaust. If that isn’t enough, there are still pre-drilled holes on the side panel waiting for a potential 140mm or 200mm to succeed the throne (I hope you wear a headset otherwise you will be wearing some ear plugs haha) but regardless of what would become of the noise level, is this my knight in shining armor? Yes, even if I am picky with small details, the drawbacks do not outweigh the gains.
Thermaltake provided this product to APH Networks for the purpose of evaluation.
APH Review Focus Summary:
8/10 means Definitely a very good product with drawbacks that aren't likely going to matter to the end user.
7/10 means Great product with many advantages and certain insignificant drawbacks; but should be considered before purchasing.
-- Final APH Numeric Rating is 7.5/10
Please note that the APH Numeric Rating system is based off our proprietary guidelines in the Review Focus, and should not be compared to other sites.
The Thermaltake Armor Revo Gene is a spacious mid-tower gaming case that delivers as promised.
Do you have any comments or questions about the Thermaltake Armor Revo Gene? Drop by our Forums. Registration is free, and it only takes a minute!
Page Index
1. Introduction, Packaging, Specifications
2. Physical Look - Outside
3. Physical Look - Inside
4. Installation and Conclusion


