Page 2 - A Closer Look - Hardware and Software
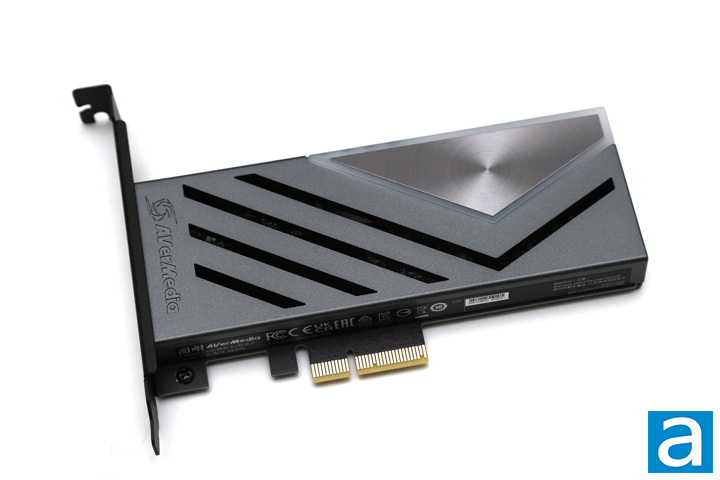
The AVerMedia Live Gamer 4K 2.1 GC575 definitely looks a lot more premium, especially when you compare it to the exposed printed circuit board of the AVerMedia Live Streamer Ultra HD GC571. This PCI Express-based capture card is covered with a metal enclosure. However, most of this enclosure does not make contact with any of the physical components on the board. This metal is a gunmetal gray with AVerMedia's logo engraved near the back end. There are multiple slits throughout the body to also allow air to flow in and out. At the other end, we have an addressable RGB area that you can customize in software. This is a translucent plastic with a circular metal pattern here. I do like the concentric circle pattern for a contrasting but pleasing look.
At the other end, we have two HDMI connections, with one for input and another for output. These are both HDMI 2.1-compliant connections, which means it supports up to 4K at 144fps. This is important, as it means PlayStation 5 and Xbox Series X owners can capture their gameplay at full resolution and frame rate. Attached at the back is a full-sized bracket, so you can install it into your system. As for its size, this card is 121mm wide, 160.5mm long, and 21.5mm thick. While this is notably longer than the aforementioned GC571, it still is smaller than most graphics cards and should fit in basically any case. Most of the width just comes from the fact the card has a full bracket to attach to your case, as the rest of the enclosure is not as wide. The card weighs about 150.5g, which is more than double the weight of its smaller brother. Based on the size of the bottom connection, you can see it will fit in a PCI Express 3.0 x4 slot.
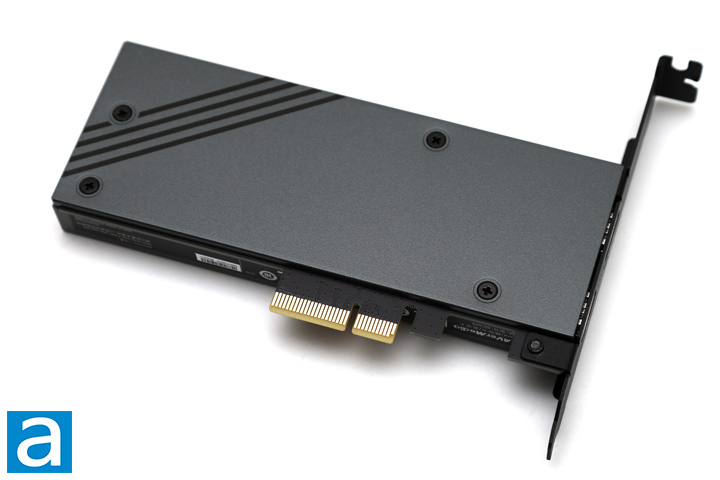
Flipping to the back, we do not have much to talk about here. The whole thing is also covered on the back with a metal plate. There is a four-line black pattern for a bit of contrast, but otherwise this is a pretty average looking backside. There is one more label, but it is on the edge of the PCIe connection. This contains all of the necessary safety certifications and disposal information for this card. You can see the AVerMedia logo once again, along with the HDMI logo. We also can see this card was Made in Taiwan. Finally, we have the serial number printed here for identification purposes.
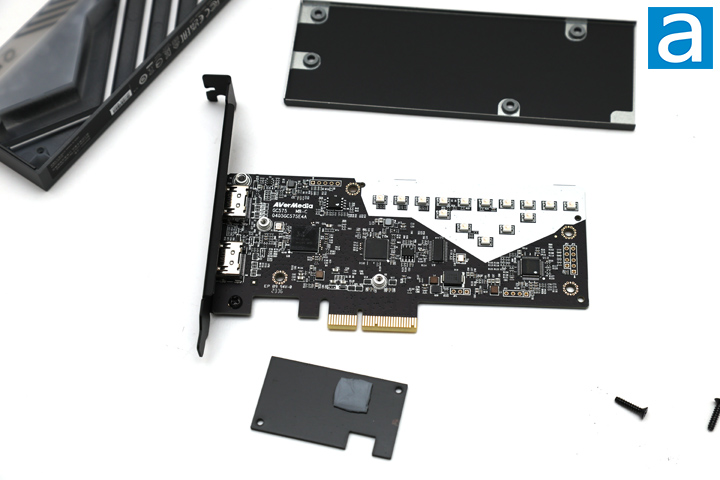
In order to dig a bit deeper, I opened up the AVerMedia Live Gamer 4K 2.1 GC575. While there is no warranty seal or anything of the sort, I would not recommend opening up this card. There are also no user-replaceable parts inside, so it is unnecessary to do so. If you want to do this, you can start by removing the four screws on the back. Afterwards, both sides pop off. One smaller internal heatsink exists over two primary components with a thermal pad on top of one of the components. This includes a Realtek RTD2801VPF SoC, which handles the decoding and processing of the input. The other is an ASMedia ASM3142, which is likely used as a bridge between the PCIe interface and the SoC. Around this side, we have a few more components, including the Winbond W25X40CL and W25Q64JV, which are both flash memory parts. There is an FE1.1s USB 2.0 hub controller and a Nuvoton NuMicro M032SE3AE microcontroller. Finally, you can see fifteen individual RGB LEDs designed to shine through the diffusion plate.
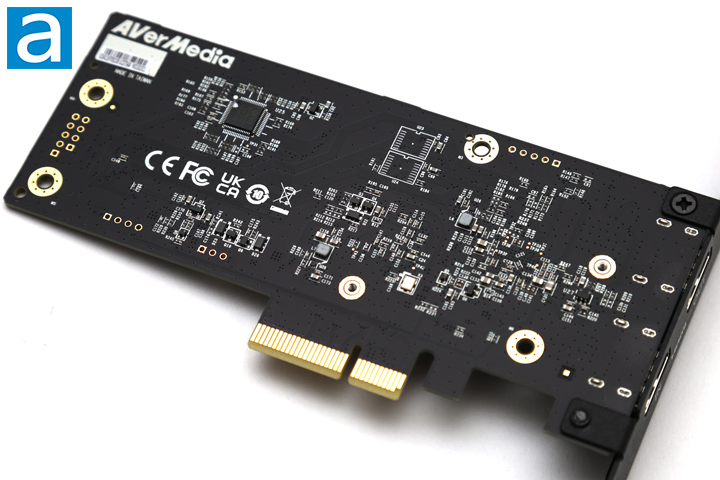
On the back, we have more smaller components, including an ENE 6K7750, which is used to control the lighting and its related effects. These lights can be controlled via AVerMedia's Gaming Utility, as you will see shortly, or synchronize with the rest of your motherboard software. Otherwise, you can see we do indeed have the serial number printed here, along with another Made in Taiwan label.

AVerMedia provides two software utilities to use with the GC575. Both can be downloaded from AVerMedia's website. The first software utility is called Gaming Utility, and the download is 33MB in size. This software is made primarily to check the status of the connected capture card. These menus show the current status of what is connected, including the video and audio output, as well as if it is being used by any other software application. In this case, I had my Nintendo Switch attached. Here, you can enable or disable HDCP as well. Under RGB Control, you can change the lighting effects to different static or dynamic modes. You can also select here to synchronize with your motherboard software. Under Settings, you can find options to update the firmware on the capture card and update the software utility itself. You can also change the input and output between HDMI 1.4, 2.0, or 2.1. As a note, you will need to change to HDMI 2.0 for 4K 30fps capture with RGB24 video format. Otherwise, the Gaming Utility is made more for status and updates rather than using the AVerMedia Live Gamer 4K 2.1 GC575.
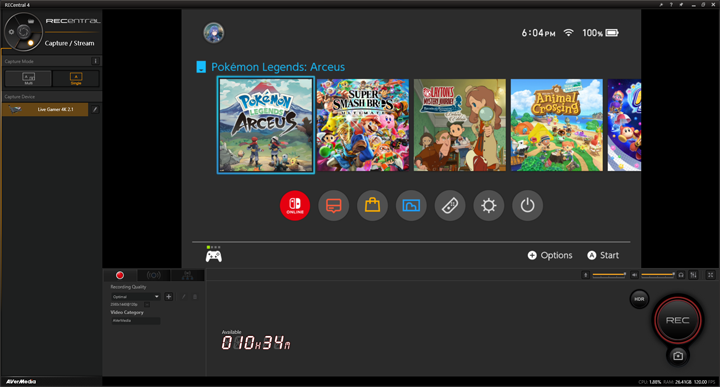
The second piece of software is AVerMedia's RECentral 4, which is made to record and stream your gameplay. This installation executable file is 155MB in size. There is a total of three primary screens in RECentral, and all of them can be selected in the wheel on the top left corner. The middle AVerMedia logo links users to their website.
The first screen is marked as "Capture/Stream", which is where you can see a screen showing your input and all the necessary configurations to set for recording or streaming. Down the left side of the menu, you can see the attached capture device. You can click on the device to make modifications such as the input resolution and frame rate. In the middle, we have the output of the attached device. All of the volume levels for input and output can be changed on the bar underneath the display. The large button on the right-side changes to either start recording or streaming, depending on the sub-menu you have selected. These sub-menus can be found in the three tabs on the smaller area of the window, below the display. Here, you can set up profiles for the resolution, frame rate, and other settings. There are three preset profiles marked as Normal, Good, and Optimal, with increasing video bitrates, resolutions, and frame rates. In the streaming tab, you can set the key for where you are streaming to, including integration with sites like Twitch, YouTube, and Facebook, as well as some Asian platforms like Douyu, AfreecaTV, and Kwai. The last tab is marked Multistream, where you can stream to multiple platforms at the same time.
The second screen to look at is marked "Media Share", which shows on the screen as a File Explorer. From here, you can upload your saved clips to YouTube. The third and final screen is the cogwheel, which is the Settings page. Interestingly, there are a lot of similar options between here and Gaming Utility. This includes updating the software and firmware of the connected hardware as well as enabling or disable HDCP. You can also change where all the files are saved, set up keyboard shortcuts for commands, enable and disable V-sync, and manage profiles.
Overall, RECentral is a functional piece of software, but I did notice some issues while using it. Primarily, RECentral sometimes froze up during testing once I started recording. The entire utility would become unresponsive, and I could only close the window. Worse yet, I would have to force close the RECentral process in order to start it back up again. This sort of behavior made the experience feel unfinished. I will say that I experienced this freezing much less with the GC575, which could indicate this is may be more than purely a RECentral issue, but I still think there is some sort of refinement to be done. This capture card is also compatible with Open Broadcast Software, or OBS. If you are more familiar with this application, using the capture card is just a matter of adding it as an additional source.
Page Index
1. Introduction, Packaging, Specifications
2. A Closer Look - Hardware and Software
3. Performance Tests
4. Conclusion


