Page 3 - Physical Look - Inside
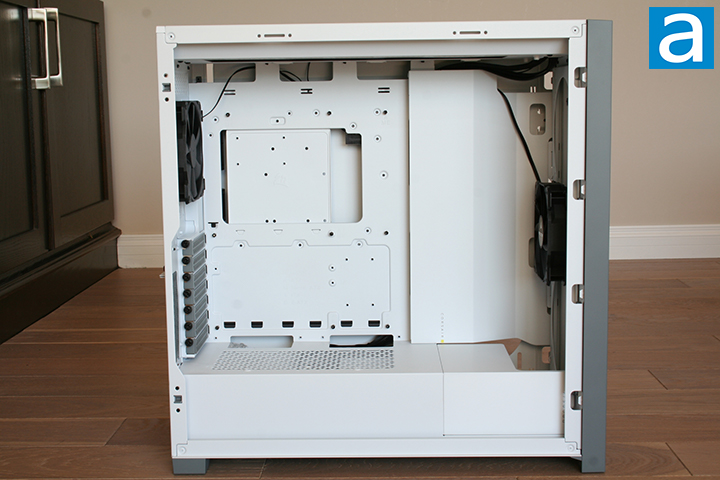
Both side panels are easy to remove thanks to the large thumbscrews and ball-and-socket joints holding them in place. The thumbscrews are very comfortable to grip and can be easily unscrewed with your hands. The ball-and-socket joints keep the side panels in place even when the thumbscrews are completely unscrewed. With the side panels removed, we can view the interior of the Corsair 5000D. The white color scheme of the case is consistent all throughout the interior, which is nothing special per se, but is still nice to look at. The PSU shroud covers a good portion of the bottom with the exception of having an opening in the front for radiator mounting, some cut-outs just below the motherboard area, and ventilation holes directly on top of the shroud. Generally speaking, the layout is mostly standard as far as ATX computer cases are concerned. Not only is the chamber designed to cover the power supply, but it also has a rack for placing up to two 2.5" or a single 3.5" drives. The air for the power supply chamber can enter the case through the dust filter-protected ventilation holes at the front of the case directly.
Various motherboard sizes are accommodated with this case, including ATX, mATX, and ITX. If your 5000D is fully loaded with fans, graphics cards, and long radiators, fresh air can be pumped by the fans of up to 280mm or 360mm radiators into the chassis through the air intake at the front panel, hit the graphics card, and be expelled out through the exhaust grille at the top or back panel. If you only plan to use a small radiator or just a CPU heatsink, the hot air can be expelled out through the rear exhaust grille on the back panel.

Moving to the interior of the case, we can see more cutouts for cable management. I think the size of the cutouts is very good, especially for the thick eight-pin CPU power cable, which is usually routed through the top left cutout. We can see a large rectangular opening mostly covered by a metal backplate. The metal backplate is a nice touch for protecting the back of the motherboard from scratches. At the same time, this metal plate can be removed by unscrewing the screws holding it on the chassis for an easier aftermarket cooling backplate installation process. The seven horizontal expansion slots can also be seen being held by thumbscrews. Two vertical expansion slots can be seen as well for users who would like the option of mounting their GPU vertically. Like its predecessor, the expansion slots feature stamped holes for better ventilation. While this design could be helpful, I do also feel a solid piece would be better for dust prevention, as there are already many areas for ventilation in this case as we will soon see. We can also see the motherboard standoffs already installed, so users can skip that step of the build. The standoffs are also removable at the user's discretion.
At the top, we can see mounting holes for case fans or radiators. According to Corsair, the roof of the case is capable of fitting either three 120mm fans or two 140mm fans. It is also capable of fitting a 240mm or a 360mm radiator. The maximum CPU cooler height is specified at 170mm. On the left side, we can see the pre-installed 120mm 4-pin PWM exhaust fan. The fan in question is a Corsair AirGuide with the model number RWF0049. Unfortunately, the rear mounting position can only fit fans at a size of 120mm, which is disappointing given how wide the case is. Aside from the lack of a 140mm fan mount at the back, the general design of the interior is very good, giving users many options for fan mounting at the top along with a spot for radiator mounting. This only gets better as we move to the front, which we will see very soon.

Because the Corsair 5000D White features a bottom-mounted power supply bay, the chassis platform is raised about 1.5cm off the ground to accommodate units with fans at the bottom. Inside the 5000D, four nubs with foam at the top elevate the power supply up a further quarter centimeter just to ensure enough air is made available to your PSU. The grille has an externally removable dust filter pre-installed, so you will not need to worry about your fans getting clogged up.
As noted earlier, we can see the PSU shroud is not entirely solid when taking a closer look at the bottom. Two cable routing holes can be seen directly on top of the PSU shroud. These cutouts are large and appear to be wide enough to fit most cables through easily. Two large rubber grommets can be seen, which helps keep the cabling situation clean and hidden on the other side. This is a nice touch and addition from the 4000D model, which did not have this. We can also see more of the pre-installed standoffs on the motherboard fitting area. The ventilation holes use a unique triangular mesh pattern. Once again, I think having these ventilation holes is a great design as the PSU will be able to draw in air from the case. No fans can be mounted on the PSU shroud, which is not a drawback by any means given how many fans can already be mounted in this case.
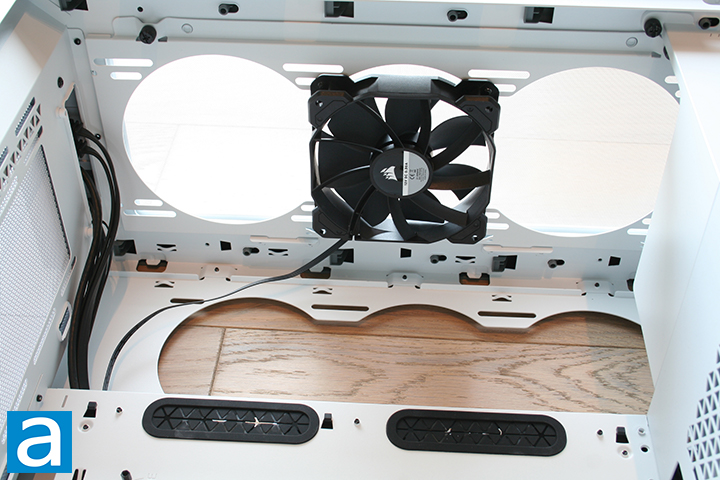
Looking at the front, we have a better look at how the front fans can be installed. The metal enclosure behind the intake fans has a large opening allowing the fans to be mounted at the front. Another Corsair AirGuide 120mm fan is mounted at the front in the middle slot, with the top and bottom slot being open for additional case fans. On top of the mounting positions available at the front, an extra three 120mm fans can be mounted on the side of the case. I see as a missed opportunity for 140mm fan placement. Either way, the Corsair 5000D can fit up to ten 120mm fans, which is a lot of fans, haha. The sides make for a good radiator mounting spot in my opinion. That way, you can intake air from the front and exhaust hot air from the back and top sides of the case while liquid cooling your CPU. Speaking of radiator mounting, the front is also compatible with fitting a liquid cooler, bringing the total amount of radiator mounting spots to a respectable three.
The steel front panel can also be easily removed so the user can get access to the front dust filter for keeping the computer components clean. The case can fit graphics cards up to 360mm in length with the front fan mounted. There is no additional GPU holder support for long and heavy graphics cards, but the Corsair 5000D does offer vertical mounting as mentioned earlier.
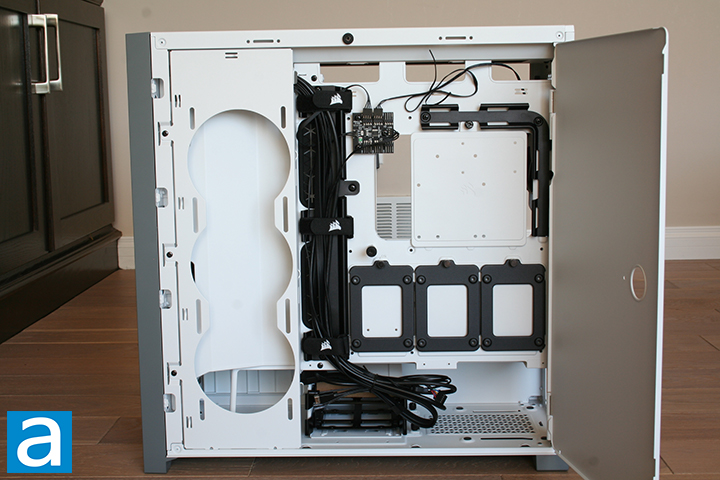
Looking at the back of the 5000D, we can see the various front cables routed closer to the left side. The clearance between the motherboard tray and the right side panel came out to around 20mm. We have a swinging magnetic door on the right side for convenient accessibility. Velcro straps branded with the Corsair logo can be seen holding the cables in place. Cable guides are not present under the 2.5" drive trays, but cable tie-down points are visible within the proximity. Generally speaking, cable management is good with all the space below the PSU shroud.
A fan controller can be seen near the top with the pre-installed fans already connected to it. The controller is capable of supporting six 4-pin PWM fans, which works very well for the number of fans this case can fit. This fan controller is powered by a SATA power connector. A 4-pin PWM fan header is used as the input, allowing for fully automatic motherboard control.
When it comes to storage options, we can see a single-bay cage underneath the PSU shroud capable of holding two 2.5" or 3.5" drives. Four SATA SSD slots can be spotted underneath the fan controller, bringing the total storage options on this case to an admirable six. If you choose to remove the motherboard back piece, you still have five storage options, which is more than enough.
You can fit a power supply of up to 180mm in length with the storage rack installed. We can have a power supply 250mm in length if the rack is removed. Without the rack, there is nothing physically obstructing you from having something even longer, so you could technically install something that spans the entire length of the case. Of course, this is just a trivial fact, because I do not believe a power supply longer than 220mm is common or even exists at all.
Overall, the interior of the Corsair 5000D has the same build quality level as the exterior, which is to say it is very good. All of the components needed for building a computer can be nicely accommodated and kept cool, especially with the additional side mounting option. The paint job quality of the interior is clean and looks just as nice as it did on the exterior. More importantly, there are tons of room to route cables, and large accessible openings to allow easy connections between the PSU and the motherboard.
Page Index
1. Introduction, Packaging, Specifications
2. Physical Look - Outside
3. Physical Look - Inside
4. Installation and Conclusion


