Page 2 - A Closer Look - Hardware and Software
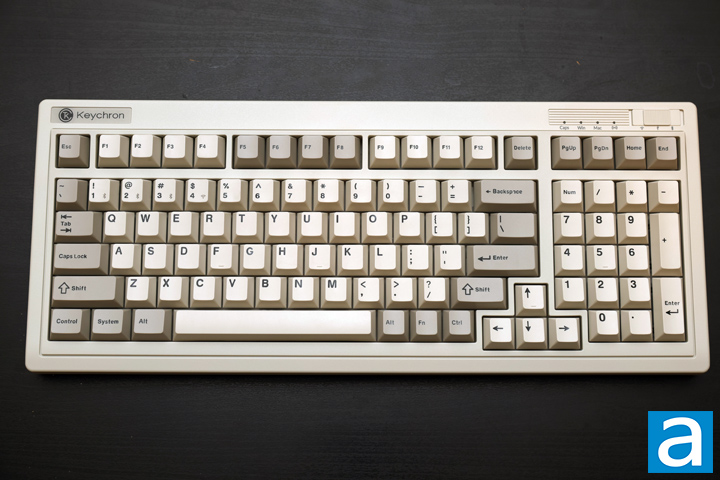
A convincing retro look is about replicating something from the past, and the Keychron R5 does a formidable job with bringing up memories of yesteryear. To me, this looks just like a slightly more compact IBM Model M. The colors are on point, with the mix of a tan and a darker gray in the right spots. Even the keys above the number pad emulate the darker gray area that normally would be the indicator lights. The other aspect is the style or design of the entire keyboard. A thicker border encloses the Keychron R5 in the correct color and physical appearance. The enclosure also has the same slightly rough texture we have seen with many electronics from this era. You can see other minor physical aspects like the secondary border and a lifted ridge at the top edge. Even the Keychron logo at the top left corner is printed like the logos from the past, although this is just a sticker. If you are looking for an older style keyboard, the Keychron R5 hits the right visual notes.
In dimensions, the Keychron R5 is 399.43mm wide, 164.78mm deep, and 39.1mm tall at the back. The height increases if you raise the kickstands underneath. This is a typical size for a 96% keyboard. In terms of weight, the Keychron R5 weighs 1.125kg, which is a bit lighter for its size and construction. Under pressure, the Keychron R5 does flex a bit, in both the ABS plastic frame when you twist the body and in terms of deck flex. This is not too bad in the middle of the keyboard, but you can feel a bit more of a squishy feel when you are typing across the board. This is understandable given the gasket-mounted polycarbonate plate inside. The front edge of the frame is approximately 20mm tall, so you can match this with a palm rest. Keychron does not include one out of the box.
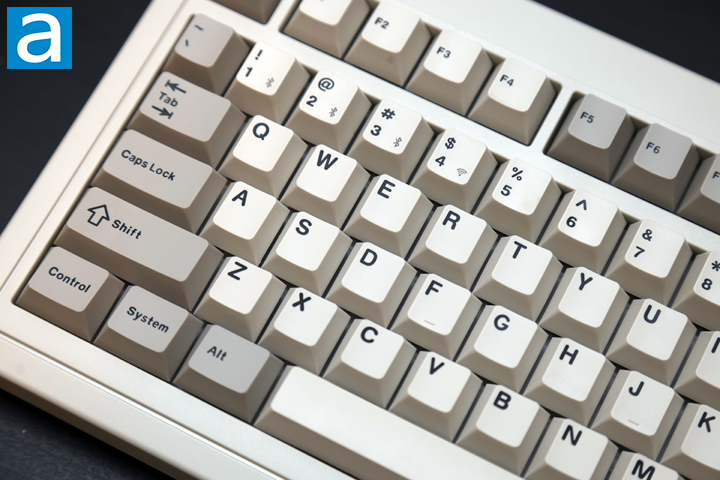
The Keychron R5 we are reviewing is in the standard North American QWERTY ANSI layout and a 96% form factor. This translates to ninety-nine keys. Keychron changes their product names for each of their sizes within a lineup, so a full-sized R6 also exists. The bottom row is semi-standard with 1.25U keys on the left side of the space bar, a 6.25U space bar, but only 1U keys on the right side. There are only three right modifier keys, as the arrow key cluster is squished into this area. It also affects the right Shift, as it is a 1.75U key. Unsurprisingly, there are no sets of keys above the arrow key either, as these have been integrated into keys above the number pad. They could only fit five at the top, and Insert is not even set out of the box. However, you can map this after the fact.
As for secondary functions, there are only a few that are marked on the keycaps of the Keychron R5, but there are more keys that are set up by default. These can be activated by pressing Fn, followed by the respective key. F1 and F2 are used to decrease and increase the screen brightness. F3 and F4 open task view and file explorer. F5 and F6 are used for decreasing or increasing the backlight of the keyboard. This can also be done with W and S, and we will explore other lighting shortcuts later. F7 to F9 are used for Previous, Play/Pause, and Next media keys. Finally, F10 to F12 are for Mute, Volume Down, and Volume Up.
Other shortcuts include Fn and left Windows key to lock or unlock this key, which is handy for gaming. When locked, the backlight under the Windows key glows red. Fn + 1 to 3 are used for pairing up three different devices over Bluetooth. You can check your battery with Fn + B, and this will illuminate the number row to the battery percentage, up to the nearest ten percent. Changing the keyboard layout from Windows to Mac is a matter of holding down Fn + Caps Lock for three seconds. Doing so will swap the modifier keys on the bottom row to the respective Mac functions, as well as the function row to align with the standard Mac layout. Finally, if you make any changes you want to reset, you can press and hold Fn + J + Z for three seconds.
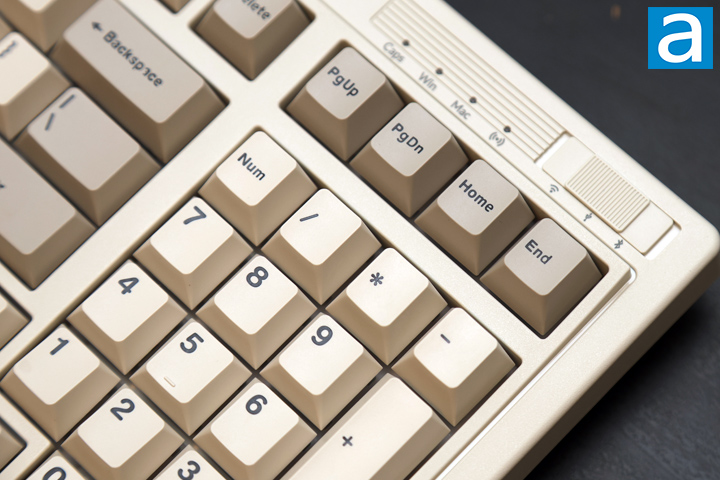
On the right side at the top, there are four pinhole lights for indicators. The first is Caps Lock. The Num Lock indicator is integrated into the backlight of the Num Lock key instead. The next two show what layout you are currently in, whether it is Windows or Mac. Finally, there is a light that Keychron calls Multi Link. At first, it glows white when the R5 powers on, and shows distinct colors when a connection is first established. For Bluetooth, it shows blue, for 2.4GHz mode with the dongle, it shows green, and for wired, the light will be white. While charging, it will glow red when and change to green when charging is complete. In the far right corner, there is a three-position switch to select the connection mode, whether with the dongle, wired, or over Bluetooth.
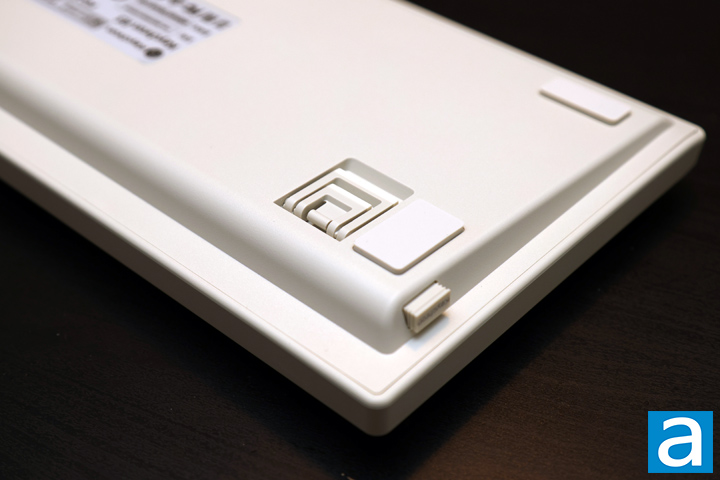
The bottom of the Keychron R5 is standard, but again matching in color. In the middle, there is a silver label with some product information. The corners have rubber pads to keep the R5 in place. At the back, there is a pair of double kickstands for different heights. As such, there are three distinct incline angles with the R5. The kickstands also have rubber padding on them to prevent movement when the keyboard is propped up. On the right side corner, there is an insert to keep your USB transmitter and receiver from getting lost, which is nice to see. At the back of the Keychron R5, there is a USB Type-C port for connecting the keyboard to your computer.
With the wireless capabilities, the Keychron R5 has a single 4000mAh capacity battery to keep everything operational. In our testing, we had good battery life results. Keychron provides an estimate of 45 hours with the RGB lighting on its lowest brightness setting. I was able to get around seven days of mixed use with the backlights on full brightness before it needed a recharge. To be clear, I was not using it the full time during the testing period. With the lights off, Keychron increases their estimates to 310 hours of use. Keychron also provides an estimate of five hours to charge the R5, which is quite long. To keep this longevity, the R5 turns off the lights after ten minutes, but this can be configured in the software. Once you press any key, the lights will turn back on. However, after a longer time going unused, the keyboard will go into a deeper sleep, and takes a bit longer to wake up. By default, this is two hours, but it too can be changed. The wake up process was smooth, and it recognized my input almost immediately after resuming. Otherwise, when the Keychron R5 operates over Bluetooth, it has a polling rate of 125Hz, while operating over wired or with the USB dongle, this increases to 1000Hz.
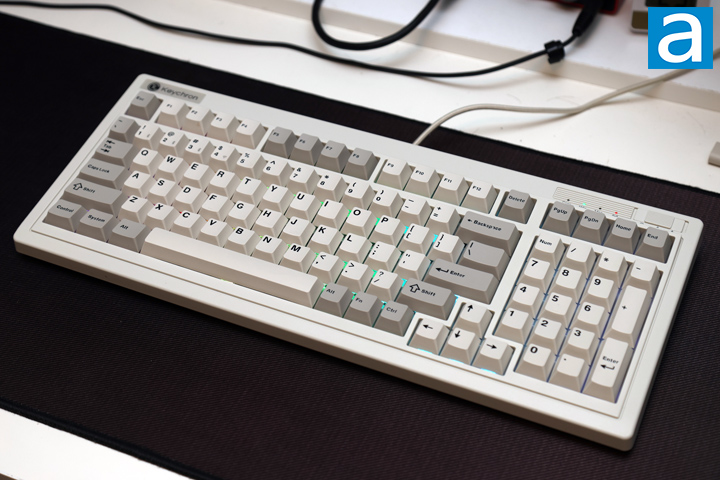
On top of the gray XTracGear Carbonic XXL, the Keychron R5 stands out for its tan color that is not commonly seen in modern electronics. I also love Keychron's dedication, making the cable, USB extender, and dongle all match the same color. Personally speaking, I am not the most accustomed to the 96% layout, although it also does not feel too different from a full-sized keyboard. I do not love having the Delete above the Backspace key, but it is a minor thing to get used to. I do also miss having a dedicated volume knob, but it would look out of place on a retro design. Some may find the shorter right Shift or closer placement of the right Ctrl a bit trickier to get used to, but it was not as much of an adjustment for me.
In terms of typing feel, the Keychron R5 is a lot quieter than you might expect. The original IBM Model M had buckling springs, which made every keystroke loudly click under every press. However, these Keychron Apex Red switches are much less pronounced in both sound and feel. Bottoming out the switch does provide a decent clack, but it still is quiet overall. These are linear switches, but they feel slightly squishy when you bottom out each key, making the overall action feel less mechanical. Longer keys that are stabilized, such as the space bar and Shift keys, are smooth but sound slightly different. Overall, I feel like a louder, more tactile switch would fit the R5's aesthetic, but this is purely a personal preference. The Keychron R5 also comes in a nonlinear Brown and linear Yellow switch options too.
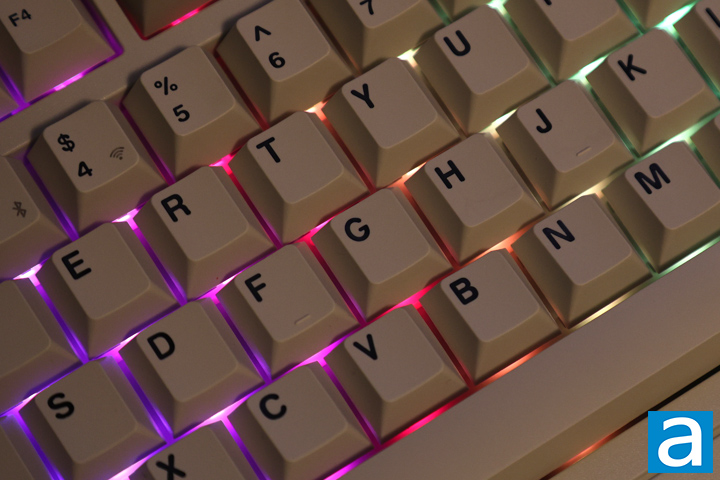
The backlights of the Keychron R5 are surprisingly bright, even if these PBT keycaps do not shine through. Keyboards of the past never had backlights, so they do break a bit of the aesthetic, but at least they look nice. The lights provide a glow around each key rather than through them. They are south-facing and make the gaps and areas around each key more visible. At maximum brightness, the lights are clear even in daylight. They can be adjusted via secondary functions by pressing the Fn key first. To change the effects, you can press Q or A, which will cycle through all the effects. W and S are used to increase and decrease the brightness, E and D change the hue, and R and F adjust the saturation. T and G are used to modify the speed of the effect if there are more dynamic parts. Finally, you can toggle all the lights on or off by pressing Fn + Tab.
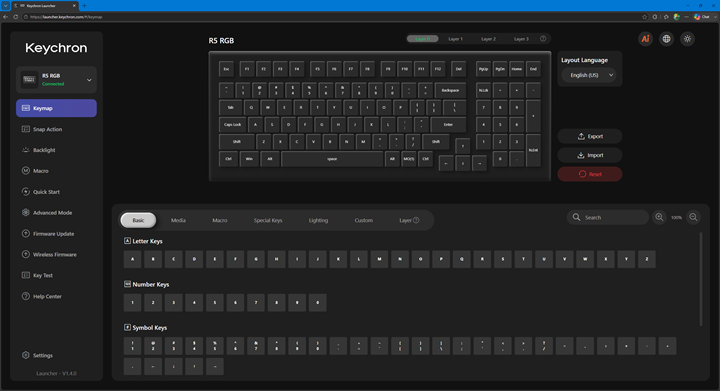
The Keychron R5 does not require any installed software, but it is compatible with QMK. Keychron has their own Launcher application, and this should serve the needs for most of their users. You need a Chromium-based web browser such as Chrome, Edge, or Opera to connect your keyboard to the browser. Once you go to the Launcher's website, you can pair the keyboard, and it will automatically recognize it. Personally, I could only ever make changes while the keyboard was connected over USB. The first thing I did was update the firmware for both the keyboard and the wireless receiver dongle. Internally, there is an ARM Cortex-M4 32-bit STM32F402 RISC controller and 256KB of flash memory to save your settings.
Using Keychron Launcher is straightforward. There are many menus on the left side for you to choose between. At the top, there is a Keymap page to let you set the keys for the regular and function layers for the Windows and Mac layouts. You can import or export these settings to a JSON file for later use. You can also reset your previous changes if necessary. Next, Snap Action is where you can setup SOCD. Backlight is where you can customize the backlights of the R5 with different effects, and two custom modes to set on a per-key basis or to mix between multiple effects. You can also set the indicator light color for the Num Lock key. Macro is where you can save and recall sequences of keys. Quick Start is used to launch applications, but you need to install Keychron Assistant on your local machine to get it working. Advanced mode is where you can set the debounce response time and mode, along with the timeouts for backlights or for sleeping. The next two are used for updating the firmware, which is self-explanatory. Finally, Key Test is where you can test all the keys and set sounds for each key press. Overall, the Keychron Launcher is straightforward to use and offers a good amount of customization.
Page Index
1. Introduction, Packaging, Specifications
2. A Closer Look - Hardware and Software
3. A Closer Look - Disassembly and Internals
4. Conclusion