Page 2 - A Closer Look

The first thing I noticed about the QNAP TS-409 is that it's comparatively smaller than the Thermaltake Muse NAS RAID, and that's by a pretty good margin. We'll crack it open in just a second for you to see how QNAP packed the hardware into the box.
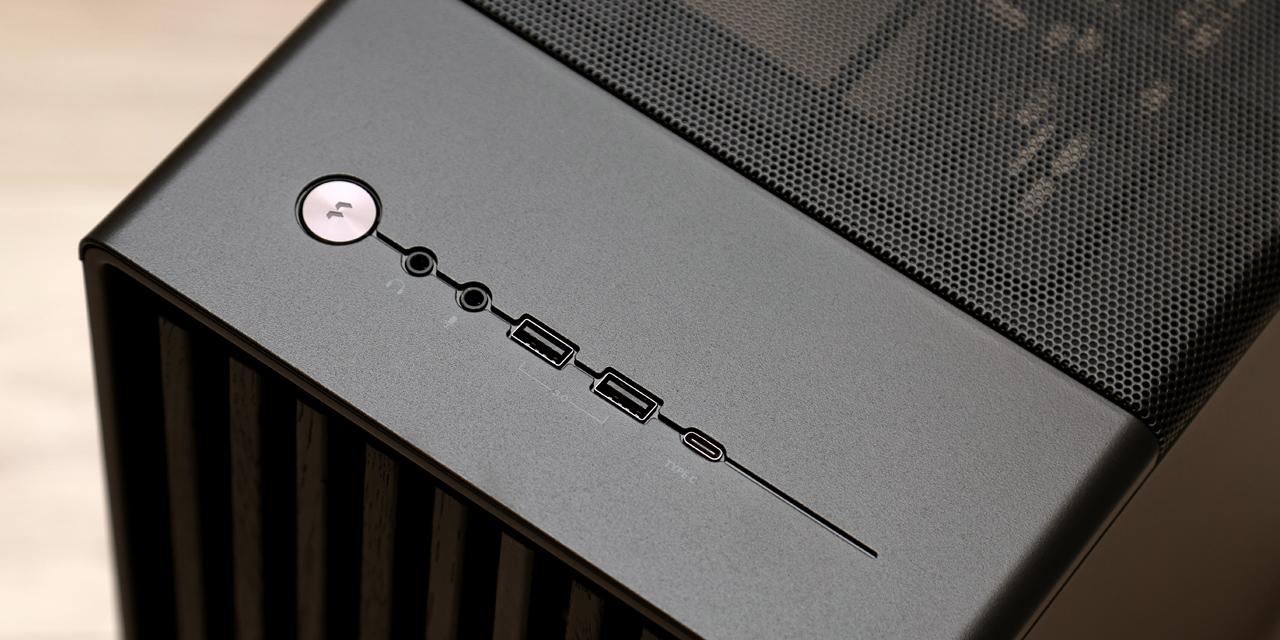
On the surface, the front of the QNAP TS-409 offers a large mesh door that covers almost the entire face of the unit. This is designed so that air can pass through directly into the four hard drive bays; as so for maximum unobstructed air ventilation. As far as meshes go, however, it may capture its fair amount of dust in the holes, but I doubt anyone's going to keep their NAS in sight for all too long -- mine is in my basement's network center since the first day it was deployed. Across the bottom of the unit is an array of buttons and LEDs. From the left is an one-touch backup button, which copies all the data in a drive connected to the USB port that's right next to it into a directory in the NAS. Quite convenient.
Continuing to the right are drive status LEDs; there's one for each installed hard drive -- along with network and other miscellaneous status indicators. The power button is placed all the way to the right of the strip.

Turning the QNAP TS-409 reveals the rest of the connectors at the back of the unit. From the left is a power input, Gigabit LAN port, and two USB ports. The USB ports can be used for connecting USB mass storage devices as well as printers; as the QNAP TS-409 has a print server function. An exhaust fan is placed above the connectors. The fan grille are really cut openings into the steel panel, which to my observations may have a little more air resistance.
The Gigabit LAN port is powered by a Marvell 88E1118 10/100/1000Mbps controller, which is also commonly used on many performance motherboards. The three USB 2.0 ports are backed by Genesys Logic’s GL852 RISC USB controller that can control up to one more USB port set on the QNAP TS-409.
Opening the QNAP TS-409 involves removing a total of five screws in order to take out the shell-styled cover. One of the screws are located behind a warranty seal, so unfortunately you will void your warranty if you open the TS-409 -- quite sad. Oh well.

The QNAP TS-409 can accommodate up to four 1TB SATA hard disk drives. Opening the mesh door reveals four HDD slots are placed on top of each other in the NAS. A tray is made to accommodate each hard drive installed. Each hard drive tray can be locked by a key to prevent easy accidental removal as well as discourage unauthorized access (It won't prevent it though, it's not hard to break or even take the whole NAS haha). SATA power and data connectors are attached solidly at the back of the bays by SATA cable adapters -- they are not fixed into any printed circuit boards, so if anything goes wrong, it can be swapped out easily given the right replacement parts.

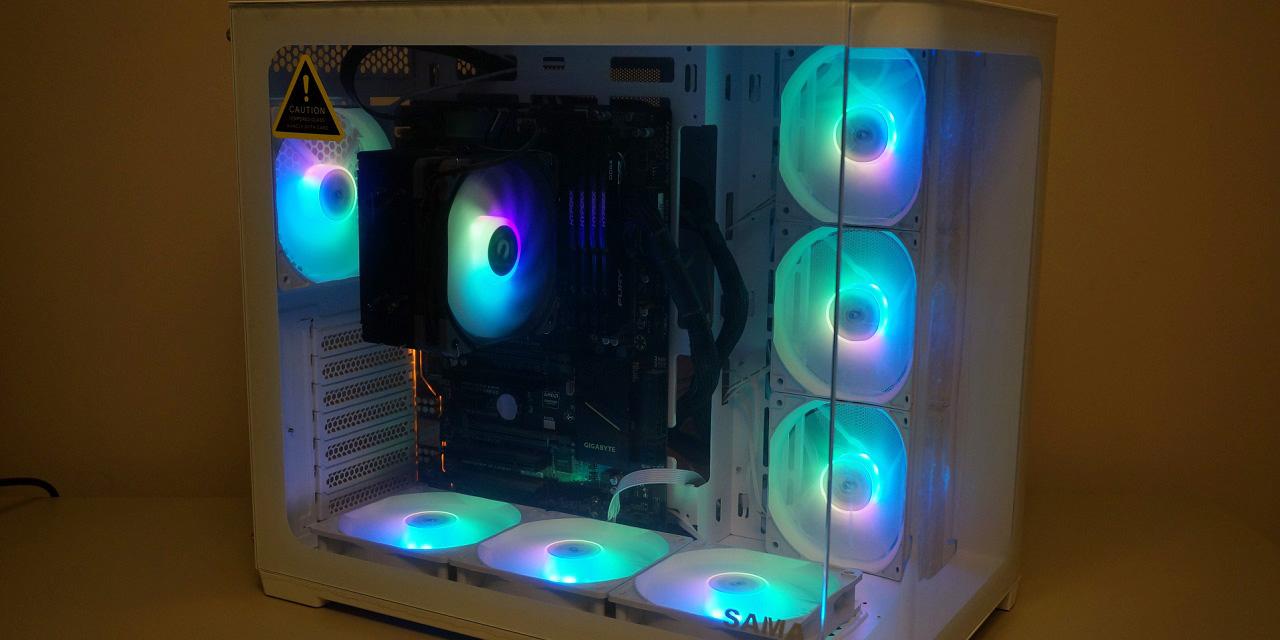
Opening the QNAP TS-409 voids the warranty, but it's well worth it to to take a look inside -- the photos are provided so you don't have to crack open yours. Anyways, the motherboard is placed at the bottom of the TS-409, and four SATA cables are neatly connected to the motherboard on the left side of the unit -- with corresponding labels on each to show which slot is which. The SATA ports are powered by a Marvell 88SX7042-BDU1 SATA controller chip based off the PCIe interface.
A closer look at the motherboard shows that it uses classic electrolyte capacitors rather than the now popular solid state capacitors. In my opinion, the latter will be better, since the QNAP TS-409 will be exposed to constant amounts of heat under typical usage of being turned on 24/7 and will degrade at a much slower rate over time. However, it still uses quality Sanyo capacitors rated at 105c. There are no user serviceable parts inside, as the Marvell 88F5281 500MHz CPU and Hynix DDR2 memory chips are soldered inside.

Turning the QNAP NAS around shows four hard drive power connectors and one fan power connector, again, plugged into the mainboard. Power is supplied this way and not directly connected to the power supply unit, because to save space and reduce heat inside the QNAP TS-409, it is placed outside as evident by the use of the AC to DC power brick.
Generally speaking, the mainboard is well laid out, separating major heat generating components by a reasonable distance to allow modest airflow to provide adequate amounts of cooling.

An overhead view of the QNAP TS-409 Turbo NAS. The hard drive bays are held inside a cage that occupies majority of the room, while room are left at all three internal sides of the hard disk cage to run wires and some room for heat dissipation. A 92mm YS Tech FD129225LB-N fan is installed at the back to draw warm air generated by the hard drives out the back of the system. As it is connected to the motherboard, the "Smart Fan" feature automatically adjusts fan speed based on temperature readings. During our usage, the QNAP TS-409 is very quiet -- the noise generated by the fan is easily overcome by the noise generated by the hard drives. By the way, the QNAP TS-409 won't isolate any kind of noise, but we don't expect it to anyways.

Four large rubber feet securely plants the QNAP TS-409 onto its residing surface, and prevent a good amount of accidental force applied to the NAS. Of course, this depends on the angle of the force, the magnitude of the force; which is determined by the unit vector multiplied by the position vector *Ahem* Anyways, yeah.

Installation of hard drives are quite simple. Simply pull out the tray of the corresponding bay of your choice, and use the included screws to secure the tray to the bottom of the hard drive via four screws. Insert it back into the hard drive bay, fire up the NAS and complete some simple configuration steps, and you're good to go.
For this review, two hard drives were installed in the QNAP TS-409: One Seagate 7200.10 320GB and one Western Digital 250GB 7200RPM disk.
Page Index
1. Introduction and Specifications
2. A Closer Look
3. Configuration and User Interface
4. Performance Benchmarks
5. Final Thoughts and Conclusion