Page 2 - Physical Look - Hardware and Software
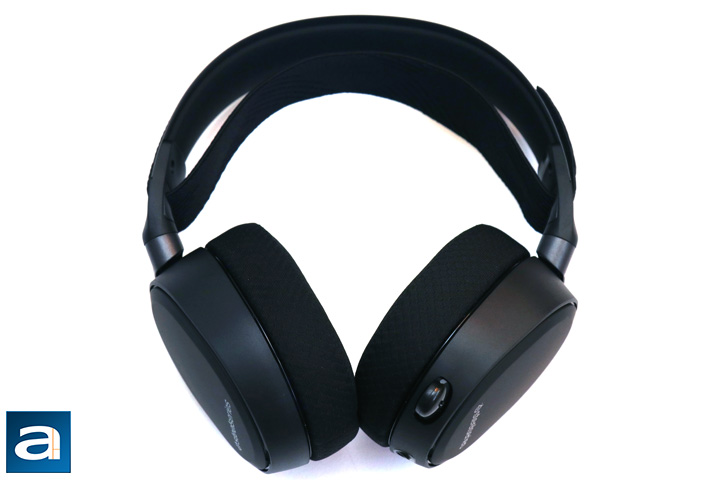
It is amazing what a change SteelSeries has done with their gaming headsets and how much cleaner they look now. We reviewed the Siberia 200 and the Siberia V3 Prism more than two years ago and they featured some really different styling. Marketed towards hardcore gamers with its bright colors or glowing sides, these headsets were loud and proud in both style and color. Fast forward a year later, SteelSeries releases their Arctis lineup, effectively replacing the older Siberia products and moniker. The Arctis lineup is now the only one available from SteelSeries. Today's Arctis Pro shows off the simpler styling while still achieving an effective design. Grilled sides are replaced with a flat side on both ears, which are actually held on the side by magnets. You can remove them and they will function as normally. Otherwise, the rest of the headset is an understated affair. A matte finish can be found all over the headset, while a smooth fabric covers the ear cups and the headband. I really like the more understated design from the SteelSeries Arctis Pro, as it makes for a really clean finish. For you gamers, RGB elements can be found around the headset, including a translucent rim around each ear and on the microphone. While I do not really care too much for these lighting elements, they can play a functional role, as you will see later on. As for materials, the ears of the headset are made up of plastic and thus you can hear some creaking when it moves about. However, from the original Arctis series, the Pro utilizes an aluminum and steel frame to keep the headset sturdy. This makes the headset feel structured while being lightweight.

Getting a closer look at the ears, the SteelSeries Arctis Pro uses an "athletic inspired airweave" fabric to wrap their ear cups. This fabric, whatever it is, makes the overall headset quite comfortable on your ears and it is great to feel. Presumably, SteelSeries has put some sort of memory foam under the ears too to help with this comfort. The cups are an oval shape to conform to ears rather than the circular ones they used on the Siberia series. The ears themselves have a full rotating ability to fold flat onto your neck, which makes resting the Arctis Pro on your head easier. They offer a bit of tilting action too, again to make the Arctis Pro fit better to your head. Internally, SteelSeries has placed 40mm neodymium drivers in each ear with a frequency response of 10Hz to 40kHz. This should cover more than the full audible spectrum for human hearing. In addition, the Arctis Pro has a sensitivity of 102dB SPL, with a total impedance of 32 ohms and a total harmonic distortion of less than 1%. We will see how this plays into our audio testing later on.
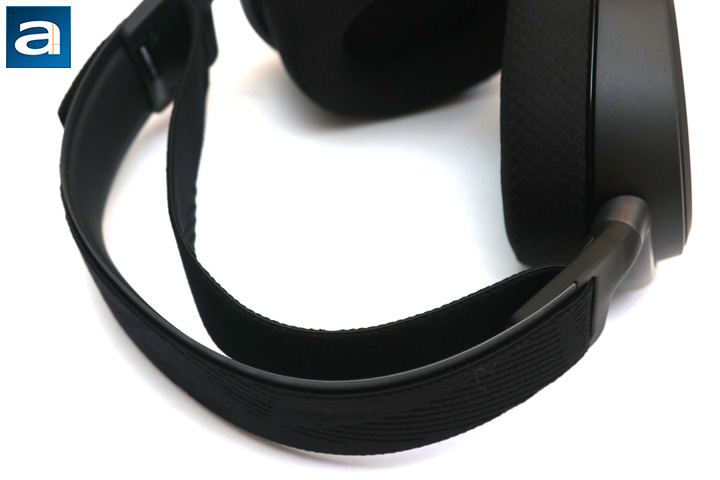
Flipping the Arctis Pro around, you can see this SteelSeries has another difference from their Siberia brothers. While both of them employed a suspension headband, the Arctis Pro uses a single strip of fabric made out of the same material as ski googles. This makes the fabric extremely flexible. Adjustments can be made by a Velcro strap on the left side. While it does not necessarily look like there is a lot of flexibility in terms of adjustment, the Arctis Pro surprisingly fit on my head. I did have to extend the headband a bit and it was snug. For those with larger heads though, this may becoming an issue, so I would try it out before buying it, if possible. The fabric is also interchangeable, as SteelSeries offers several other headbands in various colors. Of course, the one packaged with the Arctis Pro is just a standard black one, but I do like the fact SteelSeries offers this sort of customization. Otherwise, this is the only way to change the size of the headset, as the ears do not extend out.
In terms of overall comfort, I am quite surprised to say but I like the feel of the SteelSeries Arctis Pro. I did not really love the last SteelSeries headset primarily because of the suspension system it used. However, I can say the Arctis lineup has improved the issues I had. The ear cups are far more comfortable with a soft and breathable padding, while the headband sits nicely on top. Some may want more padding at the top of the headband, but I personally like this more minimal option, as it reduces the extraneous weight on the headset overall. Once again, comfort is subjective and will vary from user to user, but with a big head like mine, I did not find the Arctis Pro to be too small at all. At a measured weight of 350g, the Arctis Pro is not the lightest of headsets, but it definitely feels quite light on the head, which is another positive to its overall comfort.
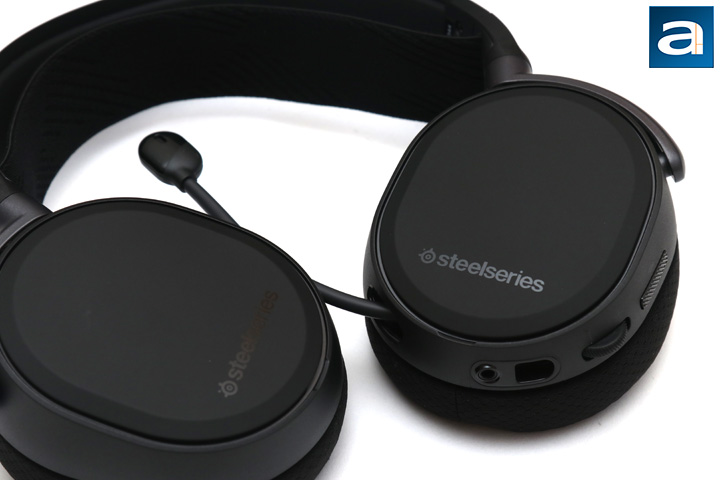
As for inputs and outputs of the SteelSeries Arctis Pro, we have several located on the left side of the headset. Starting from the front, we have an extendable microphone that shoots out. This microphone is always attached, but you can retract it into the side if you so desire. This bidirectional microphone has a frequency response of 100Hz to 10kHz with a sensitivity of -38 dBV/Pa and 2200 ohm impedance. According to SteelSeries, there is noise cancellation implemented in this microphone as well, so we will see what this means when we test the headset out. Otherwise, the microphone boom arm is flexible but stays in place when adjusted. A small sleeve is provided if you want to block out unwanted noises.
As for I/O, we start with the connection points. One is a 3.5mm jack, which is not for input, but rather to output to share your audio with another headset. I am not really sure how many people would take advantage of it, but at least the capability being present is nice. Afterwards, we have a proprietary USB cable which connects from the headset to the GameDAC unit. SteelSeries provides a cable measuring approximately 1.6m in length. Considering they also include a 1.6m USB cable to connect the GameDAC to your PC, the total combined length should be fine for most users. SteelSeries has included an adapter to a four-pole 3.5mm output if you want to use it for mobile use, or other consoles such as the Nintendo Switch or the Xbox One. Moving on, we have a volume scroll wheel, which lets users adjust the volume on the fly. I think the wheel is a bit too easy to move, as I often found myself changing it accidentally. Finally, we have a push button to mute the headset. When pressed in, it is not muted, but when released, the microphone will mute.
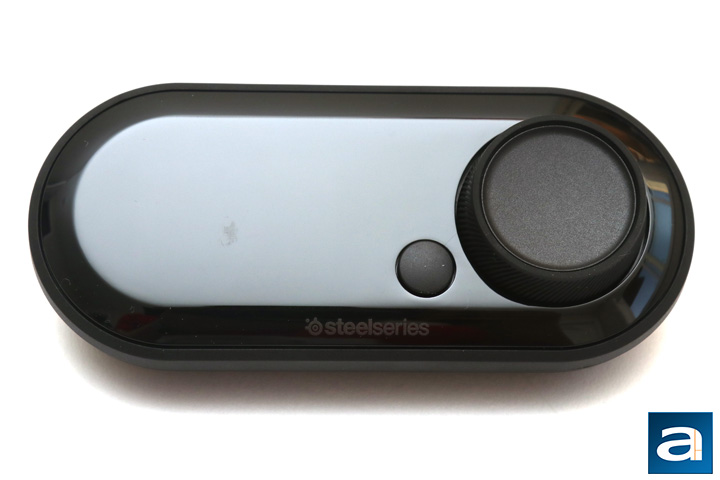
Moving to the other piece of hardware coming in this package, the SteelSeries GameDAC is a small unit with several I/O on the front and the back. The front of the unit features a fully glossy finish with a SteelSeries logo on the bottom. This display will attract dust, dirt, and fingerprints, but it also allows the OLED screen underneath shine through. On the right side we have a large knob that can be clicked. Primarily, this control wheel is meant for navigating menus, selecting items, and changing the volume. A smaller secondary button can be found to the left. Its primary function is to go back in menus, though it has some other functions. I have to say, this unit looks really minimal, much like the rest of the Arctis Pro, and should blend easily into your setup.
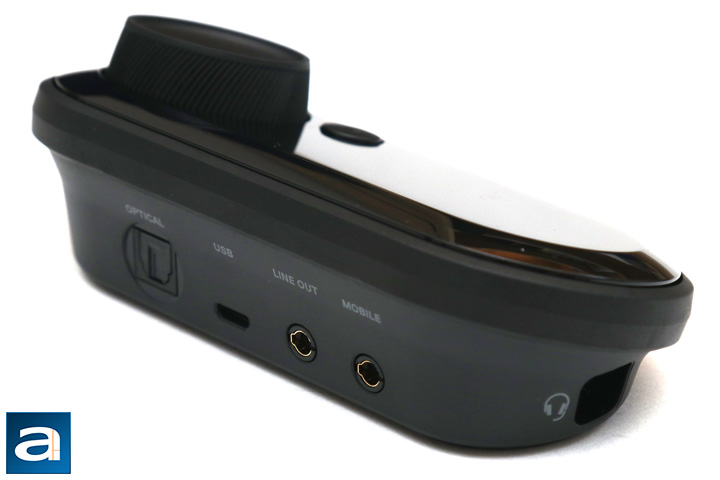
Turning to the backside, we can see all of the connection points from this vantage point. From the most left, we have an Optical In followed by a standard micro USB port to power the device. The optical in is helpful for connecting consoles like the PS4, which this headset does support. A Line Out jack follows closely, and these allow you to plug in other devices, such as powered speakers, to be controlled by the GameDAC. A mobile jack is also included so you can connect your phone here. Apparently, this will allow you to answer phone calls, but you will need a capable four-pole cable to do so. Finally, we have a headset connection jack on the left side of the unit, which is where you would connect your Arctis Pro headset. The back and bottom of the GameDAC is made up of a matte finished plastic. The underside has a circular rubber frame so the GameDAC does not move around too much. Internally, the SteelSeries GameDAC features an ESS Sabre 9018Q2C reference DAC, with 121dB of dynamic range. It is capable of a frequency response of 5Hz to 40kHz, with audio formats of up to 96 kHz, 24-bit supported.
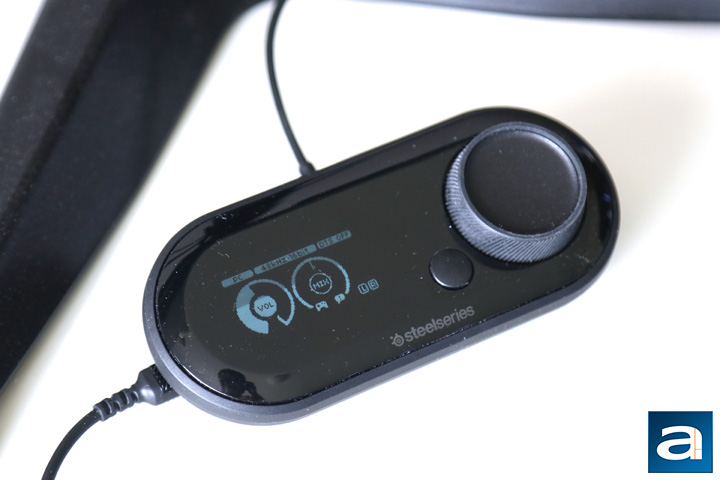
The GameDAC offers several settings changes with most of them pertaining to the audio output. On the main page, you can see most of the information such as the current input setting. From here, you can change the volume as well as change ChatMix by pressing the larger knob. ChatMix allows you to make on-the-fly changes to the output volume to blend your chat applications and your game. When you plug the GameDAC into your system, your computer will recognize two sources of output, with one for "GameDAC Game" and the other for "GameDAC Chat". Once you set up these output channels correctly, you can use the controller to modify which one you want more or less of. This is a super handy feature, as I previously found myself juggling through chat menus, whether on Skype or Discord, to adjust volumes. Pressing the secondary button here will turn on and off the surround sound. In the menus, you will find settings to change your output devices, including a "Hi-Res Mode" to use the Sabre 9018 to its highest ability. Just to note, you will also have to tinker with the Windows settings to change the sample rate to 96kHz 24-bit for Hi-Res mode to actually work. Finally, there are some settings to allow for easier streaming from a PS4, as it mixes the volumes into a single output to be consumed by the streaming PC.
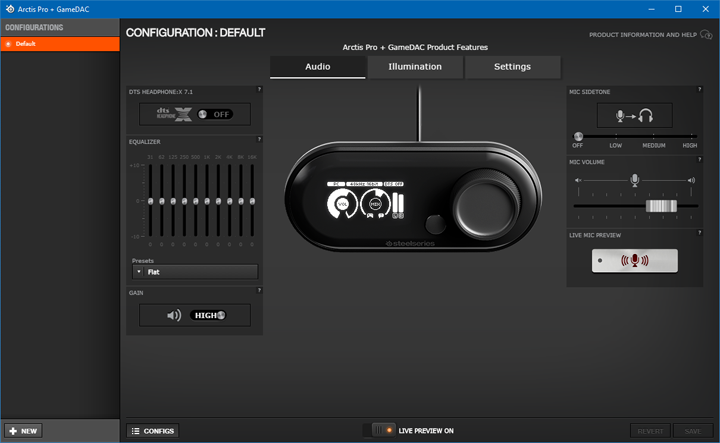
SteelSeries provides one of the best software utility experience with their peripherals in their Engine 3 software. With multiple SteelSeries products, this single utility offers a great deal of customization, but I have beat this fact to death already. Once again, SteelSeries is pretty much the standard as far as utilities go and I hope more companies will strive to this level. The installer is a bit heavy, with a download size of about 111MB for the installer alone. However, when you consider it is meant to handle multiple products, this is much better than a software application for each device. Pertaining specifically to the Arctis Pro + GameDAC, there are three tabs to adjust and change the settings on the unit. A lot of these settings are duplicated in the GameDAC menu, giving users another way to change settings.
The first tab is the Audio tab, where you can change the audio output settings. On the left side, from top to bottom, you can see settings to change the virtual surround sound, equalizer settings, and gain. The DTS Headphone:X 7.1 is featured with the Arctis Pro headset, which should offer a larger soundstaging output. On the right side, we have the ability to change microphone settings, which includes changing the Sidetone volume, input volume, and allow you to preview your current microphone settings. For your information, sidetone is the ability to hear your own voice through the headset, which makes it easier to monitor how soft or loud you are. The second tab is the Illumination tab, which allows you to change the lighting modes. This includes the RGB lighting on each side of the headset, as well as the microphone. You can synchronize these lights between the left and right side. Furthermore, you can change the color of the illumination of the microphone if it is muted or not. This gives users a visual cue to if their mic is muted or not, which is really helpful. Finally, you can also synchronize your lights with other SteelSeries products if you want. On the third tab, we have the Settings tab, which allows you to change the OLED screen brightness of the GameDAC, as well as setting a timeout to dim the aforementioned screen after an inactive period.
Page Index
1. Introduction, Packaging, Specifications
2. Physical Look - Hardware and Software
3. Subjective Audio Analysis
4. Conclusion


