Page 2 - Physical Look - Outside
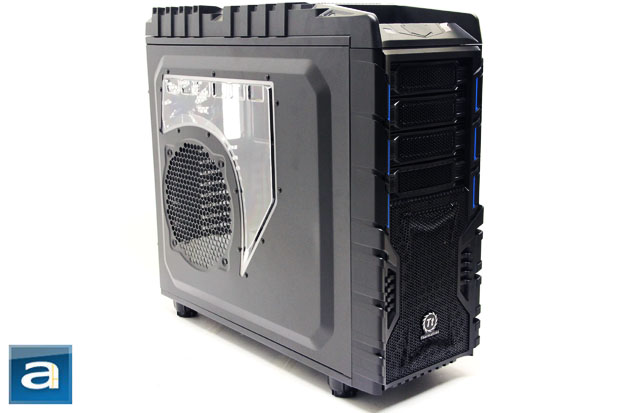
As stated earlier, the Thermaltake Overseer RX-I takes on a galactic space theme as seen on the retail box. The theme is quite a cool idea, especially since it is targeted towards gamers. Full disclosure: The chassis is not exactly my cup of tea, since I have a tendency to lean towards "cleaner" exterior case designs. The angular designs almost make me cringe at the thought of dust settling in the deep dark corners of the front and top bezel. Nonetheless, the Overseer RX-I is definitely not ugly, and keeps a solid "gaming" atmosphere in its design -- much like its predecessor, the Chaser MK-1. If you are into this kind of design, then to each their own -- this is not a part of my evaluation. The front bezel of the Overseer RX-I is a good start when taking a look at the exterior of the chassis. As stated just above, it features many angular designs and shapes that will simply stand this case apart from most in the market. The material found on the front bezel is a mix of plastic and high airflow mesh. Nowadays, many new chassis introduced in the market feature a front bezel containing a mesh design. This allows an adequate amount of airflow for the front intake fans, as well as a good conventional exterior design element.
Taking a quick glance at the side of the Thermaltake Overseer RX-I, we can further see the design elements found on the chassis. The side panel includes two features that are found on most gaming cases today. The first is an acrylic window for internal viewing and style. The second would be a fan grille and mesh for the option of installing a side window. Of course, Thermaltake has become quite creative with both these features shaping the side window that suits the rest of the space-theme design. As for the side vent, I must confess I simply loathe them. Let me explain. Ten times out of ten, I will never utilize an optional side fan, simply because it will disrupt the natural airflow from the front to the back of the case. Also, the side vent creates a point of entry for dust, which is never ideal. Last but not least, the side vent simply prevents a manufacturer from providing large acrylic window. It would be most ideal for Thermaltake to manufacture these enthusiast cases with the option of purchasing a side panel with a full sized acrylic window to please both parties.
The case measures in at 535mm in height, 220mm in width, and 580mm in length, which is considered average for a full tower chassis. Less than half a year ago, I have reviewed the Chaser MK-1 that is larger in all dimensions when compared to the RX-I, but could only support up to ATX sized motherboards. The Overseer has been shaved off in size, but now supports up to Extended ATX motherboards. The net weight of the case is around 22.7 lbs, which is not too heavy when compared with other full tower, steel-framed chassis.
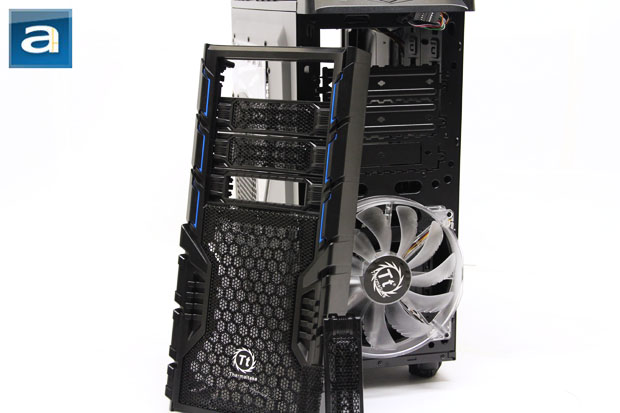
There are a total of three 5.25" bays found on the Thermaltake Overseer RX-I. Under the third 5.25" bay is a 3.5" bay to support floppy drives or other 3.5" case accessories. All 5.25" slot bays include a cover placed on the front bezel that can be unclipped from the inside of the bezel. The entire process of installing optical drives is entirely tool-free, which is quite a convenient feature.
Apart from the standard tool-free optical drive bays, the high airflow mesh wrapped around the cover is very well placed together, and is made of a high quality mesh wiring. Of course, mesh has its strengths in that it provides great exterior looks, as well as sufficient airflow. One problem that manufacturers face, however, is that increased airflow will generally increase dust intake at the same time. Each of the covers includes foam filters to counter this problem. Lastly, behind the front bezel at the bottom vent is a large air filter provided by Thermaltake to filter out the dust for the front 200mm intake fan.
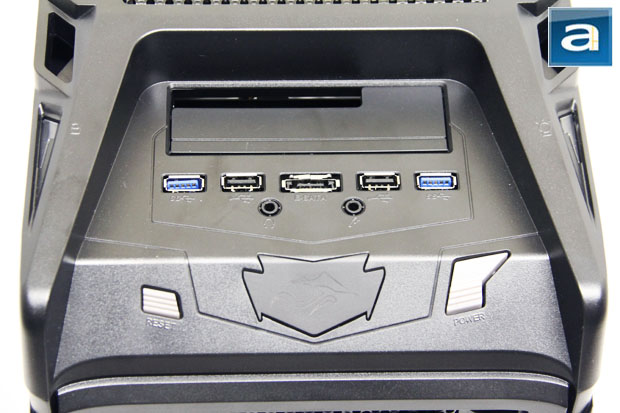
One area of the case that is always interesting to look at is the front panel connections. This area provides the user with a host of connection options that will make everyday operations more convenient. First off, the input and output connections are all found on top of the chassis. This is the ideal location for full tower chassis, since the majority of users will naturally place their system on the floor due to its sheer size. Using the above picture as a direct reference, the Overseer RX-I has the power button at the bottom right. To the left is the Overseer RX-1's creative lighting effect logo that lights up blue. The recessed reset button is found at the bottom left. In the middle section -- starting from the right side -- we have one USB 3.0 port, one USB 2.0 port, one eSATA port, one USB 2.0 port, and another USB 3.0 port. Finally, found above is a hard drive docking station that can support both 3.5" and 2.5" HDDs. But this is not it. The power LED and HDD LED are found on the very side of the top bezel, and is integrated stylishly with the eSPORTS look. The power LED lights up blue, while the HDD LED lights up orange. With all these features and front panel options provided on the Overseer RX-I, no one can really complain at the sheer amount provided. One structural issue that I have found with this section of the case is the entire front panel connections panel is connected with the top bezel. This may not be such a large issue at first, but those who need to remove the top bezel to install/remove fans or radiators may find it troubling. This is because several wires are still connected to the top panel when removed, which means the top panel cannot be completely taken off.
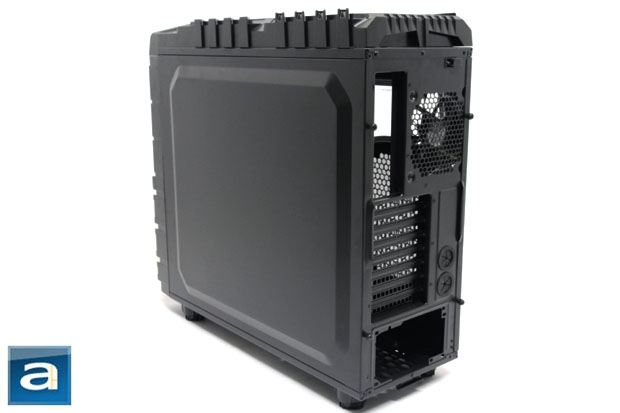
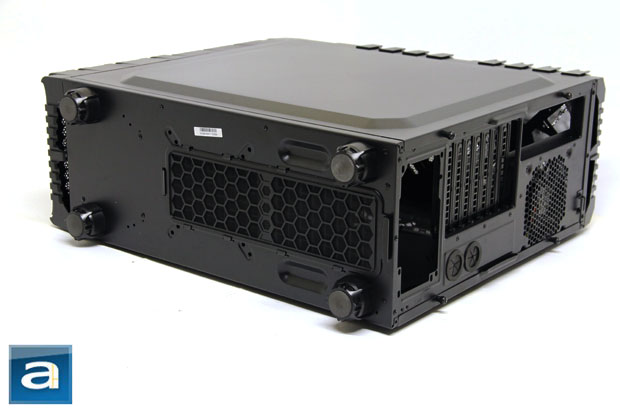
At the back of the Thermaltake Overseer RX-I is a fairly standard layout. Since the chassis utilizes a bottom mounted power supply unit, the power supply bay, logically, is here as well. Above that is a set of eight expansion slots, which can accommodate all standard motherboards. These expansion slots allow air to flow through them, which is nice. Above the expansion slots, one will find the I/O shield opening. To the right of that is a circular stamped fan vent for the 140mm exhaust fan. It will spin up to 1000 RPM, and should be way more than sufficient in handling heat exhaust. Just below the fan is an array of two pre-drilled and pre-fitted water cooling holes for those who want to use external water cooling radiators.
Also found at the back of the Chaser MK-1 is peripheral locking mechanism that uses a single thumbscrew, which can only be unscrewed from the inside to unlock. This small additional feature is vital to public LAN parties we all love to attend.
Lastly, looking towards the right side panel of the unit, there really is not much going on -- perfect. The side panel includes a generous bevel that will add additional internal room behind the motherboard tray to house wires.
At the bottom of the chassis, the first thing that sticks out would be the feet. There are a total of four feet. The feet do not include rubberized material at the bottom; featuring a soft padded material instead. The flexibility of this material may help in reducing vibration a tiny bit, but I believe its main purpose is to protect the surface that the chassis sits on. This is ideal for me, as my system sits on hardwood, and I will not need to worry about providing my own extra layer of protection. The four feet raise the chassis more than 30mm off the floor, and gives all the room needed for the bottom intake fans to draw in air. Provided is a very long removable air filter that will cover both the PSU intake fan and the optional fan mount, and it is quite nice to have.
Overall, the build quality on the Thermaltake Overseer RX-I is good. As stated before, the front bezel and top roof cover are made of a hybrid of plastic and high quality airflow mesh. The rest of the unit is comprised of steel, electrogalvanized, cold-rolled, coil (SECC) panels. This material gives a certain heftiness to the entire unit, which is not surprising for such a large case. All the pieces -- including the front bezel, top panel, and side panels -- fit together very well.
Page Index
1. Introduction, Packaging, Specifications
2. Physical Look - Outside
3. Physical Look - Inside
4. Installation and Conclusion


