Page 12 - Overclocking and Conclusion
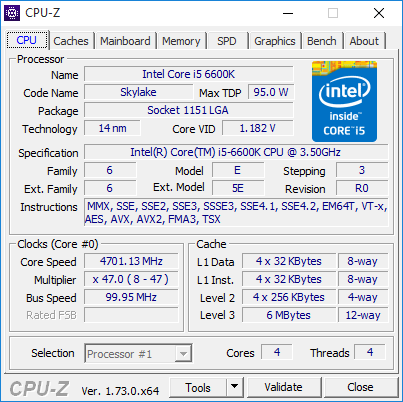
Before Sandy Bridge and Ivy Bridge, overclocking your CPU involved changing half a dozen settings to try to obtain the highest clock speed. This was because there were so many different ways to obtain your maximum frequency, things were a bit complicated even if you are an experienced computer enthusiast. With the latest Skylake processors, you can play around with the base clock like Haswell, but since I got an Intel Core i5-6600K, I simply tuned with the unlocked multiplier. Using a CPU purchased anonymously at a local retail store, I was able to attain 4.7GHz at reasonable voltages on the GA-Z170X-UD5; which was pretty good. To achieve this, I changed the CPU Loadline Calibration to High, and set every other voltage setting to "Normal". I gave the Vcore an offset of +0.120V to target 1.35V under load (CPU-Z displays the wrong voltage in our screenshot above). It is possible to crack the 4.7GHz barrier, but it will require quite a bit more voltage. To keep things running safely, I feel 4.7GHz is a very reasonable permanent overclock on the Gigabyte GA-Z170X-UD5 motherboard using my retail box Intel Core i5-6600K. This 1.2GHz change from stock translates to a 34% overclock.
-----------------------------------------
Getting to the heart of the enthusiast market is a comprehensive formula. For me, when I am looking for a motherboard, I want build quality, reliability, overclocking performance, layout that makes sense, good selection of connectors at the back, user experience, reasonable pricing, and even physical appearance. Build quality and reliability is important, because you will want something that will work for as long as you desire. Overclocking is important, because you will want to make the most out of your system. Layout is important, because it is crucial to make a good cabling job. Connector selection is important, so you will not need to go out and buy extra parts to use what you want. User experience is important, because everything from the BIOS to the way it handles connected fans will affect the way your computer functions. Pricing is important, because we are not made out of money. And physical appearance? I am an enthusiast! Based on all these items, it is easy to see why Gigabyte has been one of the leaders in the industry in the past few years. The GA-Z170X-UD5 carries all the elements that makes what a mainstream performance board appeal to the enthusiast looking to experience all the new features on the Skylake platform. From the latest USB-C with USB 3.1 support to dual full bandwidth M.2 PCIe ports, this motherboard has you covered on the latest technology. Gigabyte's quality and reliability should not need much discussion; it is unquestionably one of the best out there. With top notch integrated audio, dual Intel Gigabit LAN, HDMI, DisplayPort, integrated diagnostic LCD (Which I caught myself looking at quite a bit when testing), and an excellent multi-interface BIOS to appeal to cross-generational enthusiasts, there is a lot to like about the GA-Z170X-UD5 offering. The icing on the cake: Great looks. For about $190 at press time, the Gigabyte GA-Z170X-UD5 is a well-rounded mainstream enthusiast board that has all the features you need, all without breaking the bank.

Gigabyte provided this product to APH Networks for the purposes of evaluation.

APH equal.balance Award
Since April 30, 2007, Number Ratings have been dropped for all CPUs, motherboards, RAM, SSD/HDDs, and graphics cards. This is to ensure the most appropriate ratings are reflected without the inherent limits of using numbers. Everything else will continue using the Number Rating System.
More information in our Review Focus.
The Gigabyte GA-Z170X-UD5 is a top notch mainstream enthusiast board that is well rounded in features for only $190 at press time.
Do you have any comments or questions about the Gigabyte GA-Z170X-UD5? Drop by our Forums. Registration is free, and it only takes a minute!
Page Index
1. Introduction, Packaging, Specifications
2. Bundle, Chipset, BIOS
3. A Closer Look, Board Layout, Test System
4. Benchmark: AIDA64 CPU
5. Benchmark: AIDA64 FPU
6. Benchmark: AIDA64 Memory
7. Benchmark: PCMark 8
8. Benchmark: 3DMark
9. Benchmark: PassMark PerformanceTest 8.0
10. Benchmark: SuperPI 1M, Cinebench R15
11. Onboard Sound Frequency Analysis
12. Overclocking and Conclusion