Page 3 - Physical Look - Inside
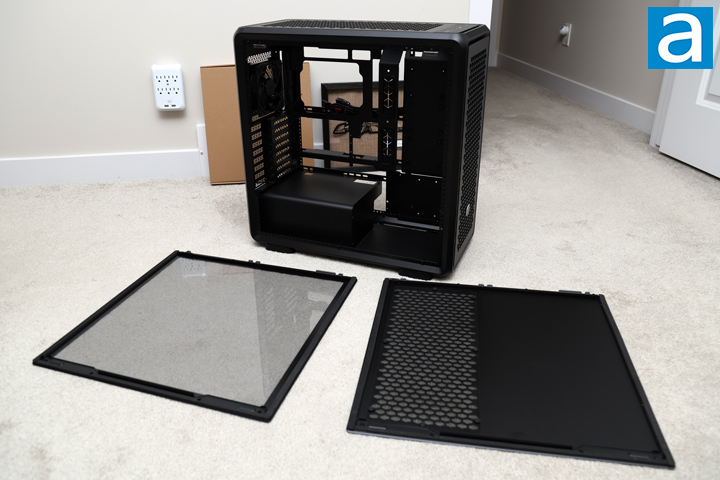
Getting into the Cooler Master MasterFrame 600 is a straightforward process. There are no screws or other hardware to deal with. Instead, the side, top, and front panels are all held on with magnets and latches. To pull the panels off, you will need to get a grip on the edges of the panels and pull them away from the case. The magnets are quite strong and hold the panels in place easily so the panels will not release by accident. These removable panels are lined with foam to reduce vibration and prevent two hard surfaces from making contact. All vertical panels can be pulled away and rested on the side of the case without falling over. One side is tinted tempered glass with a thick black rim on the inside to handle the panel without leaving visible prints. The glass is about 3mm thick and reinforced with steel. The opposite side panel is aluminum and holds to the side with the same sort of magnets.
Once the panels are off, you can get a better look at the Cooler Master MasterFrame 600's interior layout. As you already know, this case is open concept with a single division for the power supply at the bottom of the case. There are no perforations or ventilation spots in the partition. The main area of the Cooler Master MasterFrame 600 is where you would mount up to an extended ATX or SSI-CEB motherboard. This is limited to boards 305mm in width and 330mm in length. All included accessories are stored in a separate cardboard box and contained within plastic bags. Internally, everything is the same black color. The paint on the panels is applied evenly and does not scratch off easily.
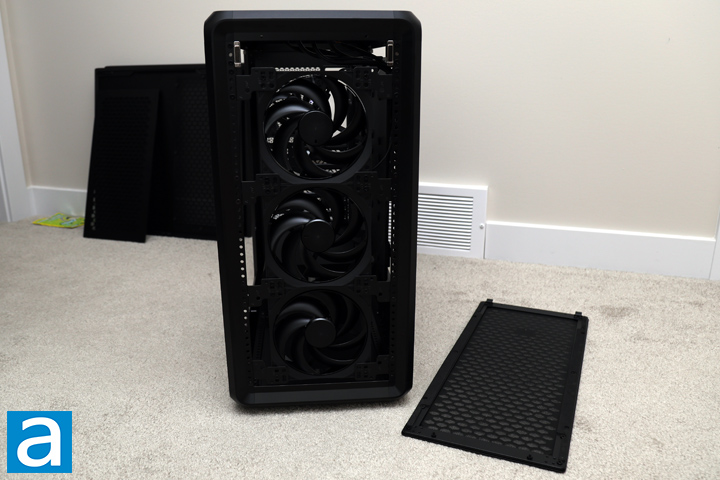
Just like the side panels, removing the front panel is a matter of pulling it away from the frame of the case. The front and top panels also have two pins at the top for alignment purposes. As I have mentioned, the front panel of the Cooler Master MasterFrame 600 is lined with a mesh filter to prevent dust particles from entering your PC. However, this mesh is attached well to the panel, so if you want to clean it up, you will need to remove the whole pane.
Behind the front is a set of three 140mm Black Edition Cooler Master Mobius fans. As such, the fan fits in with the rest of the MasterFrame 600 in its all-black exterior. Based on Cooler Master's specifications, this fan spins up to 1900 RPM, with a maximum airflow of 76.5CFM and air pressure of 2.3mmH2O. It generates up to 30dBA of noise and has a mean time to failure of over 160,000 hours. These have loop dynamic bearings inside, which are like fluid dynamic bearings. Overall, these should make for good case fans, especially since there are enough perforations at the front to not inhibit air movement. If you choose the silver version of the MasterFrame 600, you get three SickleFlow ARGB fans here instead. I am surprised that these LED lights only come with one version of the MasterFrame 600, especially since both are the same price. However, I would argue the Mobius fans are better quality fans with their loop dynamic bearings as opposed to the rifle bearings in the SickleFlow fans. As such, you will need to factor in the differences when choosing between the cases.
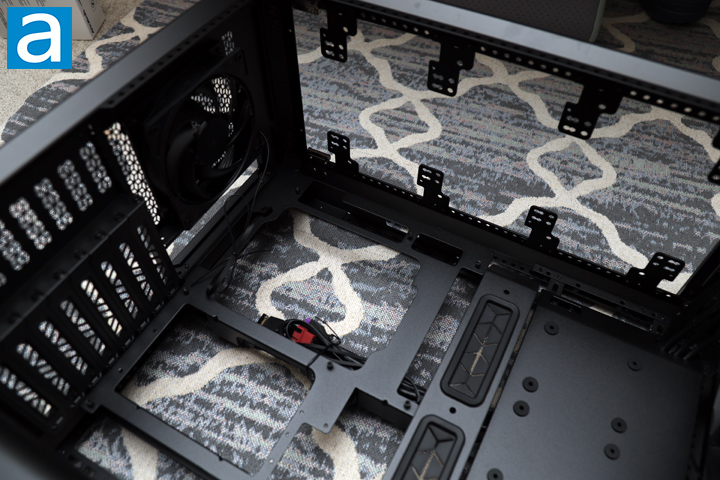
Inside, the first thing I will point out about the Cooler Master MasterFrame 600 is that the interior can be completely removed and reorganized. The back motherboard tray, power supply shroud, and other elements here are all attached to the external frame with screws and held in place in the same way. You can use the enclosure as it is out of the box, but if you want to change it up, you had better get a screwdriver to make modifications. From its factory configuration, the upper area has a typical large opening behind the motherboard. This is useful when installing third party coolers, as you can change the mounting mechanism while keeping the motherboard installed. There are multiple holes around the larger hole. The ones directly above and beside the backplate access area are meant for back connectors on motherboards. This modular interior is part of the FreeForm 2.0 design language, but it is not executed completely. For example, all these panels are held in with screws, which goes against their tool-free claims. We will see how it affects the building process later.
Above the motherboard, there is another row of holes for power cables to connect to the motherboard. At the very top of the MasterFrame 600, there are small metal mounts to install cooling options. According to Cooler Master, you can mount up to a single 360mm or three 120mm fans up here in the factory configuration. However, if you swap the brackets, you can accommodate even larger fan sizes including two 140mm, two 180mm, or one 200mm. The top exterior panel can be popped off for easier access to mounting here. At the back is another spot to place a 120mm fan. Included is a 120mm Cooler Master Mobius Black Edition fan. The specifications for this fan are 2050 RPM maximum speed, 63.1CFM airflow, 22.6dBA noise, and 2.69mmH2O air pressure. It has the same loop dynamic bearings inside with a meant time to failure of over 200,000 hours. Once again, the silver MasterFrame 600 comes with a SickleFlow ARGB fan.
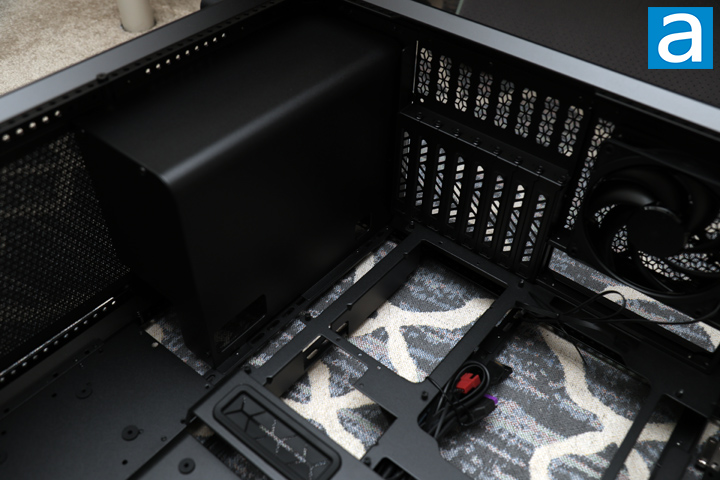
Down the back, there is a total of eight expansion slot covers, which align with a full tower design. These slots are attached to a fixed bracket. These have a bridge design, and the MasterFrame 600 does not support vertical graphics card mounting. Vertical graphics card mounting is common, so I am a bit surprised at this restriction. At the bottom, you can see the solid power supply divider. There are no ventilation holes on the shroud, but there is a hole at the back, so you can pass the power cables for your video card here. I would have liked to see a rubber grommet around these holes.
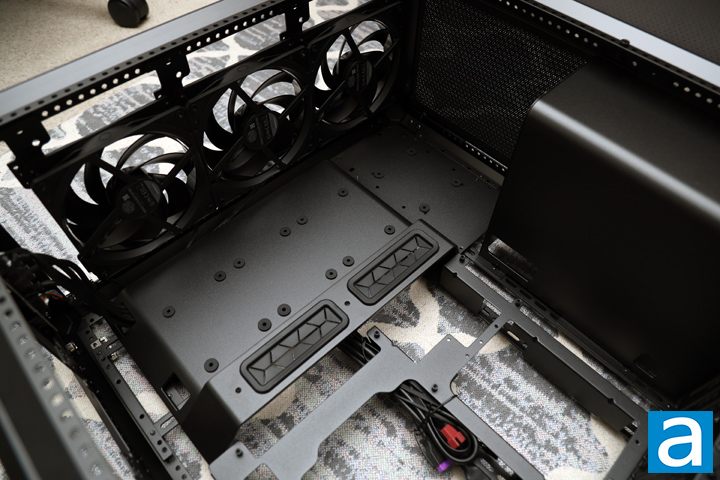
At the side front of the Cooler Master MasterFrame 600, there are multiple mounting points to install your drives. There is a total of three dedicated bays for 2.5" drives, as well as two more positions for either 2.5" or 3.5" storage options, making for a total of five distinct locations. The top three 2.5" bays are located at the upper portion and slot in without needing tools, as you just need to mount standoffs to the drive and slide them into the rubber holes. The two hybrid locations are at the bottom of the case, with one mounted on its side and the other on the floor. The floor location is particularly tricky to get to, since you will need to remove the bottom mesh underneath the case to install the mounting rails. Nearby, there is a bar with routing holes and rubber grommets to pass cables through. It exists on a separate bar from the drive bays, so you can remove this bar completely.
At the front, there are more mounting arms to install up to three 120mm, three 140mm, two 180mm, or two 200mm fans. You can also install up to a 420mm radiator at the front with a total clearance limitation of 458mm. Given the last 420mm AIO cooler we reviewed, the be quiet! Silent Loop 3 420mm, measures 475mm in length, this might be insufficient for many all-in-one options. If you do not need the drive locations on the side, you can remove the tray and shuffle the rails behind it for up to three 140mm fans or a single 420mm. If you want the larger 140mm fan here, you need to move one or both rails to widen the rail gap.
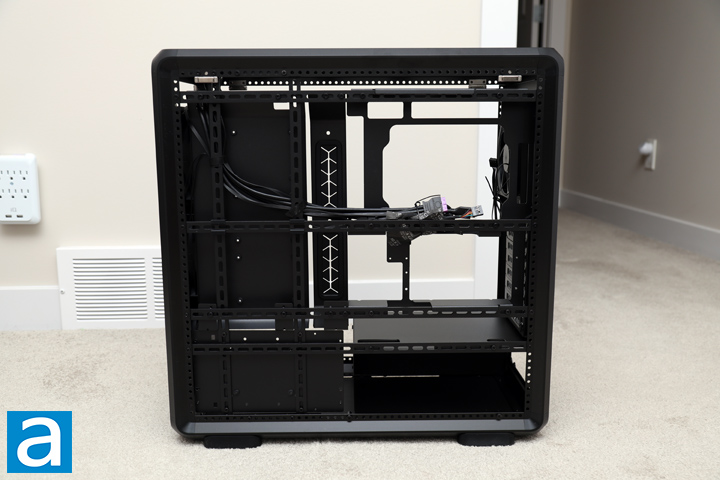
The other side of the Cooler Master MasterFrame 600 really emphasizes the "frame" in its name. The primary aspect that may catch your eyes is the presence of the many perforated metal bars. These framing elements are part of what make the MasterFrame 600 modular. As such, users can use the included straps to attach cables to the metal framing elements. The other part is the many circular holes on the exoskeleton around the case. These serve as anchor points for the metal rails. I know many people are not looking at the back here often, but I have to say the MasterFrame 600 is not attractive with all these rails. It is necessary for the modular design, but it clutters the backside.
At the top, you can see magnets holding the side panels in place. In the middle, there are cables for the front I/O panel, including a 30-pin USB 3.0 header, HD audio, USB Type-C header, and the front I/O connectors gathered into a single header. I think Cooler Master was one of the first cases to provide a single header for the front panel buttons and lights, and I am glad they continue to do so. These are gathered with some Velcro cable straps and attached to the rails. If you had the silver version of the MasterFrame 600, you would also get an ARGB PWM hub. Instead, our black version includes a three-to-one fan adapter to control the front panel fans with a single header. While this accomplishes the same goal, it looks a bit messier. In the back, there is approximately 35mm of clearance behind the motherboard and 27mm behind the drive bay front.
Under the power supply shroud, there is not too much here. The power supply slots in here and sits elevated off the ground. This means you need to hold up the power supply as you mount it in place. I find this implementation odd, and I wonder why anyone would prefer this over having some sort of resting spot on the bottom. Cooler Master should have installed some bars that go across the bottom frame for the power supply to rest upon. This would reduce the stress on the back pane and make the installation of the PSU easier.
Page Index
1. Introduction, Packaging, Specifications
2. Physical Look - Outside
3. Physical Look - Inside
4. Installation and Conclusion


