Page 2 - A Closer Look - Hardware and Software

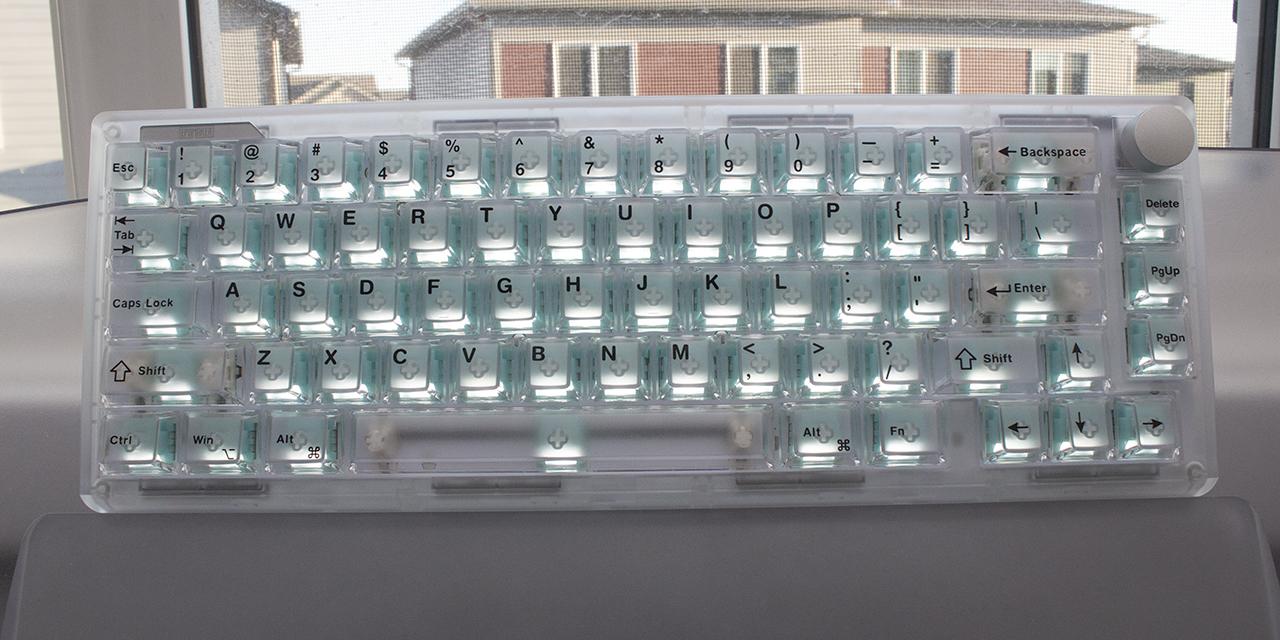
The Epomaker HE108, much like many Epomaker keyboards, is tame when it comes to appearance. Our model of the HE108 is an all-white design with cyan accent keycaps for Escape and Enter. The black version is completely black, although the keys are more translucent gray so the backlights can bleed through. Otherwise, the white framing elements around the HE108 are minimal. Once again, I would like to see Epomaker try other styles or color schemes for some more personalization or uniqueness, as their options look run-of-the-mill. They have added a bit more lighting with side light strips on both sides for some more style, but the HE108 still is a bit generic in its style. The rest of the elements, from the frame to the keys, are squared off. A small Epomaker logo is printed on the bottom right side, but the rest of the unit is free of additional logos.
In terms of dimensions, the Epomaker HE108 is 441mm wide, 141mm deep, and a maximum 48mm height at the back. The height increases more if you raise the kickstands. This is an average size for a full-size keyboard. The HE108 holds its shape in everyday use, but the plastic frame flexes easily. This is especially seen when you are twisting the HE108. There is also a bit of deck flex when pressing a key down, but it is not as apparent as some other full-size boards we have seen in the past. This is not too surprising given there is a gasket-mounted polycarbonate plate inside. The front edge of the frame is approximately 18mm tall, which means you can add a palm rest here, but one is not included. The rear edge is 32mm tall.

We received the standard North American QWERTY ANSI layout of the Epomaker HE108. This normally translates into 104 keys, but we have four more in the top right corner for a total of 108 keys. The bottom row is standard spacing with 1.25U keys on both sides of the space bar. We also have a full number pad on the right side of the HE108. All keys are standard in spacing. As mentioned already, there are four more keys above the number pad where the indicator lights would traditionally be found. Instead, these lights are placed between the Escape and F1 keys. There are three standard lights to indicate Num, Caps, and Scroll lock, and one more light with a "B" beside it to indicate charging and low battery status.

There are many secondary functions on the Epomaker HE108, but most are not printed on the keycaps. Instead, you can look at the user manual. To access these functions, start by pressing the Fn key on the bottom right side before pressing the specified key. All the top function row keys have secondary functions. F1 and F2 are used for decreasing and increasing screen brightness. F3 to F6 execute system commands, including launching task view, file explorer, search, and screenshot. F7 to F9 are for media functions including Previous track, Play/Pause, and Next track. Finally, F10 to F12 are used to Mute, Volume Down, and Volume Up. However, there is also a dedicated set of volume keys above the number pad, along with a shortcut for calculator.
Function and Windows key let you lock or unlock this key, which is handy for gaming. When locked, the backlight under the Windows key will glow white. Epomaker also supports Mac functions, and they are placed where you might expect on a Mac keyboard. Some of the Mac modifier keys are printed on the bottom row keys. You can change between operating system modes with a switch at the back. There are some secondary functions for pairing devices over Bluetooth, as Q, W, and E are used for pairing for three different devices. In wireless operation, you can check the battery life by pressing Fn + Enter. Finally, if you make any changes you want to reset, you can hold down Fn + Escape for three seconds, which will revert to factory settings. There are secondary keys for lighting controls, but we will explore these later in the review.

The bottom of the Epomaker HE108 is quite bare. On the sides, there is a diffusing bar, which sits over lighting on both sides. This adds a bit more bling and under glow to the HE108 when it is turned on. There is a shiny label in the middle with information regarding the keyboard. This includes a small description, certifications, and a Made in China label. A serial number is also here if you end up needing support from Epomaker. The corners have rubber pads to keep the product in place. There is a pair of different height kickstands. As such, there are three different incline angles of the HE108. The kickstands have rubber padding on them to prevent movement when it is propped up. The only other thing of interest is located on the back edge in the middle. This includes a USB Type-C port for connecting the HE108 to your computer. On one side is a switch to change between Windows and Mac layouts. The other switch has three positions for choosing the operation mode with the wireless dongle, over USB, or Bluetooth. The included USB dongle can be found under one of the kickstands, as there is a resting position for when it is not in use.
As we have stated a handful of times, the Epomaker HE108 can be used wireless or wired. Inside, there are two 5000mAh batteries for a total 10000mAh capacity to keep the keyboard going. In our testing, we had solid battery life results. Epomaker provides an estimate of up to 32 hours of continuous use with the lights on and over 500 hours with them off. In our testing, I was able to go twelve days over the 2.4GHz transmitter before the HE108 went into a low battery mode and automatically turned off the lights. To be clear, it is not as if I was using it full time during the testing period, but this is still adequate. Unfortunately, I was unable to fully test it without lights on as I did not have enough hours in the day, but I think Epomaker's claims are true based on our initial testing. When it functions over the wireless dongle or wired, the HE108 reports at 8000Hz by default. I would guess that if you reduce this down to 1000Hz polling rate, the battery life would last a bit longer. This reduces to 125Hz when operating over Bluetooth. To keep this longevity, the keyboard automatically sleeps when it is not in use. Once you press any key, it automatically wakes back up from sleep. This process was not always smooth, as it took a second or two longer to recognize the first input.

On my table, the Epomaker HE108 stands out over a gray XTracGear Carbonic XXL. The white keycaps are accented with the two teal translucent keycaps. In terms of layout, everything is standard and where it should be. I am not the biggest fan of the number pad in general, but it is something you get with the full-size option. I thought I would miss the volume knob omission, but the dedicated volume keys were a formidable replacement. Otherwise, everything is as you might expect for a keyboard with a standard layout.
Epomaker has nailed a good typing experience, even if it is based on preferences. Inside the Epomaker HE108, we have Creamy Jade HE switches, which we will inspect on the next page. We have seen this name from the TH108 Pro, but these use Hall effect instead. As such, even though they share the same name, the HE108 feels and sounds different. Both mechanical and Hall effect versions of the Creamy Jade have a smooth and almost creamy-like sound, but they still sound different. While the TH108 Pro was lower pitched and thocky, the HE108 accents this sound with a higher-pitched bottoming out. In comparison, it sounds like knocking on smaller marbles or rocks for each press. When you bottom out the switch, the press feels sturdy. Longer keys like the space bar and Enter key have a different sound, but the tactile feel is the same. Overall, I enjoyed typing with the HE108, even if the high-pitched bottoming out is not my preference.

One notable difference between the HE108 and other Epomaker products is the use of shine-through double-shot PBT keycaps. As such, the backlights serve a functional purpose in illuminating the legends when using the keyboard in the dark. The lighter keycaps also spread the lighting around. The south-facing lights shine through the keycaps to make the area visible. At maximum brightness, the lights may not look the most vibrant, but they are still visible in a bright room. Other areas of illumination include the pair of diffused light strips on the sides of the HE108 for more color and personalization.
Lighting controls can be adjusted via secondary functions. Once again, you need to press Fn first before the specific key. To change the effect, you can press Insert. Delete is used to change the color. The Up and Down arrows increase and decrease the backlighting brightness, while the Left and Right arrows decrease and increase the speed of the effects. Finally, Home is used to cycle through the side light colors, while Left Shift changes the side light colors. Epomaker also listened to our requests as you can turn off all the lights by pressing Fn + Backspace.

The Epomaker HE108 works with Epomaker Driver. It is a bit confusing because Epomaker calls this their 3.0 driver and we used version 3.2.14, but when we installed it on our test system, the application was called "Epomaker Driver v4". Regardless, the compressed installer can be found on the manufacturer's website as a 101MB file. Once installed, you can see the following screen with many clusters of settings. The menu is on the left column, where users can select the different pages. The Keyboard Settings page is the first one, where you can change the functions on a key-by-key basis.
Inside here, there is a smaller set of tabbed pages for Hall effect magnetic settings. The first is changing your actuation distance, which can be changed in 0.005mm increments between a range of 0.10 to 3.30mm. Next is the set of advanced key settings. The first one is DKS, or Dynamic Keystroke, which lets you set up four functions in four distinct positions of the keystroke. Press and Click or MT lets you set up two functions based on whether you hold or tap the key. Toggle Switch or TGL lets you enable continuous key triggers whether you hold it down or if you double tap it. Finally, there is one called snap key, which lets you set up a pair of keys so that when both are pressed, the last keystroke is the only one recognized. These functions are meant to help with gaming functions, although Epomaker warns that some first-person shooter games may ban you if you use these features, so use at your own caution.
In the last tab, the Other Settings is where you can configure the report rate and the sleep time. Moving on, the Fn Layer Settings is self-explanatory to let you change secondary functions, while Macro Editing is used to create macros.

Under Light Settings, users can select and change the lighting effects with many different options available. This includes configuring both the backlights and the side bar lighting. Local Configuration menu seemed to never work for me. Epomaker allows for some more social aspects by letting you share your lighting, configurations, and macro settings with other users. You need to register and login before you can upload any of these settings, but you can always view and download other users' settings from here. Profile is presumably where you can make user changes, but again this requires you to register and log in. Under More, users can update the software and firmware for the Epomaker HE108.
While all these settings seem nice to have, I do not enjoy using Epomaker Driver for multiple reasons. For one, the translucent AI bubble in the bottom right corner appears over every menu and blocks this area. Clicking on it opens a useless "AI bot" to help you find settings within Epomaker Driver. It gets in the way, and it does not help with anything. I feel like if they need an AI bot to show you the location of the settings here, then they have made the menus difficult to navigate. Next, I feel like this software was not made with user experience in mind. Everything seems cluttered with uneven spacing. There are multiple typos or grammatical errors found in the software, which shows a lack of polish or care. Unfortunately, I would not recommend installing this for the HE108, unless you really need to make a change for a specific setting.
Page Index
1. Introduction, Packaging, Specifications
2. A Closer Look - Hardware and Software
3. A Closer Look - Disassembly and Internals
4. Conclusion