Page 2 - A Closer Look - Hardware and Software
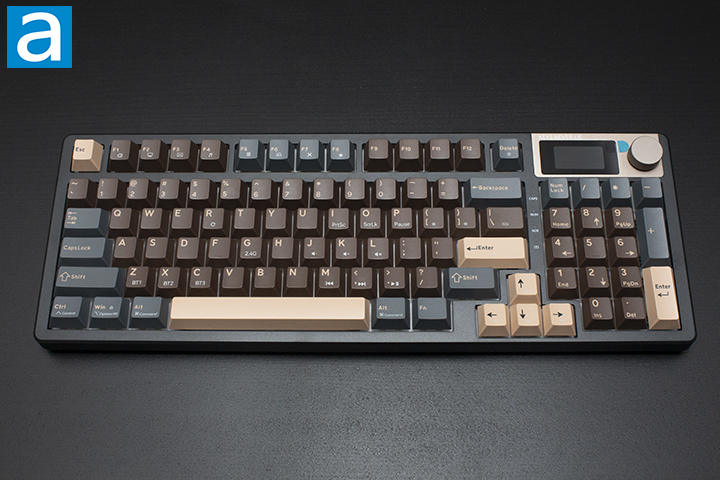
The KEMOVE K94 is a 1800 layout keyboard when it comes to appearance. This layout is becoming more common among users looking for a smaller and more compact design while retaining a dedicated number pad and arrow keys. In terms of finish, the build utilizes a plastic housing with high-profile bezels. KEMOVE opted to use a plastic case paired with PBT keycaps, which gives a good consistent appearance across the board. The keycap design fits well with the case, matching the Mocha Brown color theme. The K94 features a standard high-bezel design, keeping the keycaps almost level with the frame of the keyboard. The screen on the K94 is quite nice, but the date and time never seemed to sync to my computer. It is supposed to automatically sync to your device’s time, but I have found no success with this.
KEMOVE chose to place minimal branding on the keyboard. There is very little branding on the back, only present on the product label and magnet. As someone who prefers less branding, this is perfect for me. The K94 does not come with a wrist rest, but is height adjustable using the feet on the bottom.
The KEMOVE K94 measures in at 390mm in length, 140mm in width, and 43mm in height according to the box. Given this 94-key layout design, this is quite standard. In terms of mass, this weighs in at approximately 1060g, not including the detachable cord. This weight feels substantial, but given the internal dampening layers and battery capacity, it makes sense. Going into the build quality, the top deck shows some flex when pushing between the key gaps. When pushing down firmly into the keys, there is a small amount of flex from the gasket mount structure. There was only a reasonable amount of bending when attempting to twist the keyboard, being nothing to worry about. The case is quite sturdy for a plastic housing. As someone who has used aluminum keyboards for quite some time, I was still satisfied with the plastic build of the KEMOVE K94.
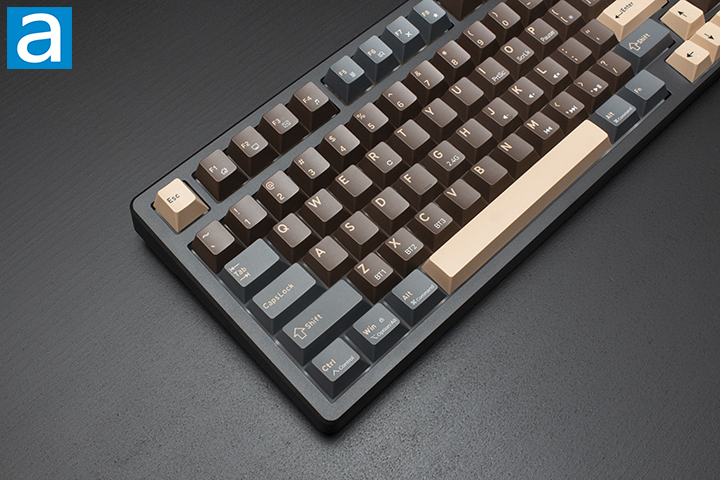
The KEMOVE K94 comes in a 1800 QWERTY ANSI layout. The standard 1800 layout typically has about 96 to 104 keys, depending on any added features. In this case, we find 94, given the use of a knob and screen. The ANSI layout is the standard American layout, which uses the single row Enter key, as seen in some of the earlier images. The keyboard does use a primarily standard bottom row, only missing the right Windows and Ctrl key. For those who do not know, 1U stands for a single unit, meaning a 1.25U keycap is 1.25 times wider than a regular one. As such, all of the bottom row keys aside from the space bar and arrow keys are 1.25U for a standard bottom row. For the average user, the typing experience will feel relatively the same, as the only difference is a few missing keys on the right side.
The KEMOVE K94 has full N-key rollover, meaning every single key pressed will register even if they are all pressed simultaneously. This means there will be no ghosting issues, where some keys may not be registered. Gamers and fast typists who have fast actions per minute or words per minute will benefit from this, as it will allow more keys to be recognized at the same time. In reality, people usually only need 6-key rollover, so the addition of N-key rollover is nice for extremely fast typists who can reach about 250 words per minute. The inclusion of N-key rollover has become quite standard among keyboards, so this should not come as a surprise that the KEMOVE K94 has it as well.
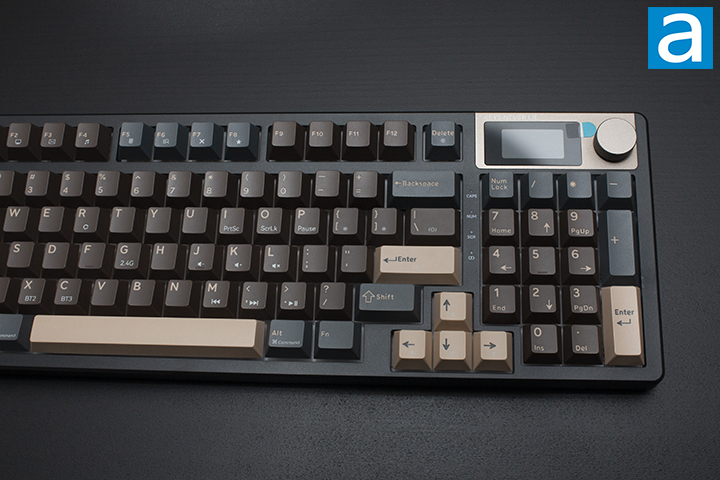
Let us take a look at the secondary functions that can be accessed using the Fn key on the bottom right side of the keyboard and the F-row, arrows, and a few extra keys. We will break this down into shortcuts, media, and lighting. I will only be testing the Windows functions, as I am on a Windows device.
Starting with the general shortcuts on the F-row, F1 through F4 will activate Home, My Computer, Mail, and Media Player, in that respective order. F5 to F8 open Calculator, Search, Close Webpage, and Bookmark webpage, respectively. I will note the keyboard does have symbols that indicate what each secondary function does, so you do not need to worry about memorizing this. In case you do not know what the symbols are, the KEMOVE K94's manual accurately maps them out. To compensate for the lack of homing keys, you can use the number pad for Ins, Del, Home, End, PgUp, and PgDn. Meanwhile, I, O, and P can be used for PrtSc, ScrLk, and Pause, if those are functions you use. I personally use PrtSc a lot to screenshot. Additionally Z, X, and C will change between Bluetooth connections, while G will toggle to the 2.4GHz interface.
Looking at the multimedia controls, we find them on the right side of the alpha keys. J, K, and L control the sound levels. They operate Sound Down, Up, and Mute. M, <, and > will play the previous track, play the next track, and pause/play, in that respective order.
Lighting is an interesting one, as we have three different methods to change it. First being keyboard shortcuts, the next being the knob, and lastly, software. Taking a look at the keyboard shortcuts, the up and down arrow keys will control brightness. Left and right control effect speed. The open and closing square bracket handle light saturation. Backslash will iterate through different effects, and Enter will go through a set of colors. Finally, we have Delete, which toggles the lights on and off. I personally find it interesting they would include secondary functions to change backlighting effects when they have much more functional alternatives such as the knob.
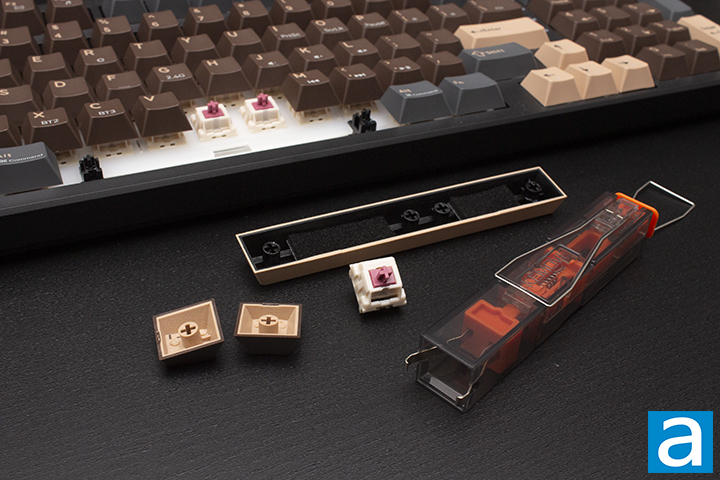
As for the keycaps, these are made out of PBT plastic or polybutylene terephthalate, as previously mentioned. I personally prefer PBT, as the material is harder and resists shining better. The lettering is printed out on the top of the keycaps using a double shot process, which is created by using a dual-injection molding process, where two separate layers of molten plastic are injected into a mold and fused. Double shot is highly durable and sought after. The coloring and legending are sharp. In terms of warp and shine, I do not think there will be much issue, as the textured design will likely overshadow it. The font used is quite sharp and consistent with the rest of the board, which is something I find nice.
Underneath the keycaps, you can see the typical MX stem. This means you can replace the keycaps with another set. This keyboard uses south-facing lights, which is good, as there will be no interference problems using Cherry profile keycaps. In regard to thickness, they are about 1.4mm thick, which is really good. The significance of the thickness of a keycap is important for the feel and pitch. To keep things simple, thicker ones have more depth and produce a deeper thock, while thinner ones produce a higher pitch sound.
The KEMOVE K94 features the Jixian Blueberry switches. The Blueberry switches have a travel of 3.6mm. This is a slight alteration compared to the standard 4mm total travel seen on most switches. The total force required to actuate is roughly 55g for operating. These switches have a rated lifespan of 50 million keystrokes, which is standard to most mechanical switches. These switch specifications are quite standard to many other switches. The KEMOVE K94 is also hot-swappable, meaning you can swap these at any time if they begin to fail.
Even with these specifications, it is quite hard to picture what these switches actually feel like, so I will try my best to explain. For a stock switch, the Jixian Blueberry switches are acceptable. The linear characteristic gives a smooth travel, but could be smoother. I will note that these switches are pre-lubricated, but very lightly to a point you may not notice it. If you have used a standard mechanical keyboard before, it will feel quite normal aside from the early bottom out. With that said, the Blueberry switches are good if you are looking for a shorter travel budget switch.
Moving on to stabilizers, we have plate-mount Cherry stabilizers. If you are unfamiliar, there are two main designs of stabilizers, which are Cherry and Costar. In both cases, these are used to maintain balance in the longer keys and stabilize them, as the name implies. Cherry ones will have stems matching the bottom of most keycaps, while Costar has a wire hooked into a hoop on the keycaps. The main issue with Costar stabilizers is how they are a rattly mess, and there is practically nothing you can do about it. Cherry stabilizers also rattle, but there are ways to reduce the sound, making it the superior choice.
There is also a large difference between plate mount and PCB mount stabilizers. Generally, there are three types of mounting method, including plate mounting, screw-in, and clip-in. The latter two are PCB-mounted. I personally prefer screw-in stabilizers, as they stay in place the best out of the three options, followed by clip-in. Given the keyboard’s design, plate mount stabilizers make a lot of sense, as they are the easiest to maintain and remove. The ease of use has a caveat that they can also easily fall out. With a small bit of knowledge, anyone should be able to fit them back into place rather easily. With that being said, the included stabilizers are tuned quite well with no apparent rattle.
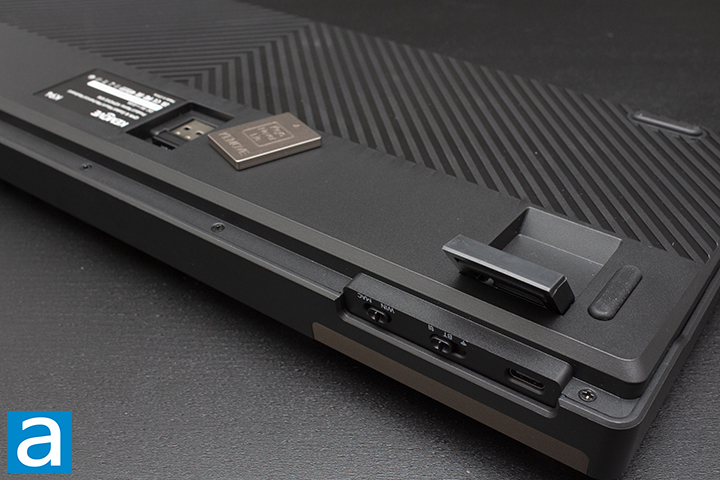
Taking a peek at the bottom of the keyboard, we have four rubber feet. The feet on the bottom side are average in size, doing a great job of keeping the keyboard in place. This keyboard has adjustable feet that can be changed to three different levels, including flat. There should be no noticeable unintentional sliding. The KEMOVE K94 uses a detachable cable design. This is my personal preference, as it makes swapping between keyboards easier. The included braided 1.8m USB Type-C cable is greatly appreciated.
Inside the KEMOVE K94, we have two 4000mAh batteries for a total of 8000mAh. According to KEMOVE, the K94 lasts 90 hours with lights on and 170 hours with lights off. I have personally cannot confirm if these numbers are correct, but I can attest to the strong battery life as in my usage the battery has barely ticked. Something to note is that the keyboard will automatically go to sleep after prolonged inactivity, which helps save battery. The sleep function is quite nice as I never noticed the keyboard having to wake back up to operate. The wireless process felt snappy.
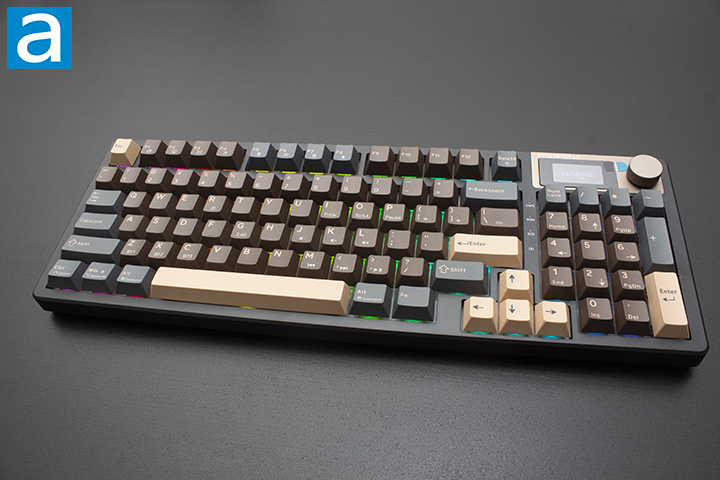
After doing my thorough inspection, I put the KEMOVE K94 to use. As these Jixian Blueberry switches are linear in nature, I made sure to account for this in the typing test. A sound test of the KEMOVE K94 can be found above. My first observation was a medium pitch clack upon bottoming out with no ping. I should note I am typing on top of a desk mat and the first level of feet, which dampens higher pitched sounds. However, the lack of pinging is more due to the dampening within the keyboard. KEMOVE has provided a good use of foam to prevent unwanted noise. The smooth linear feel was good enough. As someone who generally enjoys linear switches, I had a good experience, but I would say the lubrication on the switches could be better. The travel distance and actuation point were both good, and I had no issues whatsoever. I found the sound profile to be more on the clacky end. The travel distance was good, and I had no issues whatsoever.
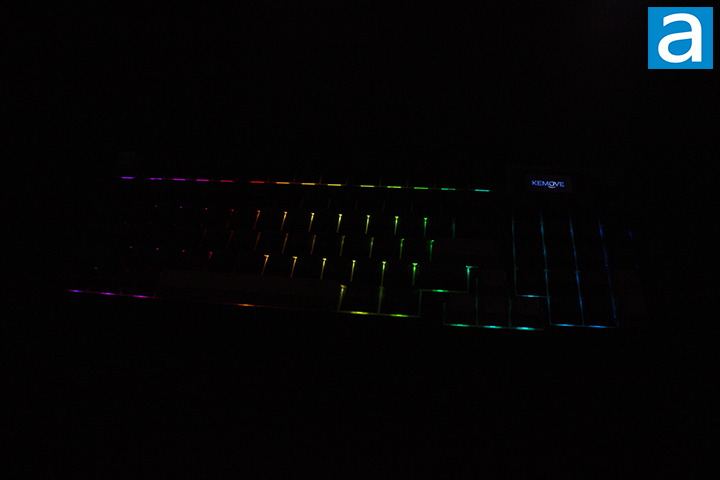
I would say the KEMOVE K94 definitely has good lighting effect potential. Despite being a darker tone keyboard, the underglow is quite appealing. With everything put together, the keyboard has a nice calm glow to it. I appreciate how consistent the lighting appears. I personally found the lighting to be fine, as I had no problem with configuring it using software or the knob. I do not think any users will have any issues in regard to lighting. There are twenty-one different lighting modes and nine different preset lighting colors.
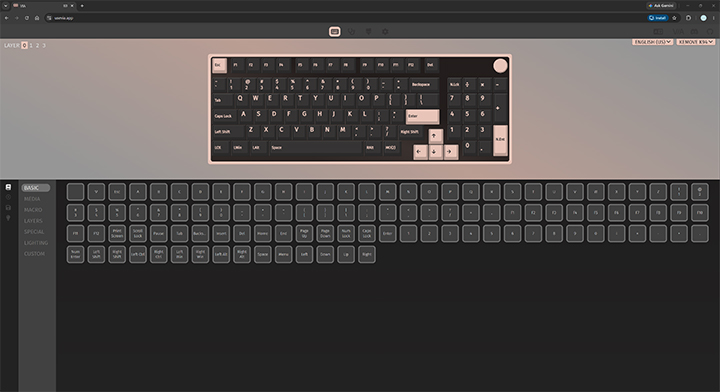
In terms of software, we have VIA, which is probably the best open source keyboard software you could possibly use. I am personally a long time user of VIA, so I have become quite accustomed to its interface. For those who are not familiar with it, VIA has four primary tabs, being Configure, Key Tester, Design, and Settings. I will note, I could not use the application to load the KEMOVE K94, but I had success using the VIA web application, which I will use to demonstrate.
Starting with Configure, under the Keymap category, you are able to adjust what each key does to any particular setup you want and also adjust any secondary functions you might want to use. If you want to use a non-standard layout like Colemak, Dvorak, or Carpalx, you can go right ahead and do it. Layout is a short category, offering you the option to change between split and long space bar. Do note this option will only appear depending on which JSON file you upload to VIA. The Macros category will allow you record macros, as you may expect. Save + Load will allow you to save your current keyboard setup. This is useful, as I personally have experienced my keyboard resetting to its standard setup, so being able to reload all my settings is quite nice. Lastly, we have Lighting, which controls your keyboard backlighting. You can select a pattern and the color you wish to use.
Moving on, the Key Tester tab is a great place for diagnosis. I often find myself using this tab when building a keyboard, as it is good for testing your PCB as well as double checking if any of your switches have bent pins. Design is a tab you must use for the KEMOVE K94, as you will need to upload the correct JSON file for the K94 for VIA to recognize it. The JSON file can be found on the K94’s product page. Do not worry about uploading the wrong JSON, as you can simply just upload another one.
Finally, we have the Settings tab, where you will actually need to go to enable the Design tab. Aside from being able to enable the Design tab, you can also toggle Fast Key Mapping and Light Mode. Keycap Theme will just change the theme of VIA to a few popular keycap sets, while Render Mode will allow you to change between 2D and 3D rendering of your keyboard. You can also see Diagnostic Information, which most people probably will not use.
Page Index
1. Introduction, Packaging, Specifications
2. A Closer Look - Hardware and Software
3. A Closer Look - Disassembly and Internals
4. Conclusion