Page 2 - Physical Look - Hardware; Installation

You are probably quite acquainted with Noctua's other heatsinks in their D-series lineup, which includes the NH-D15, NH-D15S, and the smaller NH-D9L. The NH-D12L we have today slots in between the largest and smallest size with its 120mm fan. This NH-D12L we have shares similar design elements, such as the double fin stack with its heatpipes leading to the two stacks. We also have the vanilla NH-D12L, as Noctua has not made a chromax.black version of this yet. As such, we have the traditional silver heatsink with the Noctua tan and brown color scheme.
As this shares the same design as other heatsinks in the D-series, you can see Noctua has once again used a similar leading-edge approach for the fin stack. There is a slight V-shaped slope towards the middle of the front leading. The second stack leading edge uses large zigzagged teeth to reduce resistance and noise when air goes through. There are smaller zigzagged teeth on both sides of the metal fin edges. All of these small design elements are meant to optimize airflow, reduce resistance and noise, and only negligibly decrease the heatsink surface area. The fin stacks are not created equally, as you can see the front stack is slimmer than the back stack. There are a total of 38 fins on the thinner stack, while the back stack has a total of 40 fins. The spacing in between each fin is approximately 2.0mm. From my calculations, this makes the total surface area of the cooling fins combined close to 0.74 m², which is actually a bit more area than the NH-U12A, although surface area is not the only factor when it comes to cooler effectiveness. Otherwise, we have a total mass of 890g with the fan attached, which is notably lighter than the aforementioned NH-U12A. This is still weighty though. For some perspective, a typical AMD Wraith Prism stock cooler weighs 582g. Noctua heatsinks are heavy in general and most of the weight is attributed to the size and material choices of the heatsink itself, as you will find out shortly.
In terms of its footprint, the Noctua NH-D12L is pretty typical with a height of 145mm, width of 125mm, and depth of 113mm. As the fan is mounted in the middle of these two fin stacks, the depth will only increase by an extra 25mm if you attach a second fan. As noted from the introduction, this cooler has a lower-than-typical height of 145mm, as the NH-U12A is 13mm taller. This may not sound like much, but this could be the difference between getting a cooler inside your case or not, especially in slimmer computer cases or mini ITX models. Noctua also advertises the fact this height reduction makes the NH-D12L compatible with most 4U server rack enclosures. This is especially neat, as the alternative would be going to a smaller 92mm solution. Otherwise, the NH-D12L uses an asymmetrical design on its cooler, as the stacks are different in width from one side to the other. With the single fan installed, there should be no clearance issues on either side, whether near memory slots or where your motherboard heatsinks might be. With a second NF-A12x25r PWM fan installed, you may run into clearance issues as this second fan will hover over either side. In addition, the heatsink is placed away from the top PCI Express expansion slot, so it will not interfere here either. There is a bit of clearance between the base of the heatsink and the bottom fin stack of 4.5cm.
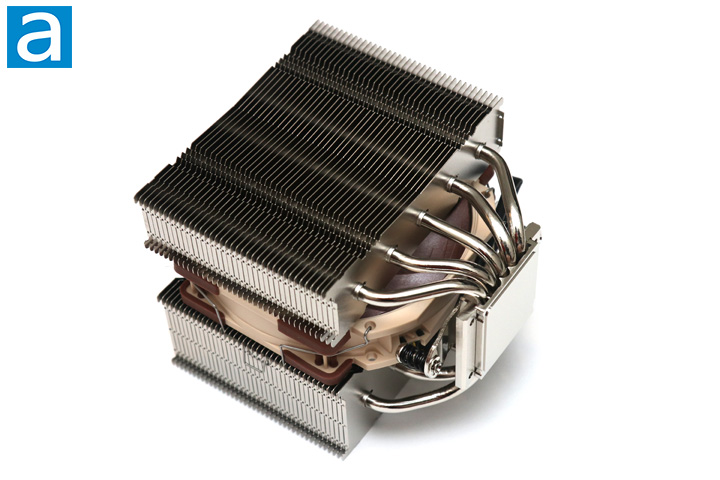
From the base where the metal makes contact with the processor, five continuous U-shaped heatpipes lead away from the CPU contact and splits into the two stacks of fins. This effectively makes ten heatpipes in total. The heatpipes are supposed to efficiently lead the heat away from its source due to the low heat of vaporization, or phase change energy, of the fluid inside. The heatpipes are aligned in manner to spread out the heat in the array of radiating fins. The 0.74 m² of surface area, combined with the 120mm NF-A12x25r PWM fan, should be able to deliver very good heat dissipation performance, but we will see if this statement is true on the next page.

The fan on the NH-D12L is held on using two wire clips that are easy to remove. It utilizes the same system found in previous Noctua coolers, and they are very sturdy when mounted on the heatsink. It clips on the outside of the fan and goes around the sides of the heatsink fins. Raised edges are integrated into the fin to secure the clips. The wire clip retention length is also reduced to a balanced level, so attachment stability is not compromised. Thus, the fan is easy to remove with these tabs and the clips can be removed uniformly. The wire clips also have an advantage by allowing users to be a bit more flexible in terms of the height the fan is mounted at. This fan will only need to be removed during installation, as it blocks the mounting screws.
As for the air mover in question, we have one 120mm Noctua NF-A12x25r PWM. The main difference between this and the NF-A12x25 PWM is this has a round frame, as opposed to the square frame on the original. Everything else is still the same as the original. This means we still have Noctua's SSO2 bearings, which are hydraulic bearings, for a longer lifespan and generally quiet operation. It also has the same specified rotational speed range of 450 to 2000 RPM, airflow rating of 102.1 m³/hour, and static pressure of 2.34 mmH2O. It also comes with a low noise adapter, which reduces all of the numbers I have stated above in order to keep the output noise low. Rated mean time before failure is approximately 150,000 hours, which is just over seventeen years. Due to the different mounting hole location, you can only use the NF-A12x25r PWM fans here. The NH-D12L comes with a second set of fan clips if you so desire to add an additional fan.

The photo above shows a shot of the bottom of the Noctua NH-D12L CPU heatsink and the configuration of the heatpipes more clearly in relation to the base leading into the fin array. You can see the base is very flat, which means the entire base should rest evenly on top of the processor. A quick inspection also reveals there are no abnormalities here. As we have seen from past Noctua heatsinks, this heatsink is composed of copper, nickel, and aluminum. The base and heatpipes are built using copper for best heat transfer ability with a thermal conductivity of 401 W/mK. The heatsink fins utilize aluminum as it is quite a bit lighter in comparison to copper. This compromise allows the NH-D12L to reduce its weight and thus reducing the stress on the motherboard. Aluminum has a thermal conductivity of 237 W/mK, which is not as optimal for heat transfer, but the trade-off is understandable.
Visually speaking, the Noctua NH-D12L keeps the natural color of its aluminum fins, while concealing the copper heatpipes with a nickel-plated coating. The electroplating of the base with nickel on top of copper has a thermal conductivity of only 90.9 W/mK. While nickel has a lower thermal conductivity than copper, the electroplated layer is very thin and should not affect performance to a significant degree. Instead, nickel and nickel-base alloys are used here because of its properties in withstanding corrosive environments and high temperatures, which is especially beneficial for a heat dissipation device. The reason why nickel has these properties is because of its ductility and toughness all the way up to the melting point of 1455c, measured at non-standard pressure. Nickel's face-centered cube crystal structure is highly resistant to corrosion, so corroded material will not build up on the surface in the long run. As a result, the Noctua NH-D12L will be less prone to losing its cooling performance over time as juxtaposed to a corroded copper surface.
Additionally, all the joints are cleanly soldered at the base while the heatpipes are soldered to the fins. While soldered fans can cost more and pressed fins are typical for most heatsinks, pressed fins can lead to degradation over time as contact between metals decreases due to thermal expansion and contraption. As per usual, the Noctua NH-D12L appears to be built very solidly. Reliability should also be excellent as Noctua offers a six-year warranty.

As you have read in our other Noctua reviews, installation is straightforward and easy. The same system used with practically all of Noctua's heatsinks is found here, which they call the SecuFirm2 system. If you are installing this on an Intel system, you can use the included metal backplate with part number NM-IBP4, which supports both newer LGA1700 and older LGA1200 and LGA115x mounting positions. As such, the bolts on the backplate are adjustable to the location of the holes on the motherboard. However, if you are installing the Noctua heatsink onto a recent AM4 AMD motherboard, you can use the stock motherboard backplate.
On the other side, two mounting bars are included to attach the heatsink to the motherboard. Once the backplate is mounted, the plastic spacers can be installed to space out the mounting bars. With an Intel system, the two mounting bars can be placed in a horizontal or vertical configuration, depending on what the user chooses for their installation orientation. The bars included here are the NM-IMB3 v3. With an AMD system, like the one I have above, the bars included here are the NM-AMB6. These are screwed into the backplate with the plastic spacers in between, and only fit in one orientation. Be sure that the bars curve inward, towards the processor. Once you tighten the bolts on the bars, you can install the heatsink.

Before doing so, be sure to place a bit of thermal paste between the processor and the heatsink. On a larger processor, such as the Intel LGA1700 compatible ones, Noctua advises to put a small dot measuring in 4 to 5mm in diameter with a square pattern of four dots surrounding the middle one. Otherwise, you can use a single small dot measuring 4 to 5mm in diameter alone. Next, remove the attached fan from the NH-D12L and place the heatsink over the two protruding screws on the mounting bars. At this point, I would recommend you to use the screwdriver provided, as accessibility to the screw can be limited. With this tool, tighten the screws, alternating between each screw to evenly attach the heatsink to the motherboard. Finally, reattach the NF-A12x25r PWM fan to the heatsink. As I have noted before, the NH-D12L does not interfere with my RAM, as it slots in the middle of the cooler and the heatsink stays away from other components mounted on the motherboard. Overall, the installation process was a breeze and Noctua has maintained its high standards for cooler installation ease.
Page Index
1. Introduction, Packaging, Specifications
2. Physical Look - Hardware; Installation
3. Test Results
4. Conclusion


