Page 2 - Physical Look - Hardware; Installation

I have previously said I was impressed with the SilverStone Tundra TD03-E when I reviewed it not too long ago, and I can confidently say the same about the TD03-LITE. SilverStone decided to stay close to the design of the Tundra Series coolers with the all black sleek exterior. There are some minor differences on the outside compared to the TD02-E and TD03-E we reviewed. The difference is there is no longer a carbon fiber like finish around the edges of the radiator. Personally, this is not a big deal for me, as I will most likely not see the radiator after the initial install. Identical with the TD02-LITE, the SilverStone logo is clearly displayed on the water block of the TD03-LITE. SilverStone's logo also lights up around the edges, and looks very good once installed. However, if you do find any sort of LED lighting distracting, it cannot be turned off by a switch, which is rather unfortunate.
The radiator design of the TD02-LITE and TD03-LITE are the same in nature, as it utilizes traditional aluminum fins. This is the first difference I noticed when comparing it to the TD02-E and TD03-E, which utilizes fins they claim to have an increase in heat transfer. When reviewing the TD02-LITE, I asked the question, "Why did SilverStone develop a product with superseded qualities?" It really comes down to cost; we will have to see whether or not it will affect the performance on the next page. The two tubes connecting the radiator to the water block is sealed, as it operates in a closed-loop configuration. SilverStone claims this new model has a thick, leak-proof tubing that increases reliability. It also features the same amount of tubing as the TD02-E and TD03-E, measuring in at 310mm. Upon inspection, it seems it can handle the normal usage of bending and twisting with no problems. Also, the closed loop configuration does not require a refill of any sort, and can be used right out of the box pre-assembled.
The dimensions of the Tundra TD02-LITE comes to 153mm in length, 120mm in width, and 27mm in height. Comparing the TD03-LITE to the TD03-E, it has been slimmed down in both the length and the width. This may be beneficial to people who have tight chassis interiors. However, we know here at APH Networks size is not always everything, and it is performance in the real world that we are looking for.

The Tundra series has been designed as a closed loop water cooler, and the TD03-LITE is no different. It requires a pump to cycle the coolant to the water block when the system is on. The pump on the water block is directly powered by the 3-pin header on the motherboard, and is rated at 12V and 2.9W from the manufacturer. Looking at the SilverStone website, the base of the water block is 100% copper, which is optimal for fast heat transfer. Differing from the TD02-E and TD03-E, both the TD02-LITE and TD03-LITE contain screws on the base; eight of them to be exact. Although SilverStone claims a screw-less design allows for better reliability compared to the traditional mounting method with numerous screws, we will have to go to the results to find out if this is indeed true. The thermal conductivity of copper is 401 W/mK, and makes for a good contact material without heavily increasing the cost to consumers. However, if cost was not an issue, a nickel-plated base would have been better. Even though it has lower thermal conductivity at 90.9 W/mK, a thin nickel-plated surface over the copper is desirable, as it is able to withstand more corrosive environments and higher temperatures in the long run in comparison to pure copper-plated surfaces.

Installing the fan on the radiator did not require too much thinking as it was simple and straightforward. Using the long screws provided, and making sure you have the right configuration, you can go ahead and tighten the fan onto the radiator. It is important to note while tightening the fans to not overdo it, as it will bend the plastic pieces around the fan. Since the SilverStone Tundra TD03-LITE comes with only one fan, it must be set up on either the front or the back with a push or pull configuration as pictured. As many of us here at APH Networks are cabling enthusiasts, I would recommend installing the water block before installing the radiator, but the end choice is up to you. However, if you are going with the recommended way, you will have to install the backplate first.
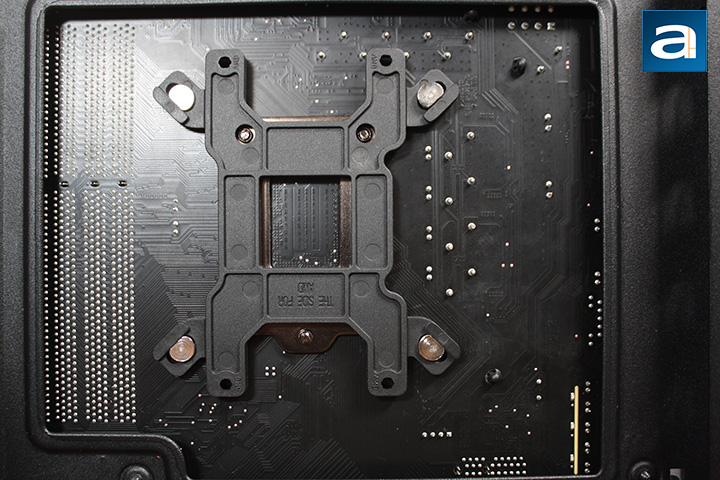
The backplate was something I was critical about the last time I dealt with a SilverStone all in one water cooling product; namely the Tundra TD03-E. The installation process was difficult, because the backplate would shift, and I had to ask for my colleague Preston's assistance in order to get it installed. He also felt the same way about the TD02-E, which utilizes the same backplate as the TD03-E. I was very interested to see if they had taken any of the suggestions made by me and Preston regarding this matter. To my surprise, they have made revisions to the LITE series, and I was more than excited to see how it affected the installing process. The main difference was not in how the backplate is structurally, but in how the screws are placed in the holes. The head of the four screws that go into the respective holes were cut in half, meaning the edges of the screws were up tightly against the backplate. This function of this revision prevents the screws from moving away from the back of the motherboard, and also from over tightening of the screws.

For any CPU cooling systems, you want to make sure you have a good amount of thermal paste applied before any installation. The next part of the installation would be to put the four plastic standoffs onto the four screws of the backplate. As I have previously mentioned, the revisions indeed made a difference to not push the backplate away when I put in the standoffs. Making sure you use the same slot on each bracket when placing the water block on the standoffs, you can then mount the nuts on the respective screws. After installing the water block, you will have to find a space on your chassis that has sufficient room for the radiator and the fans. For my setup, it was at the top of the chassis, which will be shown on the next page with the test results.
Page Index
1. Introduction, Packaging, Specifications
2. Physical Look - Hardware; Installation
3. Test Results
4. Conclusion


