Page 3 - Physical Look - Inside
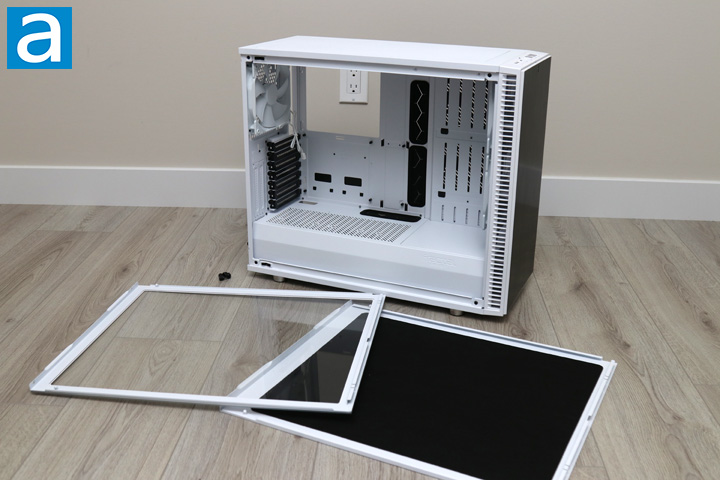
Removing the side panels is a pretty straightforward job as we have already mentioned. Once you remove the thumbscrews from the back of each panel, you can pop it off the ball and socket joints and swing it out. I would have liked to see captive thumbscrews used here, especially since they are so common for convenience. You can see the glass panel and the solid steel panel in front of the case. The black fabric is Fractal Design's excellent sound dampening material that remains thin but heavy to remove noise while not insulating too much heat. Otherwise, the inside of this Fractal Design Define S2 is white and black with an open interior overall. Various elements like the expansion card slots, rubber grommets, and some removable parts are black, while the rest of the interior maintains a white look, including the fans. This layout is pretty typical with the power supply mounted at the bottom, separated from the motherboard and the rest of the components. As you can see, the shroud is not solid, as there are slits to let air pass through the two zones. This layout is quite similar to the Define R6 sans a front drive bay.

The Fractal Design Define S2 is a mid-tower ATX case and thus can handle any motherboard from mITX to ATX, and even EATX up to 285mm wide. Despite the white backing, the riser mounting holes are actually labeled for users who are not as familiar with the layout. The ATX layout is installed currently, but you can change it up if necessary. At the top, you can see the offset area for holding a variety of radiators and fans. Users can mount up to three 120mm or 140mm fans or the respective radiator sizes here as well. The offset should be enough such that it should not get in the way of the motherboard. In addition, you can see there is a circular hole. This is supposed to be used as a fill port for those with a custom water loop. In addition to silence, one of the other goals of the Define S2 is to accommodate custom water loops, which means needing mounts and spacing for radiators, pumps, and reservoirs in addition to tubing. The motherboard tray shows off the large hole that will accommodate users with their aftermarket heatsink backplate installation without removing the motherboard itself from the chassis. The edges are rounded off to prevent your cables or fingers from being stripped accidentally.
At the back, we have the single Dynamic X2 GP-14 with a 3-pin motherboard header. I might have expected PWM fans, however, this will be a bit more understandable when we get to the back of the case. You may be asking what the difference between the original Dynamic and the Dynamic X2 fans are. Fractal Design has changed up the bearings inside to their LLS or Long Life Sleeve bearings with an even longer 100,000 hours life expectancy. This is 2.5 times longer than the original Dynamic fans lifespan. These are otherwise the exact same fans in terms of the rest of the specifications such as measured noise, airflow, and static pressure.

At the front of the Define S2, there are a few more interesting things of note. First, there are the two more Dynamic X2 GP-14 fans in all white. The front location can actually mount up to three 120mm or 140mm fans or their respective radiator sizes. Next, we have the longer slits on the side panel. This area is actually intended to help with mounting water cooling components like pumps or reservoirs here, which lines up nicely with the fill port at the top. If you need more space, you can remove the metal plate at the front of the shroud. This will then give users the basement of the shroud to work with. In addition, the whole area can be removed altogether in a system that is very similar to the Define R6's drive cage.
The case routing holes can be found close by and practically every routing holes from the front to the back is filled in with rubber grommets. These are not too flimsy that they fall out and they should stay in place to hide extra cables. Finally, you can get a better view of the ventilated shroud. There are actually two SSD mounting positions here if you do choose to install your 2.5" drives here. It would have been nice to see an additional two drive sleds included at this area, as you will have to relocate the ones behind the motherboard for use here. This area will also be used if you are going to mount your GPU vertically, as the mount connects to the power supply shroud here.

Since we have the open layout in the main chamber, the back of the Fractal Design Define S2 is where you will find most of the drive storage in addition to the power supply area and a few extra goodies. Starting with the drive area, you can see Fractal Design has allowed for up to three 3.5" drives to be installed here with the necessary screws to mount them in place. You can also install smaller 2.5" drives if you want. Each cage is installed into the case with captive thumbscrews. Due to a limited spacing, Fractal Design has actually included a SATA power cable extender to accommodate the up to three drives you install here, in case your power supply cables do not fit. Moving to the bottom, we have the power supply area where you can mount your ATX power supply. With the aforementioned ATX power supply bracket, you can mount your unit outside the case and slide it in from the back. Rubber mounts raise the power supply off the bottom of the Define S2 to prevent any vibrations and also allow for adequate airflow. In the middle, two 2.5" drive sleds with captive thumbscrews are placed here so you can install your smaller drives. Otherwise, at the back we have about 23mm of spacing overall, which is quite a bit of wiggle room. Numerous cable tie points and two Velcro straps are included to keep your cabling neat and tidy.
At the middle, we have a built-in Nexus+ Smart Hub three-speed fan controller. This is the same one we found in the Define R6, with the capability to control up to six voltage-controlled fans and three PWM fans via your motherboard. This does not require any additional software, as it still gets the signal direct from the motherboard. This is powered by a SATA power connection, which is much better than the older Molex standard. This should mean the three fans included can be plugged in here, but I still would have liked individual PWM control for each of the included fans.
Before we end of this page, we can take a look at the I/O connector cables on the Fractal Design Define S2. The cables are extremely well insulated and bundled. We have a USB 2.0 header, USB 3.0 header, USB 3.1 Gen 2 header, front audio connector, and the individual front LED and switch connectors. It would have been nice to see a single block of connections for these like NZXT did on their H500 and other H-series cases. Overall though, I am really impressed with the layout of the Fractal Design Define S2. You may lose out on the extra drive storage found in the Define R6, but here we have more support for mounting custom water cooling components. Even so, quality is on par with their flagship Define R6 with no real missing features.
Page Index
1. Introduction, Packaging, Specifications
2. Physical Look - Outside
3. Physical Look - Inside
4. Installation and Conclusion


