Page 2 - Physical Look - Outside
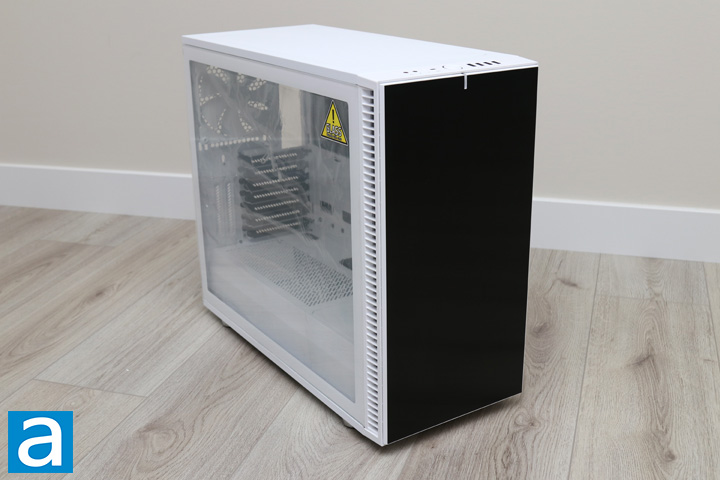
Our original Fractal Design Define S borrowed a lot of similar elements from the Define R5. So it should come to no surprise that the Define S2 borrows a lot of similar elements from the newer Define R6. In fact, if you were to glance between the two, you will probably not realize there is much of a difference, at least during first impressions. As we mentioned, there are other colors for the Define S2, but we received the white one. In addition, all of the Define S2 versions come with tempered glass, which is a bit surprising considering the S-lineup used to have a heavy focus on silence. In terms of aesthetics, our white version is more of a Star Wars' Stormtrooper palette, especially with the large black front panel on the white body. The typical Fractal Design "fridge" is in full effect, which makes for a clean exterior. It may not be a minimalist one, but everything is tidy and in an expected place. Overall, I really like the way it looks as it sticks to a known formula from Fractal Design. In terms of dimensions, the Define S2 measures in at 543mm in depth, 233mm in width, and 465mm in height, which has the exact same dimensions as the aforementioned Define R6. In terms of weighting, the Fractal Design Define S2 tips the scales at 11.6kg, which is about 25.6lbs.
As for the tempered glass side panel, the White version of the Fractal Design Define S2 offers a window with no tint. If you get the other colored versions, they will have a slightly more tinted glass, similar to our Define R6. I really like the way Fractal Design has implemented their tinted glass side panel. Just like they did with the Define R6, the tempered glass is attached to the rest of the case with two thumbscrews at the back, a clip at the front, and a ball and socket tab along the top and bottom near the front. It works really well since the screws are not necessary to keep the panel attached. The glass is also lined with a white frame to hide handling marks you may make while moving the panel around. With such a large glass window, you may think there are some RGB lights or fans inside, but there are none. Whether you want them or not is a different question, but its omission is something to note. Otherwise, the rest of the Define S2 is made out of steel. Overall, these two materials make the Define S2 look well-refined in addition to keeping with the style that Fractal Design has not swayed from.
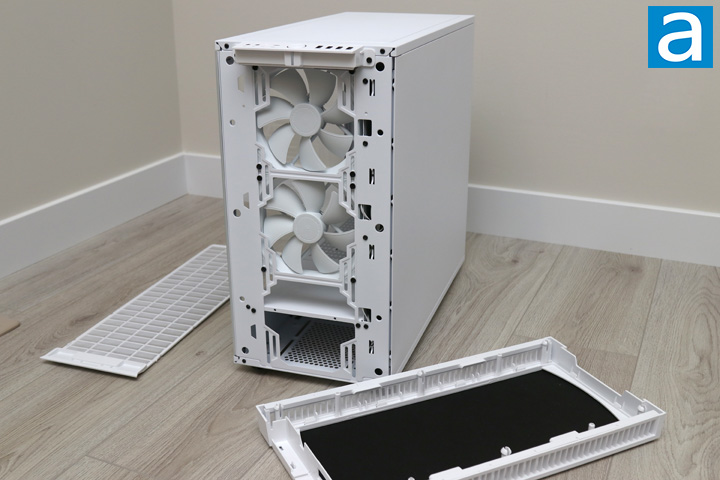
The one notable feature we have seen on the Define R lineup is the swinging door at the front. However, the Define S2 does not carry this feature over, though they have made some improvements at the front over the last Define S. First of all, to remove the front panel, you will need to slide out the bottom filter. This opens up a hole into the front, where you can pop off the plastic front. The front is held on with six plastic pegs that fit quite well. Upon removing it, you might think there are no filters here. However, upon closer inspection, the filters actually exist right where the holes are on the side of the front panel. The mesh is super fine and is easily removable via a plastic frame, making for a really sleek way to clean them out. The original Define S was missing is the sound dampening material, but thankfully, I can say this does exist here. This makes the front panel heavier but much better at insulating noise. As for the fans, you will see we have two Dynamic X2 GP-14 fans installed here, which are both retail grade ones. I also really like the fact these fans fit with the white scheme, even if they are hidden from plain sight.
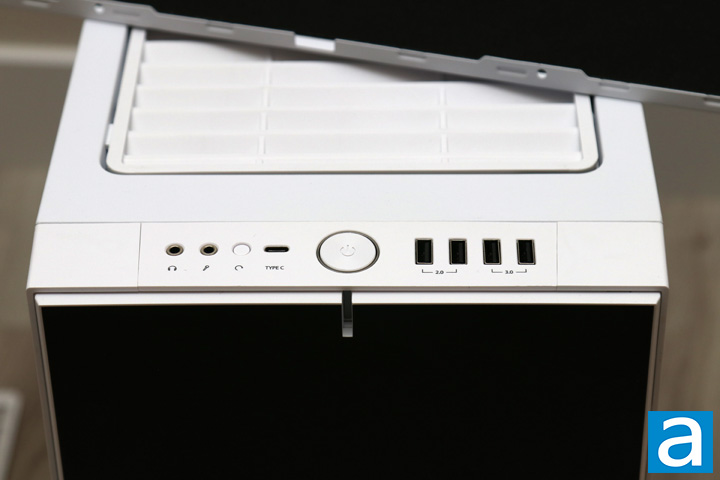
At the top of the case, we have the front panel connection points, which you can see another difference from the Define R6 we looked at. From left to right, we have the two 3.5mm audio jacks for headphone and microphone input. Next, we have a small white reset button to force your computer to restart. The next connector is one I am super happy to see, which is the USB Type-C input. This is a USB 3.1 Gen. 2 connection, which supports higher transfer speeds of up to 10Gbps. For the Define R6, this was a separate purchase to upgrade their case, so I am really happy to see this stock on the Define S2. However, Fractal Design also offers a model with this newer input on the front by default. Next, we have a large white power button, surrounded by an illuminated ring for power status. This illumination dips into the front for better visibility. Also, the LED here doubles as a drive activity light by flashing to indicate activity. I do miss the older Fractal Design power buttons that had a satisfying travel to it, but alas this is not the case anymore. Finally, we have two USB 3.0 and two USB 2.0 ports.
Moving back, we have the same updated ModuVent cover we saw with the Fractal Design Define R6, except now in white. As such, Fractal Design offers multiple ways to use this area. Traditionally, the top has become useful for exhausting hot air out. As this follows the natural process of heat rising, it makes sense. However, this also allows dust to settle into your case through the top area. In response, case manufacturers have often just put mesh filters on top and called it a day. On the other hand, some users want a quieter build, and thus some cases do not have any opening here. Instead of going after one or the other, Fractal Design used this updated ModuVent system to accommodate for both users. The thick panel at the top actually separates into two different panels, depending on what you want to do. If you want to use the top area for mounting cooling, you can keep the mesh filter to prevent dust from entering while letting air out. If you want a quieter build, you can pop the steel panel on with sound dampening material to close off this opening and silence any annoying noises inside. It is not the easiest part to separate from each other, but I have yet to see anyone create a better solution for this and I am quite impressed nonetheless.
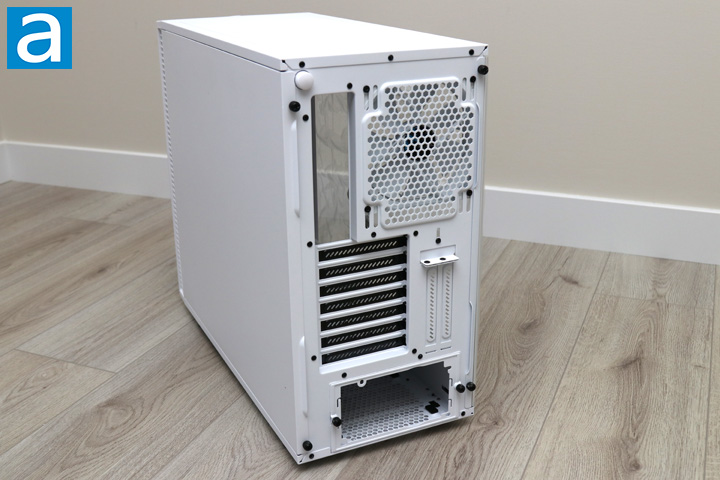
Moving to the back, the rest of the case follows the same black and white color scheme with a standard layout. At the bottom, we have the power supply opening with a removable bracket for ATX power supplies. Moving up from here, we have the standard seven black slots for expansion cards, plus another two white ones for vertical mounting. It should be noted you will have to purchase separate cables and mounting equipment for the vertical mount, but it is available from Fractal Design with their Vertical GPU Riser Kit. Further up, we have the opening for the motherboard connections with the exhaust fan located right beside it. This is another Dynamic X2 GP-14 fan, which is great to see. We usually only have spacing for fans of 120mm in size, but the Define S2 has spacing for both 120mm and 140mm cooling options. The fan is also mounted on rails so you can slide the fan up and down depending on the rest of your components. Finally, on the top left side, we have a large push button to release the ModuVent top cover. As for the other side panel, you can see that this is held on with two thumbscrews. It also swings out and is held on the lock set of ball and socket joints like the glass panel.
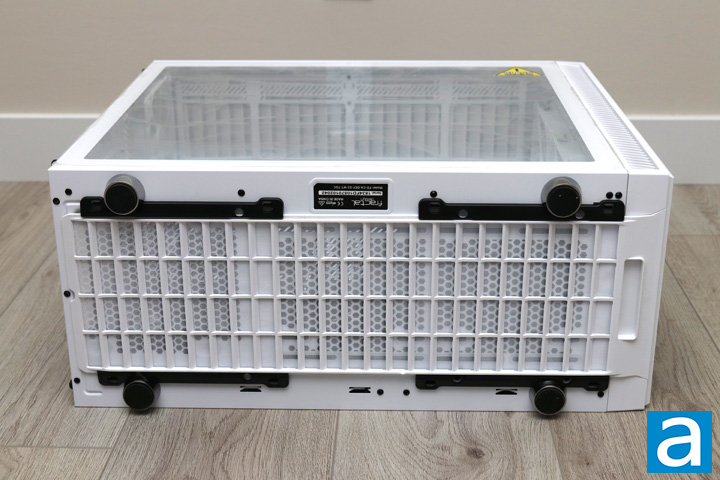
At the bottom of the case, we have a very similar layout once again. We also see the black and white theme here with the darker feet and filter holders. Four legs can be found at the bottom with one in each corner. These legs provide the chassis about 2 cm rise over the surface it resides on. For those who want more fans, the bottom panel here has room for up to two 120mm or 140mm fans or a radiator as large as 280mm. The washable fan filter for all the bottom intake fans can be seen in our photo above. It can be removed from the front of the case for cleaning. At the back, we also have the intake for the power supply, which is covered by the same aforementioned filtered.
All in all, the Fractal Design Define S2 is eerily similar to the Define R6, which is a very good story. Fractal Design has not really disappointed us in the past, and the Define S2 follows this path. Everything fits really well, with nothing feeling cheap or misplaced. The Define S2 may be quite a bit heavier than the previous Define S, but we will see why this is the case when we take a look at the inside.
Page Index
1. Introduction, Packaging, Specifications
2. Physical Look - Outside
3. Physical Look - Inside
4. Installation and Conclusion


