Page 3 - Physical Look - Inside
One change that I have been seeing more consistently in new cases is the method of the holding the side panels. We went from standard screws to thumbscrews, captive thumbscrews, and now a completely tool-less design in a relatively short period. With respect to the Fractal Design Meshify 2 Compact, you can see Fractal Design has implemented a tool-less and an almost seamless way to attach and remove the side panels. Both the tempered glass and steel panels are held on with friction clips on the top and hooks at the bottom. Removing them requires you to grab the tab at the back and push away from the rest of the structure. The hooks ensure the panels are aligned in the right position and for the panels stay in place. This is the same method that was employed on the Define 7. I really appreciate the fact the tempered glass panel does not use the side bolts we used to see. Furthermore, the tempered glass panel is slightly tinted for a bit of a darker exterior. You can still easily see your components inside. The panel has steel on the top and bottom edges to attach to the rest of the Meshify 2 Compact, and there are also thick black bars on the top and bottom to hide handling marks.
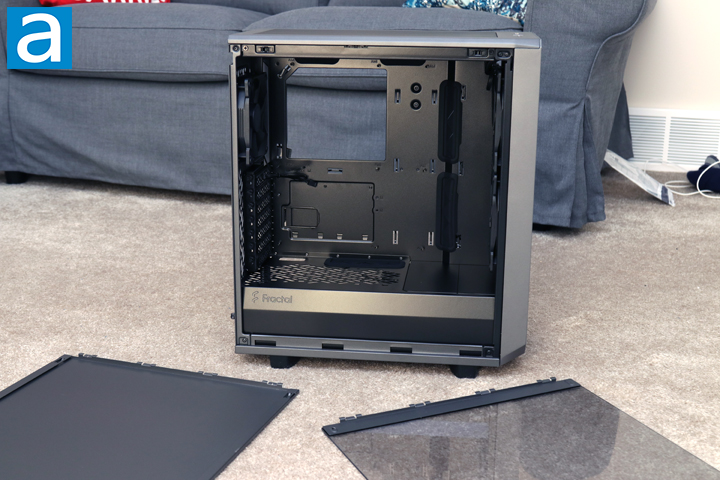
Once you get inside, you can see the open concept design. The entire area is unobstructed for air to pass from the front to the back. The case is divided with the motherboard area for majority of your components and a power supply area hidden under the fixed power supply shroud. You should be able to install motherboards ranging in size from the mini ITX to standard ATX form factors. Unlike the gray exterior, everything internal is black. The surfaces are durable enough so that they do not scratch easily nor does the paint come off. Compared to more typical mid-tower cases, you can see that the Meshify 2 Compact keep its small size by chunking out the space at the front of the case. There is something to like about this more efficient use of space, as we will see later in our installation process.

Removing the front panel is a two-step process, depending on how much you want to remove. If you just need access to the mesh and the fans, you can swing the door open. The door is attached with plastic pegs on the left side and plastic hinges on the right. This will then give you access to the fans and the screw mounting positions. The nylon mesh can then be removed from the front panel if you pop the entire panel off of the plastic holders. The previous Meshify C used a fixed foam mesh on the back of the front panel and this nylon mesh should be easier to clean while allowing more air to pass through. As you can see here, we have two Fractal Design Dynamic X2 GP-14 fans here. These use Fractal Design's LLS bearings, which is short for "long life span". These are the same model of fans they used in the original Meshify C, although Fractal Design has increased the size of the front-facing fans to 140mm. Other fan specifications are 1000 RPM rotational speed, 18.9 dbA noise output, 68.4 CFM airflow, and 0.71 mmH2O static pressure. These are said to have a mean time before failure of 100,000 hours, which translates to over eleven years. These are still three-pin voltage-controlled fans and I wish we would see some PWM fans here instead. Finally, you can remove the entire frame around this door, if you desire. The front panel is held on with plastic tabs and thankfully the I/O is separate from this panel so you will not have any cables getting ripped from their connectors.

Moving to the interior, the standoffs for the motherboard exist at the back of the Fractal Design Meshify 2 Compact with a large cutout behind the motherboard tray for access to the flip-side. This is useful for access when installing third-party coolers after you have already installed your motherboard. At the top, we have slots for mounting radiators or fans. These mounting rails are located in a removable tray to make installation even easier. The tray is held on with two screws and slides in from the left side of the Meshify 2 Compact. As for compatibility, these rails can accommodate two 120 or 140mm fans or a radiator up to 240mm in size. Interestingly enough, you can also purchase multi-brackets to install two more 3.5" drives at the top of the case and attached to the top rails. Finally, there is one more fan at the back for air exhaust. This is a Fractal Design Dynamic X2 GP-12 fan with a 1200 RPM rotational speed, 19.4 dbA noise output, 52.3 CFM airflow, and 0.88 mmH2O static pressure. Once again, this is another voltage-controlled fan with a three-pin header.

At the bottom of the case, you can see all of the seven expansion slots with a bridgeless design. This means there is no metal frame between each slot, making any expansion card fully exposed at the back. While I honestly did not notice this difference at first, I have to say it looks a lot nicer once you have your video card installed at the back with no bar in between the two or three slots your card occupies. You can get a better picture of the power supply shroud, which is not a solid metal panel. Instead, it has the same patterned perforations that you see on the back of the motherboard. There are two specific slotted areas on this opening for users to mount two 2.5" drives, although you will need to purchase the necessary mounting brackets separately. Finally, there are two openings on the power supply opening near the back to let cables to pass through. One smaller area near the back does not have a grommet, while the other one in the middle is larger and is covered by a rubber grommet.

At the front of the case, you can see a better picture of the pre-installed fans. If you did want to swap out the fans, you can install up to three 120mm or two 140mm fans, or radiators up to 360mm or 280mm in size. If you do choose to go with the three fans or 360mm radiator, you will need to remove a portion of the power supply shroud, which can be removed in two sections. This will let users expose as much or as little of the basement of the case depending on the thickness of their cooling at the front. You can also use this area to mount a pump or reservoir after opening the second portion and mounting with a multi-bracket. Moving further in, you can see there are two long bars of cabling openings to let users pass the necessary power cables through. These are angled slightly and have large rubber grommets to conceal excess cabling.
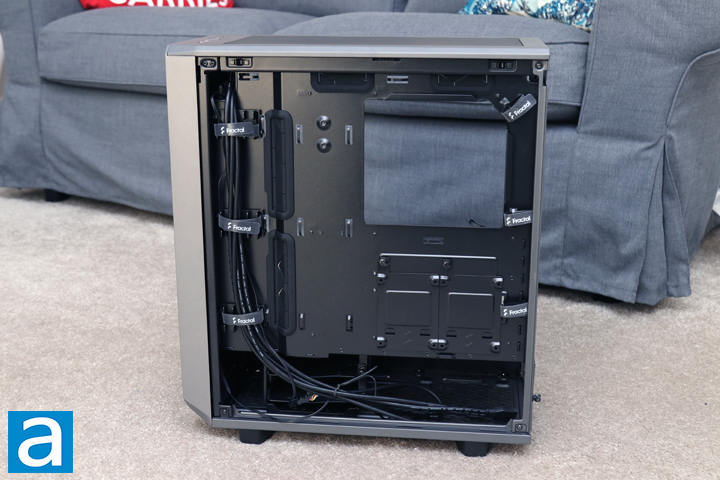
The back of the Fractal Design Meshify 2 Compact is pretty typical with the large rectangular cutout. A full cable valley is located at the front of the Meshify 2 Compact with three Fractal branded Velcro straps for organizing cables. These straps are also attached to a separated cable channel to let users better segregate their cables here for neater organization. Three more Velcro straps can be found on the right side of the case, presumably to be used for the CPU power cable. These straps are just attached to the enclosure, so you can move them around. In terms of cabling space, there approximately 2cm of space between the back of the motherboard tray and the side panel. This increases to nearly 3cm in the cable valley. It might have been nice to see a fan controller here, especially with their Nexus+ 2 fan hub included in the Define 7. Otherwise, all of the cables from the front I/O are nicely sleeved in black cable wrap to keep the all-black exterior consistent. Finally, the power supply area is located at the bottom corner and has rubber pads to ensure the power supply does not create vibration noises during operation. You can also install a 120mm fan at the bottom of the case for some more airflow, but this will impede the drive cage being present and the power supply length.
As for internal drive storage, there are two separate metal 2.5" drive sleds located under the motherboard opening for installing SSDs or smaller format hard drives. In the basement of the Meshify 2 Compact, there is one more area for drives with a drive cage. This lets you store two 3.5" or 2.5" drives in a metal enclosure. Each drive is attached to a metal tray, which Fractal Design refers to as a multi-bracket, before slotting into the rest of the metal structure. These metal trays also have rubber grommets to dampen vibrations between the drive and the rest of the metal tray. The drive cage is held onto the base with screws and can be removed if you need more space in the basement. As such, a maximum total four drives can be installed into the Meshify 2 Compact at stock configuration, but there are many different positions to use depending on your setup. With additional brackets, you can expand this to up to eight, but you will need to obtain these separately.
Page Index
1. Introduction, Packaging, Specifications
2. Physical Look - Outside
3. Physical Look - Inside
4. Installation and Conclusion


