Page 2 - A Closer Look - Hardware and Software
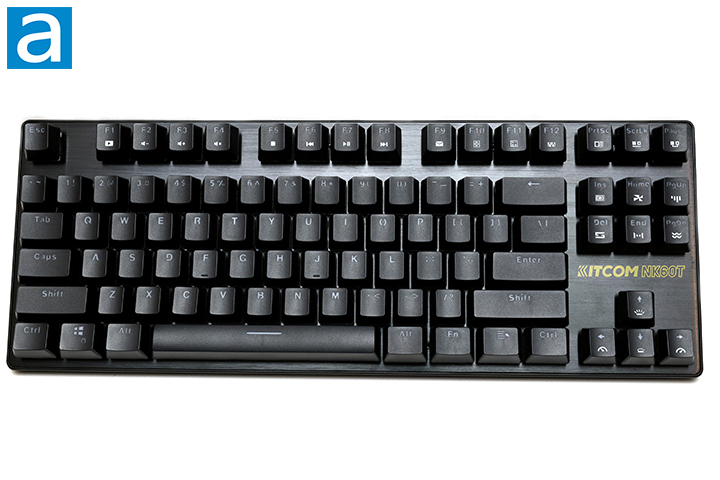
The appearance of the Kitcom NK60T looks quite generic, using a black aluminum backplate and plastic casing. I personally really like the standard appearance as there is nothing really wrong with it. Above the arrow keys, we find some branding, which is a common trend among budget keyboards. I personally would have preferred to move the branding to the back of the keyboard, but that is just personal preference. I really like the brushed aluminum look as it generally makes the whole build feel a bit more premium in comparison to using plastic all the way through. The NK60T does not come with a wrist rest, but that is understandable given the price point.
The Kitcom NK60T measures in at 360mm length, 133mm width, and 33mm height. Compared to other keyboards, this is about average for a TKL layout. In terms of mass, this weighs in at about 780g, which is appropriate for the class. Going into build quality, the top deck shows a surprisingly small amount of flex when pushing into the keyboard. No flex should be noticeable in standard use cases, as flex did not occur until applying a significant amount of force. As previously mentioned, this uses an aluminum top plate, making it quite sturdy. I proceeded to try to twist the keyboard, finding little to no give due to the aluminum plate and internal structure. However, the plastic did show a little more flex as I could pull it a tiny bit away from the aluminum plate, but this is completely reasonable. The build quality is surprisingly good for general use and performance.
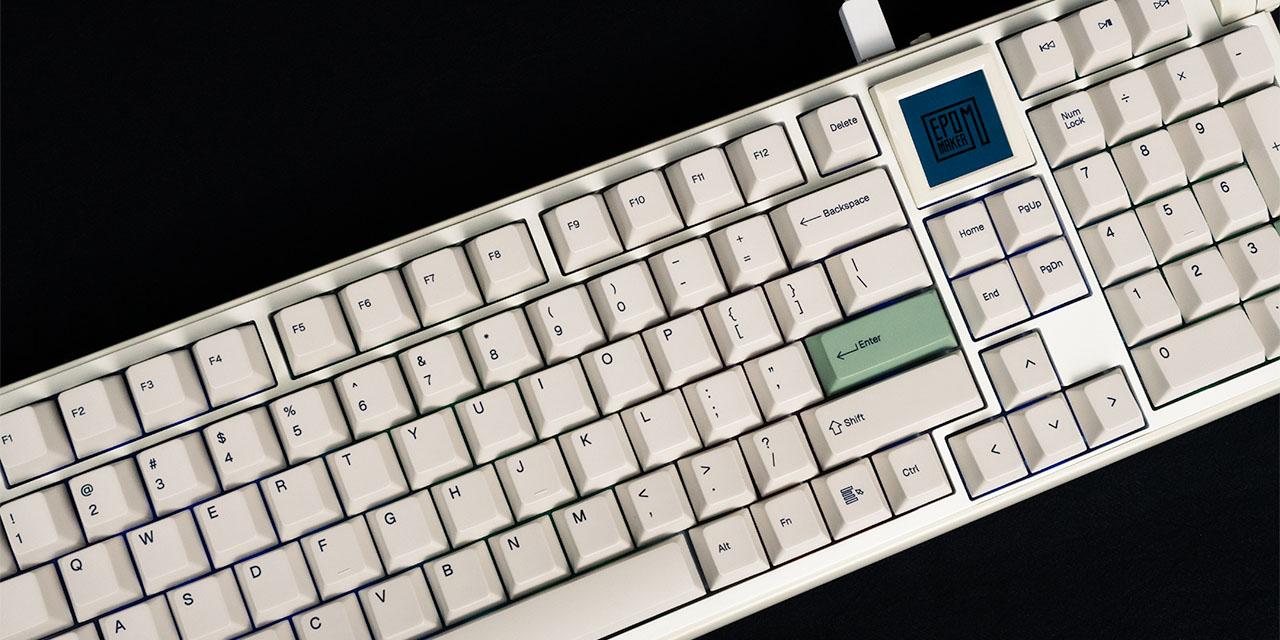
The Kitcom NK60T comes with a standard TKL QWERTY ANSI layout. The TKL or 80% layout has 87 keys, saving space on your desk by removing the number pad. The QWERTY ANSI layout is the standard American layout, which uses the single row Enter key, as seen in some of the previous images. The keyboard uses a standard bottom row, meaning that all the keys on the bottom row are the same size, each being 1.25U, excluding the space bar. For those who do not know, 1U stands for a single unit, meaning a 1.25U keycap is 1.25 times wider than a regular one. As such, a regular keyboard typically has a 6.25U space bar, as we can see in the image above. Some keyboards will shrink down the Windows and Function keys, but I personally like this standard bottom row as I have grown accustomed to it.
Moving on to key rollover, the Kitcom NK60T has full N-key rollover, meaning every single key pressed will register even if they are all pressed simultaneously. This means there will be no ghosting issues, where some keys may not be registered. Gamers and fast typists who have fast actions per minute or words per minute will benefit from this, as it will allow more keys to be recognized at the same time. In reality, people usually only need 6-key rollover, so the addition of N-key rollover is nice for competitive games like StarCraft where highly skilled players will reach about 200 actions per minute.
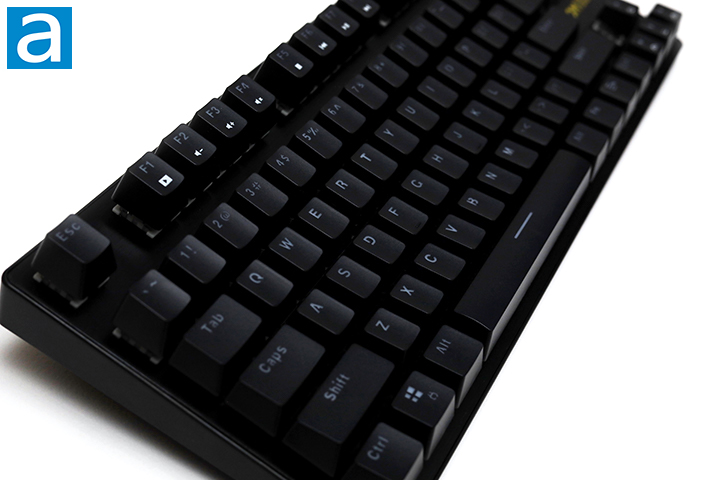
Moving on, let us look at the secondary functions located at the top Function row. All these functions can be activated by using the Fn key positioned next to the right Alt key. we find a plethora of different key combinations. Starting on the left side of the keyboard, F1 to F8 control opening a media player, volume down, volume up, mute/unmute, stop, rewind, pause/play, forward, in that respective order. F9 to F12 control mail, browser, calculator, and macro. These will likely be the primary secondary functions in daily use. Additionally, Kitcom adds some functions to adjust the backlighting, which we will talk about shortly.
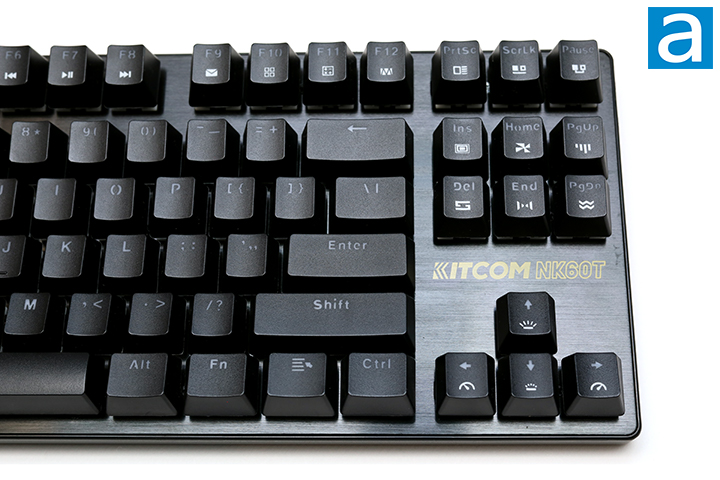
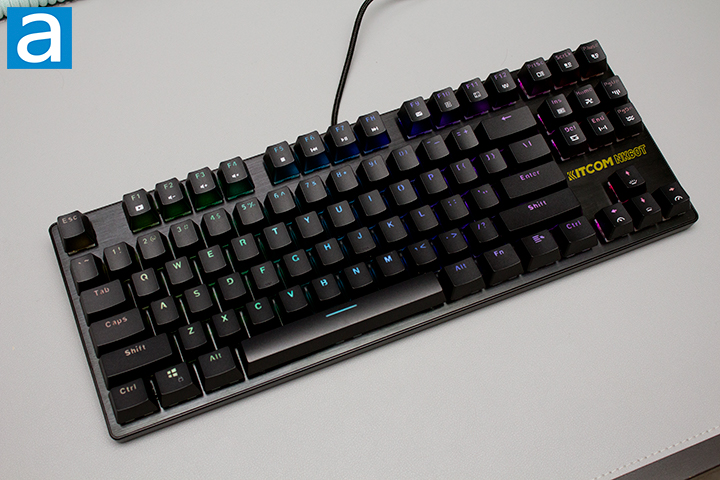
Onward towards the RGB LED functions, we have the Insert key, which changes between five different reactive effects, being advanced reactive, ripple, cursor, aurora, and water-drop. In actuality, I was only able to use four different effects, being all of the previously listed effects except for ripple. The Home key activates the rainbow spiral, commonly seen on many Corsair keyboards like the K95 RGB Platinum XT or K60 RGB PRO SE. The Page Up key is supposed to change the backlighting to a meteor effect, but in my experience, it simply changes the backlighting to white. We observe spectrum, breathing, marquee, and starlight effects using the Delete key. With the Page Down key, we observe the classic rainbow wave in four different directions. The Print Screen, Scroll Lock, and Pause keys take control over the color of the effects. Pause will automatically set the color to a rainbow, while Print Screen and Scroll Lock will adjust the primary and secondary colors in that respective order. There are nine selectable colors. As someone who is not a big fan of having an entire rainbow lighting up on my desk, I really appreciate the option to have a primary and secondary color. My one complaint would be the labels for the secondary functions’ designs do not really tell you anything, but this is quite minor. You will likely require your manual to properly adjust your keyboard.

With the previously stated lighting effects, the Kitcom NK60T is quite versatile in its appearance. Under proper lighting, the NK60T's backlight are definitely still apparent. It looks quite good in my personal opinion; not being too strong or flashy on the highest brightness. As you can see from the image above, with the lights off, the lights shine through the keycaps beautifully. You will have very little issue finding any keys in the dark, but I would still recommend turning on a light as it is quite bad to look at a screen in the dark. Generally speaking, RGB LED lighting has become quite normal and Kitcom has provided and adequate experience in their customization.
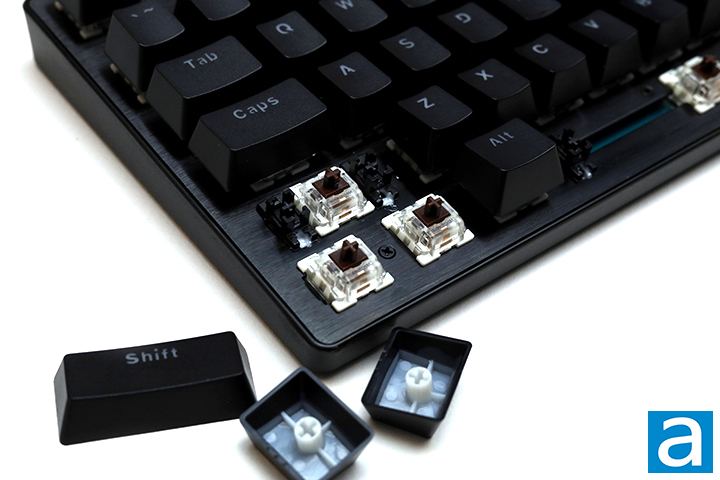
As for the keycaps, these are made from Acrylonitrile Butadiene Styrene or ABS plastic. For matte black keycaps like these, I personally prefer PBT, or polybutylene terephthalate keycaps. The reason being, PBT is harder and maintains its color better, often shining much slower. The provided keycaps use double-shot injection to get a nice shine-through effect. The choice of font is quite interesting as it is very rounded, but feels incomplete. What I mean by this is characters like the at sign have a portion of the strokes cut off. the "a" in the at sign appears to look more like a "u". This is a small detail, but some may be bothered by this. Underneath, you can see the traditional Cherry MX-style stem. This is nice because it means you can replace the keycaps if you ever want to change things up. In regard to thickness, they are about 1mm thick. This is on the thinner side, which is understandable given the price. The significance of the thickness of a keycap is important for the feel and pitch. To keep things simple, thicker keycaps have more depth and produce a deeper thock, while thinner keycaps produce a higher pitch sound.
The Kitcom NK60T features Outemu switches. For our review unit, we were provided with some Outemu Brown switches. These are a budget Cherry MX Brown clone that provides a very close experience. These are tactile switches with a key travel distance of 4mm and actuation at 2.1mm. The force required to actuate is 45cN. Even with these specifications, it is quite hard to picture what these switches actually feel like, so I will try my best to explain. As this is a tactile design, you will notice a small bump if you type very slowly. For the average user, the bump will make it feel more like a scratchy linear switch as it is barely noticeable. Although this is not great, Outemu Browns live up to the expectations of Cherry MX Brown clones as I personally find they both miss the mark with their tactile characteristic. These switches do require a bit of time to break in before the scratchiness goes away, but once completely broken in, they do not feel terrible. With that said, Outemu Browns will provide an adequate experience if you are moving from a membrane keyboard to this budget mechanical keyboard.
We have plate mount stabilizers on the wider keys. This means the stabilizers are mounted directly to the plate rather than the PCB. This is often where you will find most of the keyboard rattle. Kitcom combats the rattling sounds by applying lube to their stabilizers. This is a pleasant surprise as this is typically something you would only find in an enthusiast keyboard. Although the application is not perfect and some rattle is still apparent, it still does a decent job in reducing the noise. I am very happy to see manufacturers lubing their stabilizers in this way as it simply provides a better typing experience. For a budget keyboard, this is beyond my expectation, and I have nothing to say except wow.
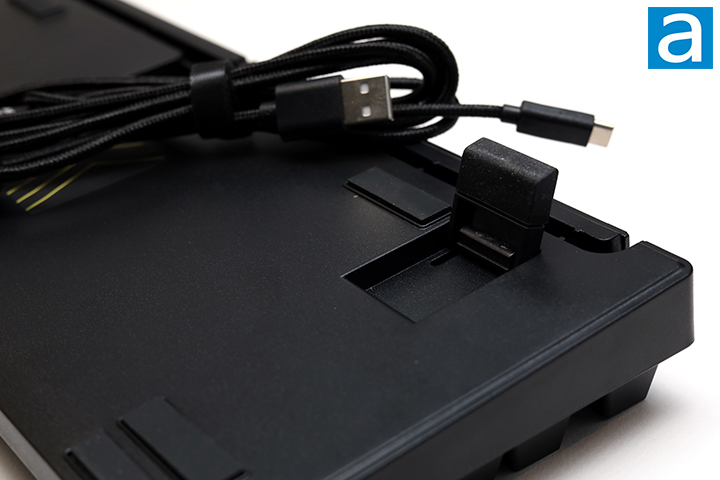
Taking a peek at the back of the keyboard, we have six rubber feet on its base and two more on the flip-out feet. Four feet are for when the keyboard is lying flat, and the other four when the feet are propped out. I appreciate the amount of care put into keeping this keyboard in place. There should be no noticeable unintentional sliding. However, there is a cable runway that I personally find not very useful. The runway uses really tight bends that are really hard for the provided braided cable. The channels are also really thin, so cables thicker than the included cable will not fit. The cable plugs in at the bottom using a USB Type-C Interface. This is a good thing as Kitcom is following what has become normal.
After doing my thorough inspection, I put the Kitcom NK60T to use. As these Outemu Brown switches are tactile in nature, I made sure to account for this in my typing tests. My first observation was an echo when bottoming out the key. This echo is caused by the hollow interior of the keyboard. It is important to note I am using a leather desk mat, which does not help very much with noise dampening. As I have previously mentioned, the tactile feel is only noticeable if you are typing very gently and slowly. When typing normally, it more or less felt like a scratchy linear switch. As previously stated, these switches still live up to the Brown switch expectations. Something I found quite strange was how audible the scratch was. In most cases, I cannot hear the scratching, so this was a first for me. The scratchiness becomes less noticeable over time as you begin to break in each individual switch. As a budget option, Outemu Browns are definitely a satisfactory choice, but I would personally opt for the Outemu Reds as I prefer linear switches. The Outemu Blues is also a decent option, but keep in mind they are quite loud. The stabilizers are a bit scratchy as well, but the effort put into lubing the wire is great. Of course, the rattle is still there, but it is much more muted in comparison to some of the more premium keyboards I have used in the past. Huge props to Kitcom for doing this as it is my personal belief that well-done stabilizers are essential for a good keyboard.
Page Index
1. Introduction, Packaging, Specifications
2. A Closer Look - Hardware and Software
3. Conclusion