Page 2 - A Closer Look - Hardware and Software

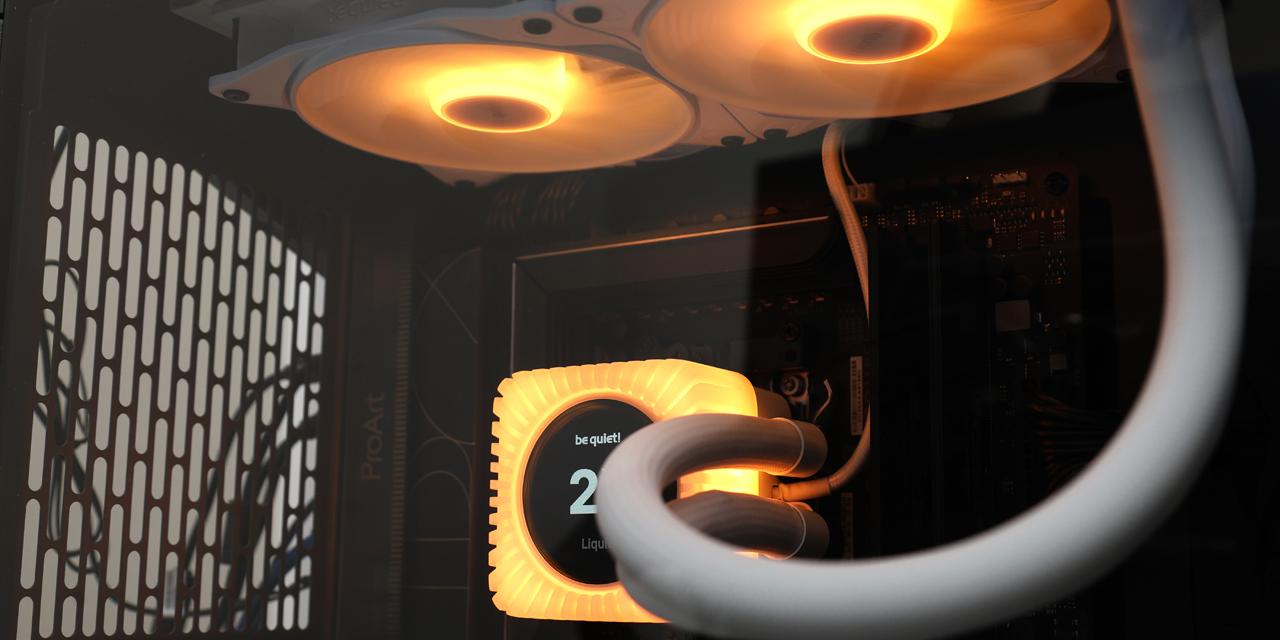
The be quiet! Light Loop IO LCD 240mm White is best described by its name, as this fully encompasses all visual elements. The most obvious one is the color, which is white. This is seen in all areas of the cooler. The Light Loop name indicates there are illuminated parts of the AIO cooler, which is seen by the translucent fins framing the combination block. This is reminiscent of a previous Light Loop cooler, which also had translucent fins. The LCD portion is also seen on the pump block. The be quiet! branding is kept to a minimum with no real places for logos other than on the center hub of the fans. The pump block and the radiator are connected with two braided rubber tubes that look clean. The sleeve covers the cables connecting the fans and the pump. Today, we have the 240mm size in the white color, but there are also black and 360mm variants in this lineup.
The be quiet! Light Loop IO LCD 240mm White radiator measures 277mm in length, 120mm in width, and 27mm in thickness without any fans attached. These are typical numbers for a 240mm closed-loop cooler. The size of a radiator plays a crucial role in cooling, as a larger surface area results in better heat dissipation. It is made of aluminum, which performs satisfactorily in terms of heat transfer. However, the main advantage of this material is its lower mass, which should reduce the strain placed on the case. The overall build quality of the be quiet! Light Loop IO LCD 240mm is good. I would also like to see a bit of protection under each mounting hole to ensure screws do not contact the fins, but if you use the included ones, this will not be an issue.

Taking a closer look at the radiator, the be quiet! Light Loop IO LCD 240mm White uses a standard radiator fin layout. The fins are placed in this way, so they contact the liquid running through the top and bottom. The wavy set of fins are consistent in pattern, but I did notice one or two slight variations, which likely was caused by a ding during manufacturing or in transit. Heat from the liquid runs through the radiator and transfers to the fins through the contact points. Fans are attached to the radiator to dissipate the heat. There is a fill port on the radiator, and the manufacturer has included extra liquid so users can top up the cooler if necessary. The liquid is transported around the loop via rubber tubing, which measure 400mm in length. This was enough tubing for my build, although it can vary based on where you mount the radiator in relation to the CPU block. When I installed the cooler above, there was more than enough tubing. However, if you place it on the front panel or the side of your case, the tubing may be a bit tauter. The rubber tubes are strong and flexible and did not easily kink. They pivot on the water block for better maneuverability.

The two fans included are be quiet! Light Wings LX 120mm PWM high-speed fans, although slightly modified for easier cabling. Rather than using standard four-pin PWM and three-pin addressable RGB headers, each fan has a male and female proprietary connector. This plugs into a cable on the radiator to provide power and lighting control. The fans have rifle bearings inside to keep them moving. Each one operates at a maximum 2100RPM with an airflow of 61.8CFM, air pressure of 2.51mmH2O, and a rated noise level of 30.9dBA. These have a lifespan of 60,000 hours, which translates to approximately 6.8 years. This is a bit short, even if it surpasses the warranty length. As these are addressable RGB LED fans, there are translucent blades with the lighting situated inside the middle hub. There is a total of sixteen LEDs in each fan.

On the other end of the tubes are the combined contact plate, pump, and water block. This cooling block measures approximately 68mm in height, 71mm in width, and 71mm in length, not including the tubes coming out of one side. Note that these are different numbers than what be quiet! provides in their specifications, but it should not make a big difference in most situations. The top of the block is a translucent frame that disperses the LED lighting underneath. In the middle, there is a circular 2.1" IPS LCD screen boasting a maximum display brightness of 500 nits. Not only can you display your own images and graphics, but the screen can also show system information gathered by IO Center, as you will see shortly. The base contacting the processor is a nickel-plated copper plate. The base is flat with circular polishing marks. The pump inside operates at up to 2900 RPM. The single cable extending from the block is a USB Type-C plug, which will connect to an included IO Controller.

The be quiet! Light Loop IO LCD 240mm White can be controlled via the company's IO Center software utility. This is accessible via a Chromium-based browser, such as Chrome, Edge, or Opera, or with an installer. I opted for the installable software, which comes packaged as a 175MB compressed ZIP file. When you first launch the software, you likely will need to update the firmware of the cooler. Afterwards, it will show you a main page with all detected be quiet! products displayed. We used this software for their Dark Perk Ergo and Dark Perk Sym mice, but we will only look at the cooler's menus today.
There are four menus for the Light Loop IO LCD 240mm White. The first is Illumination, where you can set the color and effects of the lights of the fans and the combination block. You can set these together or separately and each offers a variety of static and dynamic effects. There are two modes that require IO Center to remain open. The first is Temperature, which shows colors based on the current temperature of a configurable sensor. The second is Screen Sync, and it matches the lighting with what is shown on the screen. Down below, you can see we can change the direction, brightness, and speed of the effects. Finally, you can enable Windows Dynamic Lighting to control this with Windows' own lighting settings.

The second menu is Screen Setup, where you can choose what shows on the screen. This includes a static color, an image, videos or GIFs, or changes dynamically based on a specified sensor. In addition, you can add an overlay to any background to show text, the time, an audio visualizer, the current media playback art, or information from a configured sensor. You can set up to five different screens and cycle between them based on a timely basis. You can also upload a background to the cooler, which will display when IO Center is not running.

The third menu is Cooling Setup, which is where you control how the fans and pump operate. The first tab is default and is based off the PWM signal from your motherboard. However, you can also change to use built-in curves. The second tab is marked General, and it shows a traditional fan curve to follow based on either the CPU or coolant liquid temperature. There are two curves for Quiet or Performance mode. The third tab is marked PID. This stands for proportional-integral-derivative, and sets curves based on what you set the target temperature for the coolant liquid. Finally, the last tab is for Cooling Studio, which sets overall curves across multiple products, if applicable.

The final menu is for Product Settings. Here, you can check for firmware updates for the IO Controller and water cooler. There were several updates while I was testing this product, so it is clear the manufacturer is keen on addressing bugs. Other specific settings include toggling the screen overlay when the app is not open, calibrating the LED lighting to match what you expect, rotating the screen based on the mounting orientation, and resetting the device to factory settings. I really appreciate the light color calibration to ensure the illumination matches your expectations.
Overall, IO Center is straightforward to use. There were times the application would crash on launch, which is something they should address. It was not always reproducible, but I found it happened when I launched the application from the system tray. Otherwise, the utility offers customization to a fine detail, which is much appreciated.
Page Index
1. Introduction, Packaging, Specifications
2. A Closer Look - Hardware and Software
3. Installation and Test Results
4. Conclusion