Page 3 - Installation and Test Results
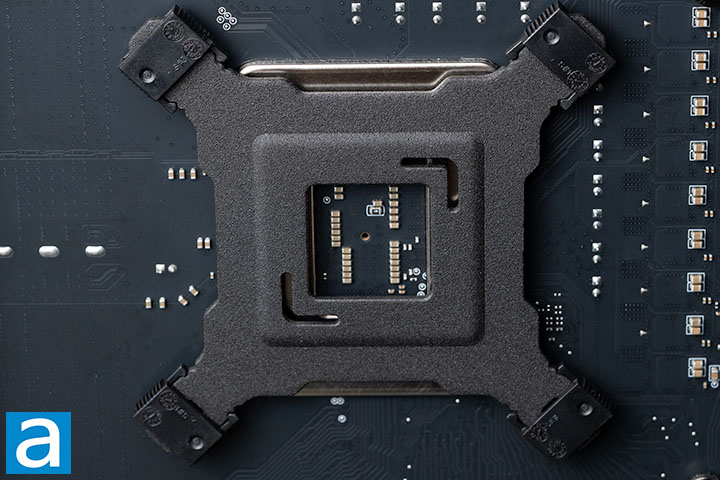
TRYX has included an easy-to-follow, bright, fluorescent lime-green user manual with installation steps for the STAGE ARGB 360mm. For my Intel CPU with the LGA1700 socket, I installed the provided backplate and secured it in place with four thumbscrews. The backplate has a sandpaper-like texture and was a bit heavier than I expected, but the extra weight is likely not enough to cause any issues for the motherboard.
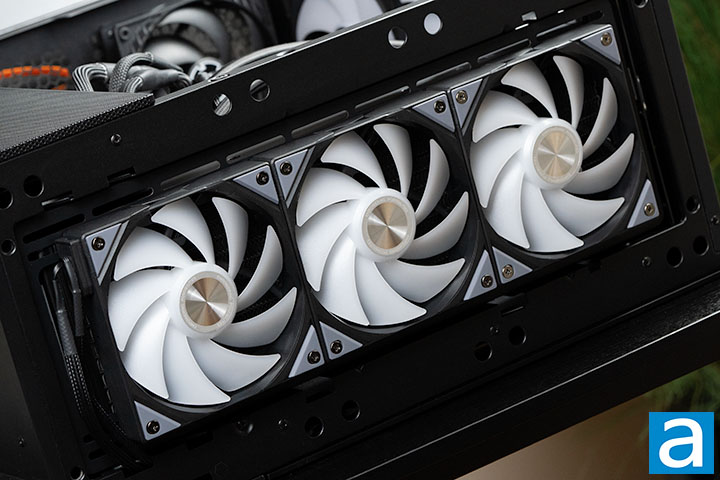
Before installing the pump block onto the CPU, I first installed the radiator with the fans, since this was the more involved step. For the case I was using, I had to unscrew the fans because I needed to sandwich a metal tray between the radiator and the fan. I chose to do a front mount with the tubes in the upper position due to the limitations of my case. It is commonly recommended to orient the tubes on the bottom for a front mount to ensure air bubbles do not form during operation. Luckily, I did not hear any noise that would indicate the presence of air bubbles during testing or everyday use.
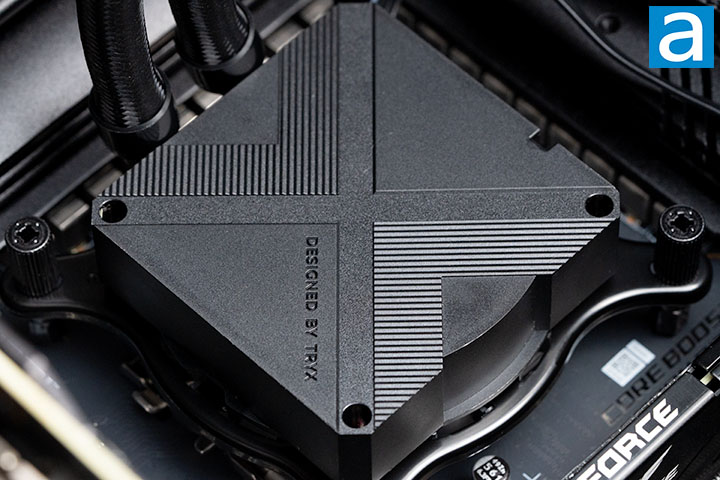
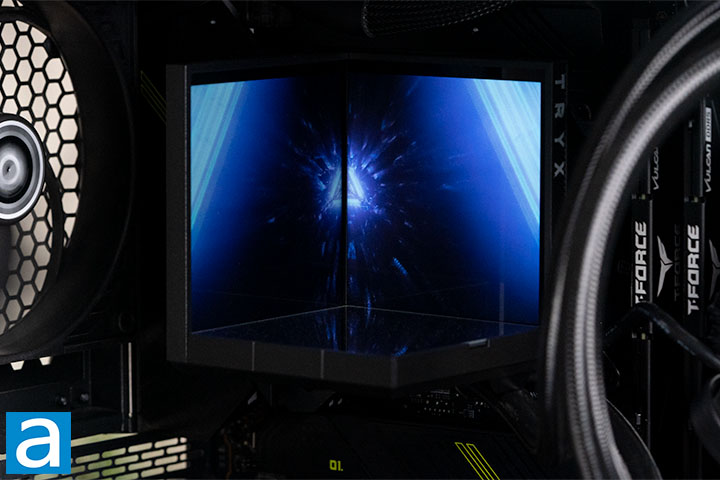
With everything else in place, I installed the pump block with the pre-applied thermal paste onto the motherboard. By default, the clip for Intel sockets is installed onto the pump block. If you use an AMD socket, you will have to swap it out with the other clip. After the pump block was in place, I mounted the display unit on top and secured it in place with the switch located near the bottom.
Our test configuration is as follows:
CPU: Intel Core i9-14900K
Motherboard: MSI MAG Z790 Tomahawk Max WiFi
RAM: Team Group T-Force Vulcan DDR5-6000 2x16GB
Graphics: ASUS TUF Gaming GeForce RTX 3080 V2 OC Edition 10GB
Chassis: Lian Li Lancool II Mesh RGB
Storage: Western Digital WD_BLACK SN770 NVMe SSD 1TB, Western Digital Black SN750 NVMe SSD 1TB
Power: Corsair RM850x 850W
Operating System: Microsoft Windows 11 Pro
Compared hardware:
- TRYX STAGE ARGB 360mm
- SilverStone IceMyst 360 PRO
- TRYX TURRIS 620
All tests were performed on my custom-built computer to best reflect real-life performance. The computer remained in a room with the temperature controlled to be about 20 degrees Celsius for all tests. The thermal paste was applied according to standard practices for Intel CPUs. The fans attached to the heatsink were all connected to the same CPU 4-pin fan connector on the motherboard. The case fans, GPU fans, and the product's CPU fans in my computer were all set to max speeds to allow maximum airflow through the heatsink for all tests. For the idling tests, the computer was left running for at least an hour before data was collected. To stress the CPU, Prime95 was used to place a high load on all available threads using the Large FFTs torture test setting. The highest core temperature measured by HWiNFO was recorded after waiting at least 10 minutes for the temperature to stabilize. HWiNFO is used to obtain accurate temperature data, since it directly reads the CPU's integrated thermal sensors.
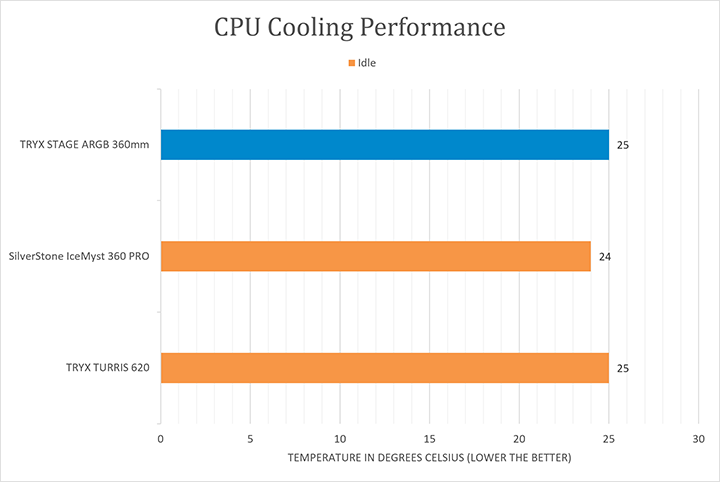
Starting with the idle test, the computer was left idling for a long time before the highest average core temperature was taken. In the first graph, the TRYX STAGE ARGB 360mm achieved an excellent idle temperature of 25 degrees Celsius, which is within the margin of error of the SilverStone IcyMyst 360 PRO at 24 degrees Celsius. To get a better idea of the performance, we will move on to the load test.
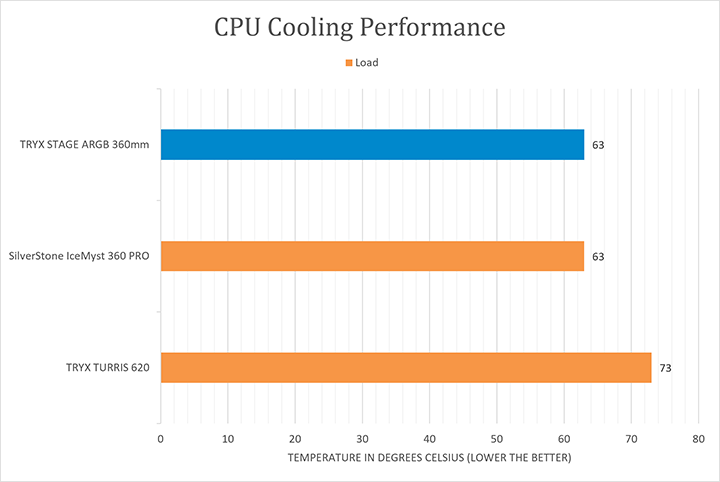
After stressing the CPU for over 20 minutes to generate as much heat as possible, the temperature was stabilized, and the highest average core temperature was recorded at 63 degrees Celsius with no observed thermal throttling. This performance is excellent and is tied for the lowest with the SilverStone IcyMyst 360 PRO. My CPU averages at 250W with spikes to around 300W, so the TRYX STAGE ARGB 360mm successfully smashes the 280W TDP stated on TRYX's website.
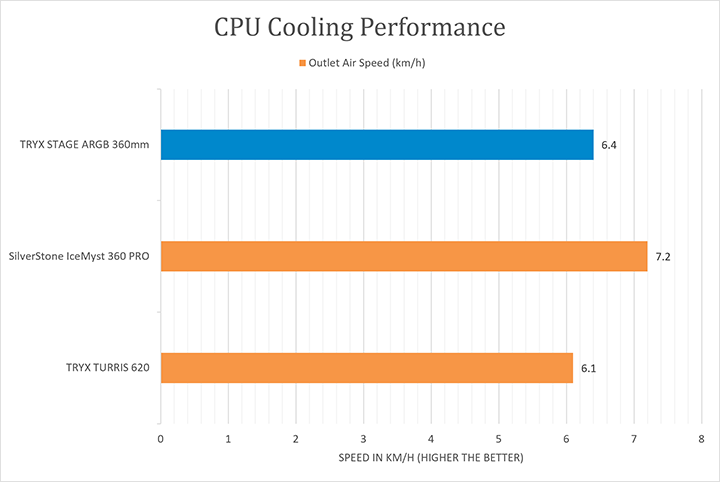
We will use an airflow test to quantitatively measure the performance of the cooler under the back pressure caused by the heatsink. Manufacturers will almost always list the maximum static pressure of the fan, but this is not a very practical metric. The maximum static pressure will only be reached when the fan is pushing against a wall, which will never be the case for a computer build. The best way to visualize static pressure performance is to use a pressure and airflow curve, or PQ curve, as it is a line graph that shows the airflow at every back pressure value. The graph is also not linear, so it cannot be easily produced. Luckily, TRYX has provided the PQ curve for the ROTA SL ARGB fans utilized by the STAGE ARGB 360mm. We will place the cooler on the table and measure the airflow and compare it with the graph to analyze the airflow performance of the cooler.
Measuring with an anemometer directly on the exhaust side of the radiator, the TRYX STAGE ARGB 360mm produced an airflow of 6.4km/h or 4.0mph. The anemometer was placed behind the middle fan on the radiator, so the actual airflow would be around two to three times what we measured, at low static pressure, since there are three fans. Converting the number we measured to CFM gives about 43CFM. Analyzing the PQ curve provided by TRYX reveals to us that the fans can handle about 0.1mmH₂O before it reaches the zone where the airflow drops by about 6CFM with a tiny change in pressure. With such a low margin, I would expect the airflow to drop by a decent amount once it is inside a PC case, where there is higher pressure compared to my open desk. Two possible solutions are to either use fans that handle back pressure better or place three more fans on the backside of the radiator. However, for my low to medium pressure PC build, the performance was still excellent despite the concern.
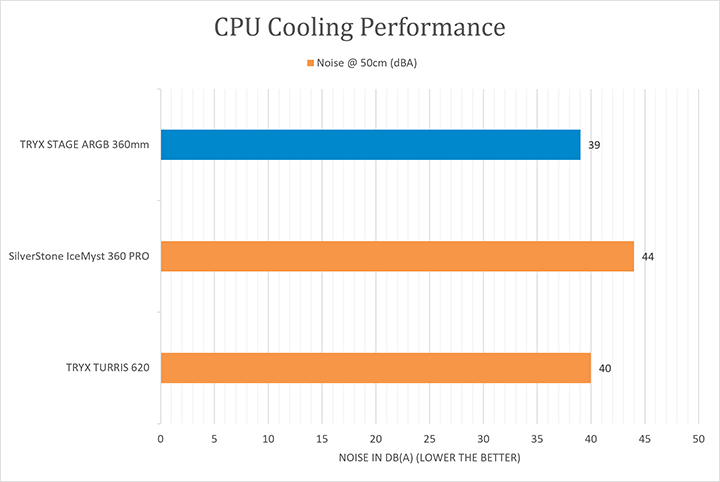
Measuring from 50cm away at maximum fan speed, the cooler produced 39dBA of noise with no detectable pump noise. I would rate it as slightly quieter from a subjective standpoint. On a scale of 0 to 10, where 0 is pure silence and 10 is standing right below fireworks, I would say the cooler is a 0.5 on idle. The sound produced is nearly silent, but I can still faintly hear the wind movement when my ears are right beside the radiator. At full speed, I would give the noise a rating of 3.0. It is noticeable, but still pretty quiet.
The dual 4" IPS screens on the TRYX STAGE ARGB 360mm also produce stunning aesthetics. The 60Hz refresh rate allows for smooth 60FPS video playback of fast pace, action intensive videos. The 720 x 720-pixel resolution delivers 255 pixels per inch with sharp and clear images and videos. The customizable nature of the screen also allows for an incredible amount of personalization. The colors produced are good, but could be even better if TRYX utilized the AMOLED screens they used in their higher-end products. I was initially skeptical of the mirror on the bottom of the display unit, but after testing, it was my favorite detail. The reflections allow the display unit to create some incredibly stunning and mesmerizing pattern animations.
Moving onto the feature highlighted in the name, the stage-like design of the open display unit allows you to place a small figure or object on the mirror section with any video playing in the background. There is, however, one problem I noticed. The edge where the two displays meet is significantly darker than the other parts of the screen, and can sometimes look like a solid black line. Overall, the TRYX STAGE ARGB 360mm is an excellent-performing cooler for both temperatures and acoustics, with unlimited customizability to produce stunning aesthetics.
Page Index
1. Introduction, Packaging, Specifications
2. A Closer Look - Hardware and Software
3. Installation and Test Results
4. Conclusion